
In this era of expanding into overseas markets to strike it rich, having a high-conversion-rate B2B e-commerce site is the cornerstone for generating targeted overseas inquiries and building brand equity. However, for many self-employed foreign trade professionals and factory owners with no prior experience, building a website often means incurring exorbitant outsourcing costs—sometimes running into the tens of thousands—or dealing with the headache of complex coding.
To break through these technical barriers, this tutorial offers a tailor-made website-building solution for absolute beginners that will help you “overtake the competition.” We’ll completely do away with the cumbersome, traditional method of writing code by hand and guide you through mastering the “golden combination” of website-building tools—widely recognized within the global independent website community as the most efficient and cutting-edge:
Hostinger (the best value-for-money web hosting for global audiences) ➕ WordPress (the most powerful open-source website builder) ➕ Elementor (the world’s best visual drag-and-drop editor) ➕ Elementor Template Kits (a suite of premium, ready-to-use business templates).
With this underlying architecture—proven by countless successful companies expanding overseas—even if you’re a complete beginner with no coding knowledge, you can quickly build an enterprise-level B2B independent website that loads lightning-fast, features a sophisticated design, and is tailored to the inquiry patterns of international customers—all by following step-by-step instructions, just like “putting together building blocks.” Avoid detours, refuse to be taken advantage of, and take true control of your core digital assets.
Are you ready? Let’s officially kick off this journey to build a high-quality website!
🛠️ List of Key Resources and Tools for This Tutorial
To make it easier for everyone to follow along seamlessly, I’ve compiled all the tools, demo sites, and bonus source code used in this step-by-step website-building tutorial right here. I recommend opening these links and having them ready before you start the hands-on exercises:
- 👁️ Website Development Showcase for This Issue: Click to view the full 1:1 demo site
- ☁️ Website Setup (Hosting): Use the Hostinger promo code 2026ZLINK (Enter 2026ZLINK at checkout; actual discounts are subject to the checkout page)
- 🎁 Core Page Builder: Elementor Pro GPL Edition Free Download for ZLink Fans
- 🛒 Direct Access to the Template Library: ThemeForest Official Website: Kits Section
- 📦 Source code for this practical exercise: Download the B2B Industrial Machinery Elementor Kits Featured in the Tutorial
- 🤖 Productivity Tools: Interstellar Screening Room – A Platform for Stable AI Account Sharing and Top-Up Services
💡 ZLink Tip: Now that we’ve gathered all the “ammunition” above, let’s officially begin our journey to build an independent website from scratch today!
🛠️ Step 1: Choose a Web Host and Domain Name
There are countless web hosting providers on the market, but many newcomers to international trade often fall into the trap of choosing professional cloud servers that are extremely expensive and difficult to use. For those involved in international trade or expanding overseas, server performance directly determines how quickly international visitors can load your website. Today, I’d like to recommend Hostinger—widely recognized by tens of millions of webmasters worldwide as the best value for money.
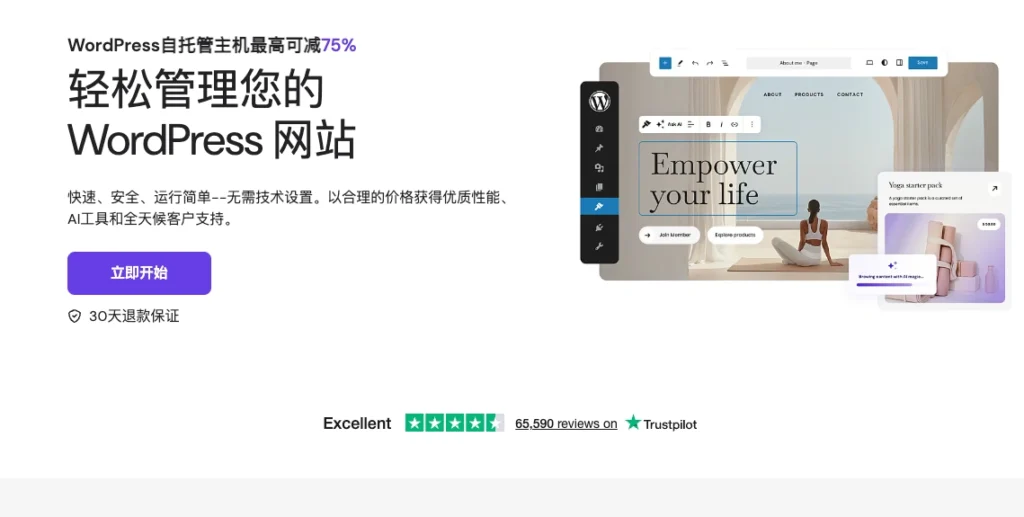
Its biggest advantages are its exceptional value for money and its minimalist, user-friendly control panel (hPanel), which is extremely beginner-friendly for those new to international trade. Additionally, its global network of servers is ideally suited for expanding business overseas.
1. Choose the commercial plan that offers the best value for the money
On this page, I strongly recommend that you select the “Business Plan” right away. Many beginners choose the most basic plan to save a few dozen yuan, only to find that after uploading a few high-resolution product images, their website slows down to a crawl. The Business Plan strikes the perfect balance between performance and price, offering more powerful CPU processing capabilities and ultra-fast NVMe storage—the essential foundation for ensuring your website loads instantly, improving your Google SEO rankings, and retaining international customers.
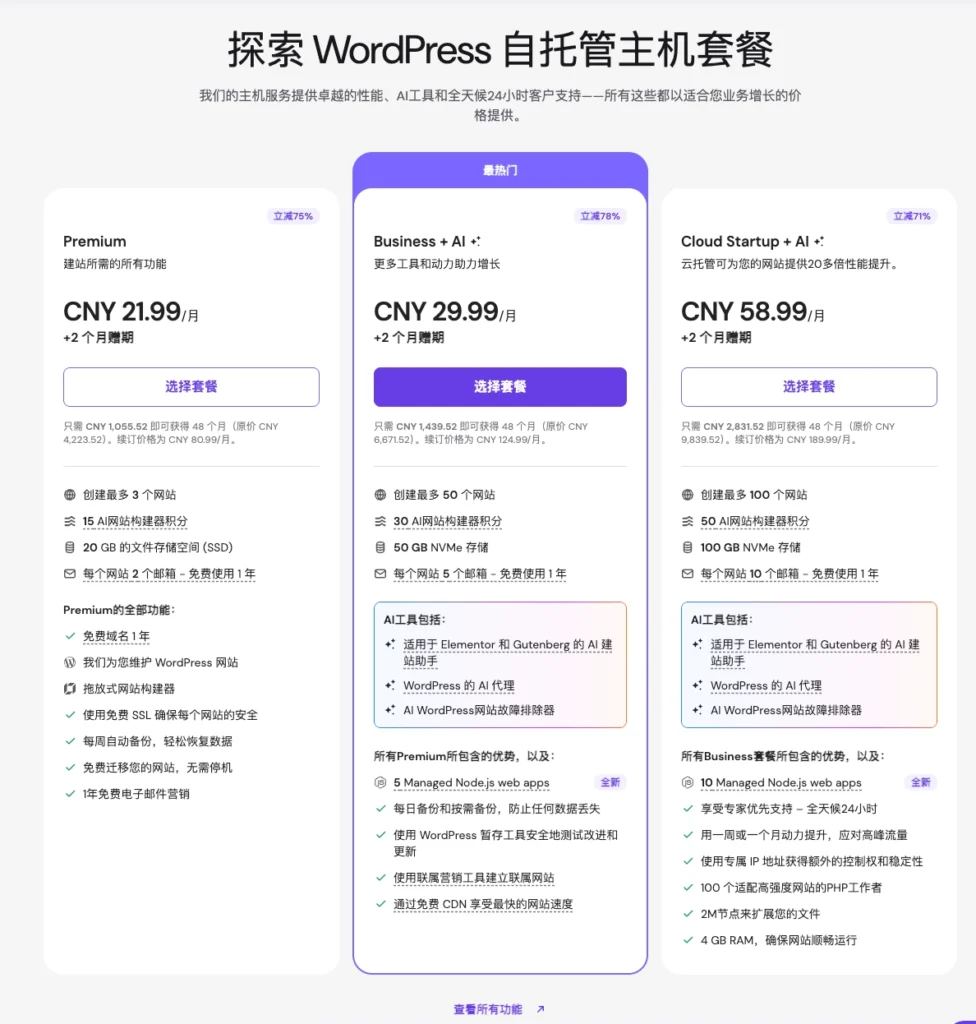
To be honest, many beginners struggle when choosing a hosting plan. The monthly price difference between the Basic (Premium) and Business plans is only a dollar or two. If a friend asked me, I’d usually give them this honest advice:Try to choose the commercial version right from the start . This isn't a sales pitch; it's just some practical advice we've learned the hard way:
- First is startup speed. Foreign users don’t have much patience when browsing websites—if the page takes more than 3 seconds to load, they’ll just close it. The commercial version uses ultra-fast NVMe solid-state drives and comes with a global acceleration network at no extra cost. It’s like building a highway for your website; this kind of underlying speed advantage is very difficult to make up for later by modifying the code.
- Second, it gives beginners a “second chance.”. When you’re just starting to learn how to build a website, it’s inevitable that you’ll run into some hiccups—sometimes, just clicking the wrong button can cause the site to go blank. The Basic Plan only backs up once a week, but the Business Plan performs automatic backups every day. Did your website crash? Just go to the admin panel and restore it with a single click. With this safety net in place, you’ll feel confident enough to explore and experiment freely.
- Finally, there are the hidden economic costs. The drag-and-drop website builder we’ll be using later is quite resource-intensive, and the commercial version has enough processing power to ensure you won’t experience any lag when working in the backend. Furthermore, if you purchase the Basic Edition, you’ll have to spend over a hundred dollars later on to buy plugins separately for “daily backups” and “global acceleration.” When you factor all of this in, buying the Commercial Edition outright is actually the most cost-effective and hassle-free option.
Building a website is like building a house: if you lay a solid foundation at the beginning, you’ll feel confident later on when it comes to creating content and driving traffic.
2. Purchase Duration and How to Get Discounts
Regarding the purchase duration, I strongly recommend that everyoneSelect 48 months (4 years) directly . The reason is simple: the unwritten rule in the hosting industry is that “the initial purchase is cheap, but renewals are expensive.”
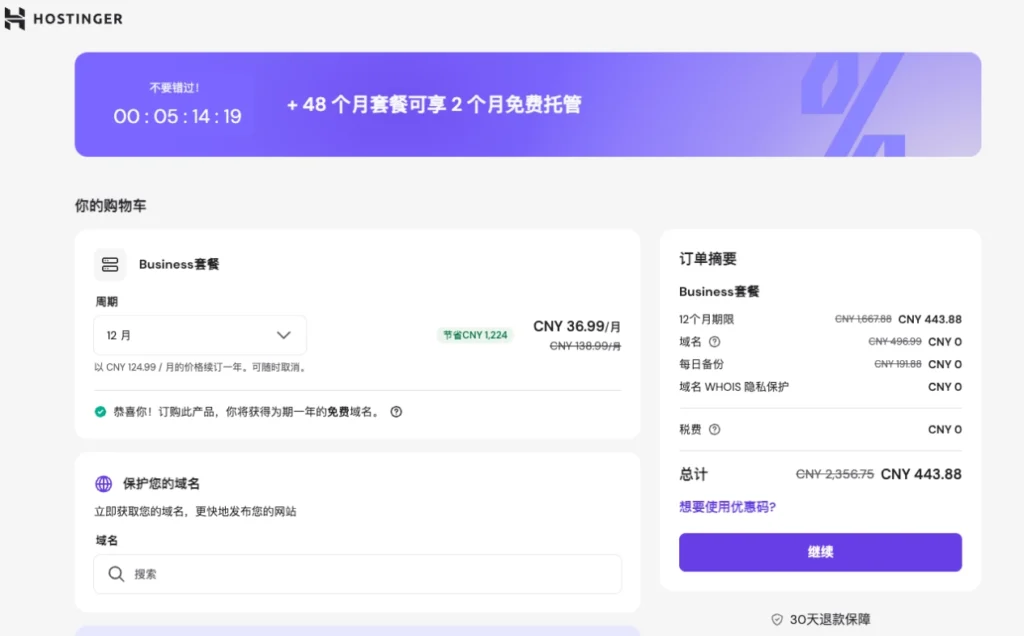
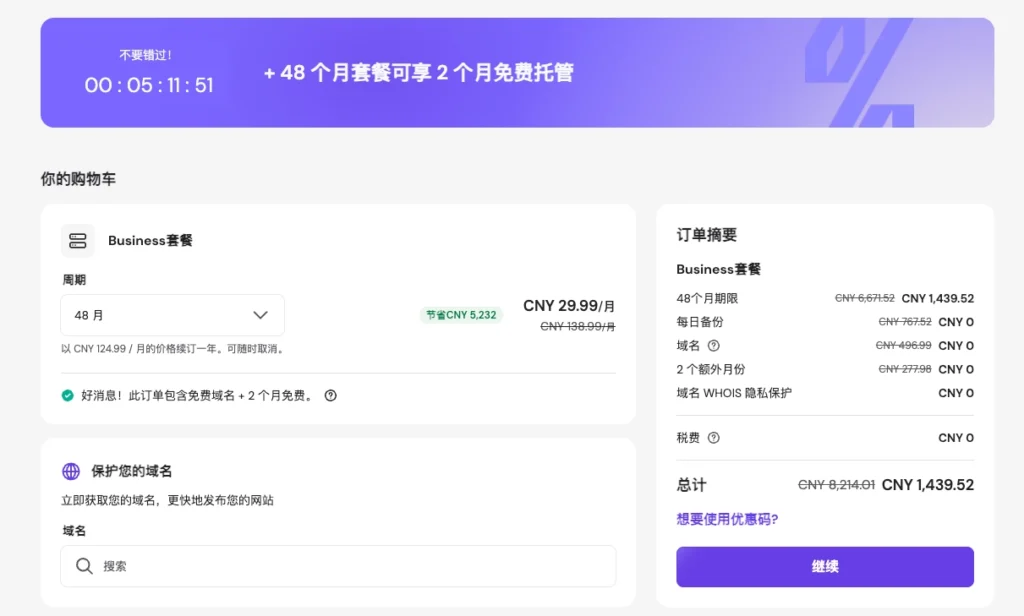
The low price you're seeing right now is a special offer for new customers. If you only sign up for one year, the price will return to its original rate when you renew next year—and it's often two or three times as expensive. Signing up for the full 48 months right away offers three practical benefits:
- Lowest unit price: It works out to just a few dollars a month on average—it's the best value.
- Lock in a Low Price for 4 Years: Lock in this “bargain price” for four years at once, so you won’t have to worry about high renewal fees for years to come—you can focus on your business with peace of mind.
- Risk-Free Trial and Error: It comes with a 30-day no-questions-asked money-back guarantee. Even if you change your mind about building a website after purchasing it, you can simply request a refund—no pressure at all. You can do this directly through ZLink’sExclusive Discount LinkVisit the Hostinger website to make a purchase and take advantage of currently available offers (subject to the checkout page).
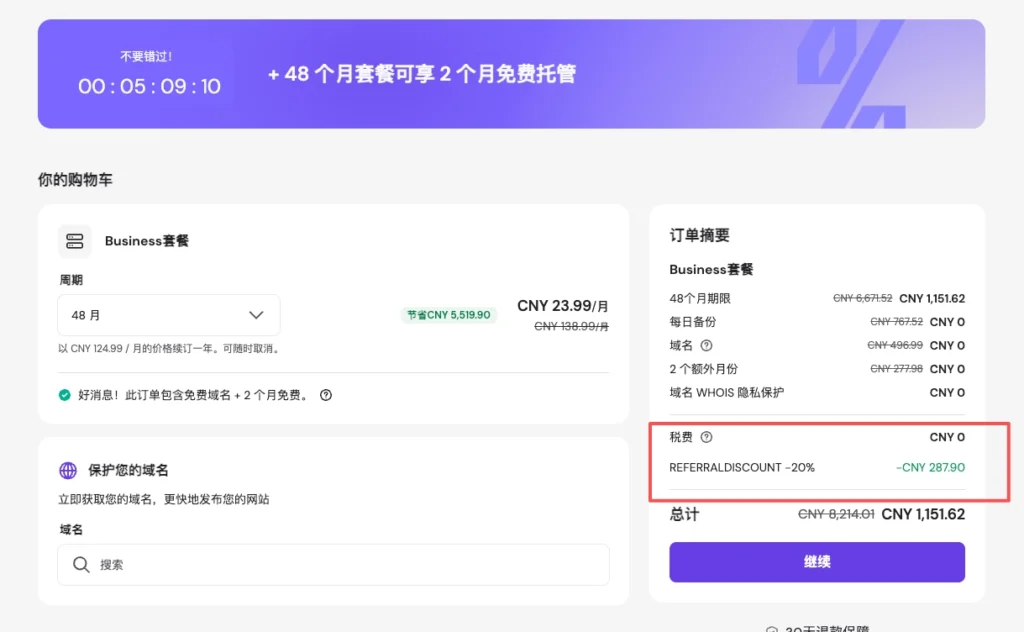
On top of the original low price for new customers (valid for 48 months), we’ve applied an additional discount to the total price! All these measures have truly helped you save a significant amount of money, bringing the initial trial-and-error costs of building a website down to a minimum.
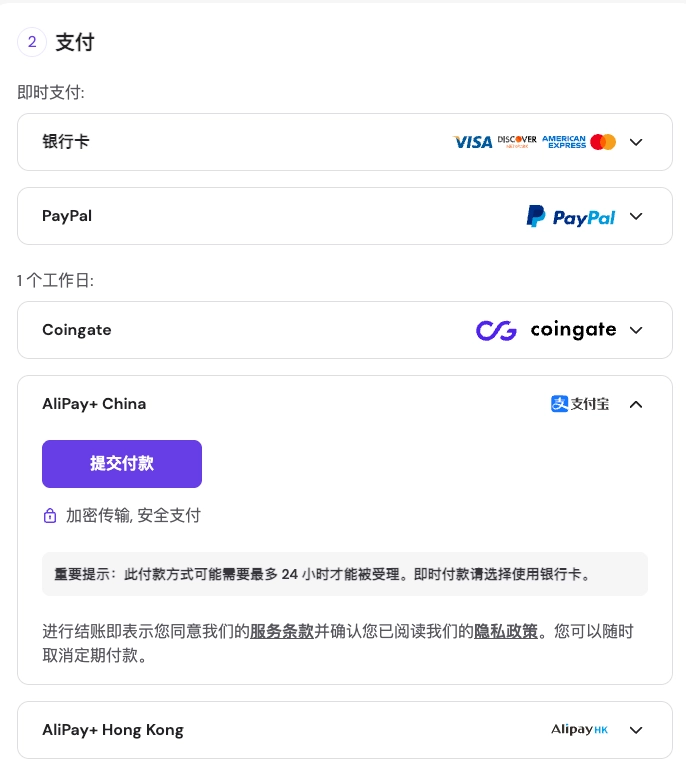
Users in China can choose to pay via Alipay, which is quite convenient. Once payment is complete, you can begin configuring the server and installing the website system.
⚙️ Step 2: Install WordPress
The specific steps are as follows:
1. Access the Account Control Panel and Add a Website
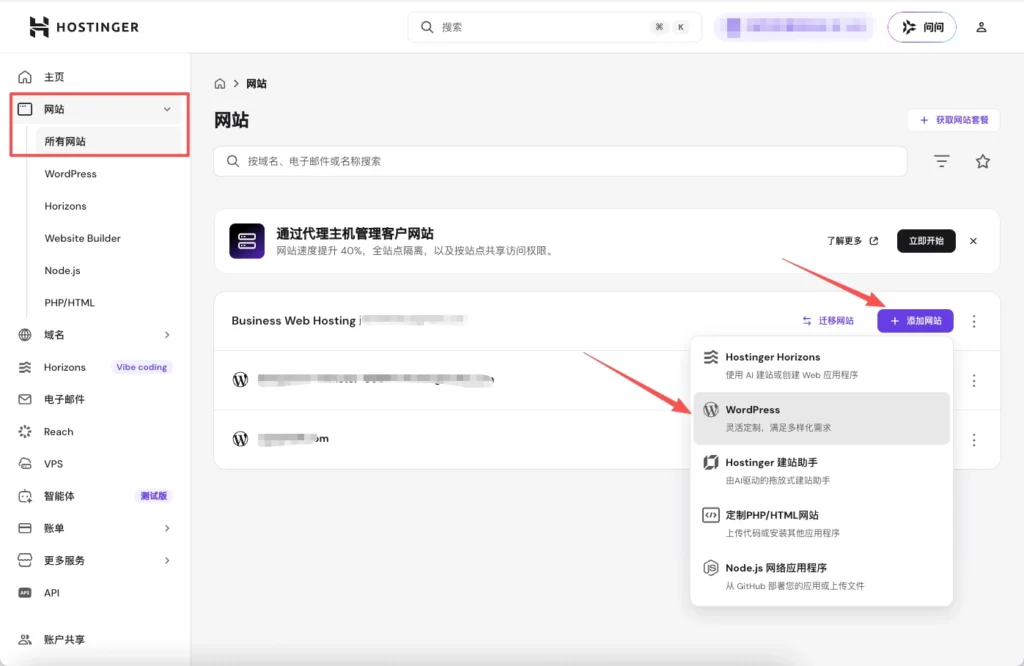
After the payment is successful, the system will automatically redirect you to Hostinger’s account control panel (hPanel). In the navigation bar at the top of the page, click the “Websites” option. In the list of pages, you’ll see the “Business Web Hosting” plan you just purchased. Within the card area for that hosting plan, click the “Add website” button to begin the setup process for your new website.
2. Select a Website Builder and Configure Settings
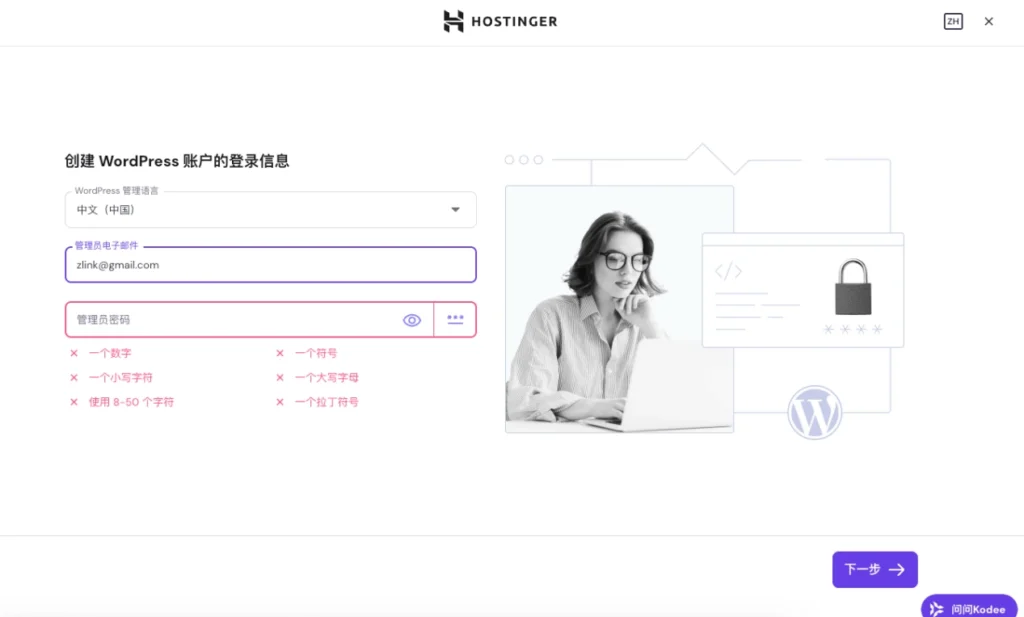
In the website builder selection screen that appears next, simply select WordPress . Follow the on-screen prompts to complete the following basic configurations in order:
- WordPress Administration Language: Based on your personal preferences, select the interface language for the website’s admin panel from the drop-down menu (such as “Chinese (China)” or English).
- Administrator Email: Enter your primary work email address (such as zlink@gmail.com, as shown in the example). This email address will be used to receive important system notifications from the website, form inquiries, and for password recovery, among other purposes.
3. Link or select a temporary domain name
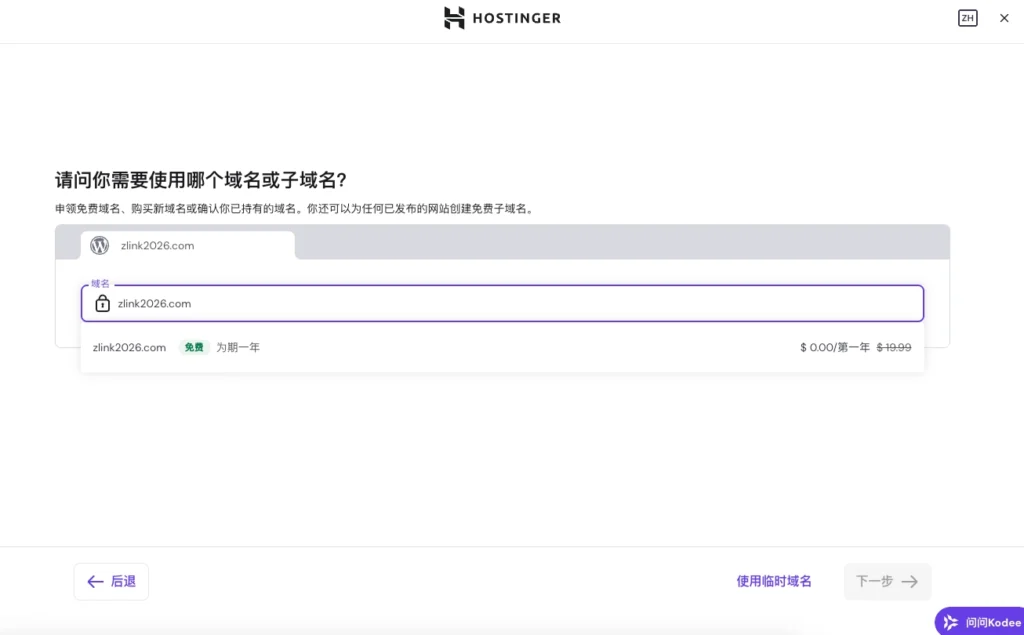
On this screen, the system will prompt you to specify the website’s URL. Based on your current level of preparation, you can choose one of the following two options:
- Add and Register an Official Domain Name: If you have already decided on your brand’s official domain name, you can enter it here directly to claim the free domain included with your hosting plan (as shown in the example, zlink2026.com, which is free for the first year).
- Using a Temporary Domain Name: If you haven’t come up with a suitable domain name yet, there’s no need to get stuck at this step. Simply click the “Use a Temporary Domain” link at the bottom right of the page. The system will automatically assign a temporary address for you to use in the meantime. You can use this temporary domain to access the WordPress dashboard and start building pages and uploading content. Once you’ve confirmed your official domain, you can bind it and replace the temporary one—this process will not affect your website development progress or existing data in any way.
Wait for the installation to finish.
4. Skip the preset website setup wizard and go directly to WordPress
Once the domain configuration is complete, the system will redirect you to the “Choose a Website Building Method” screen. At this point, the main area of the page will display two options: “Create a Website with AI” and “Pre-built Websites and Themes.”
In this step, do not check any of the options listed above. Please look directly at the bottom right corner of the page and click “Migrate to WordPress” Button.
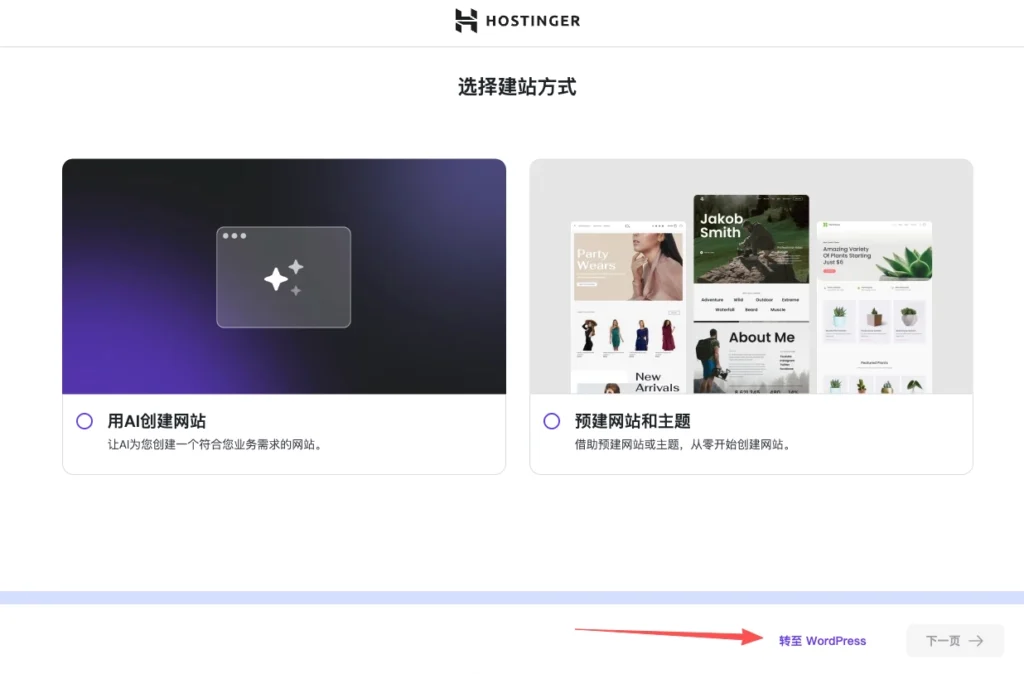
Instructions and Reasons: The core approach of this tutorial is to build a high-conversion-rate B2B/B2C standalone website from the ground up by deploying Elementor Template Kits. By bypassing the AI-generated and pre-built themes provided by hosting providers, you can ensure you start with the cleanest possible WordPress environment. This effectively avoids unnecessary, pre-installed plugins and code, laying the foundation for building a high-performance, highly customized website later on.
(Additional tip: If your current project requirements are fairly basic and you just need to quickly create a simple personal or showcase website, click here to learn how to use Hostinger AI to build a website in one click.) Once you’ve successfully logged into the WordPress admin dashboard, you’ll need to complete a few key initial setup tasks.
🧰 Step 3: Deploy the Elementor Engine
The website builder comes pre-installed with several basic annual themes (such as “2025,” etc.). To ensure optimal loading speeds and complete customization flexibility when using the page builder later on, our top priority is to replace the website’s underlying framework with the lightest, cleanest theme available.
1. Install and activate the Hello Elementor Clean Theme
Please follow these steps to perform the operation in the admin panel:
- Go to Theme Settings: In the dark navigation menu on the left side of the WordPress dashboard, locate and click “Appearance”. The system will automatically redirect you to the “Themes” management page.
- Add a New Topic: Click at the top of the page or below the content area “Install a Theme (Add New Theme)” Click the button to access the theme library.
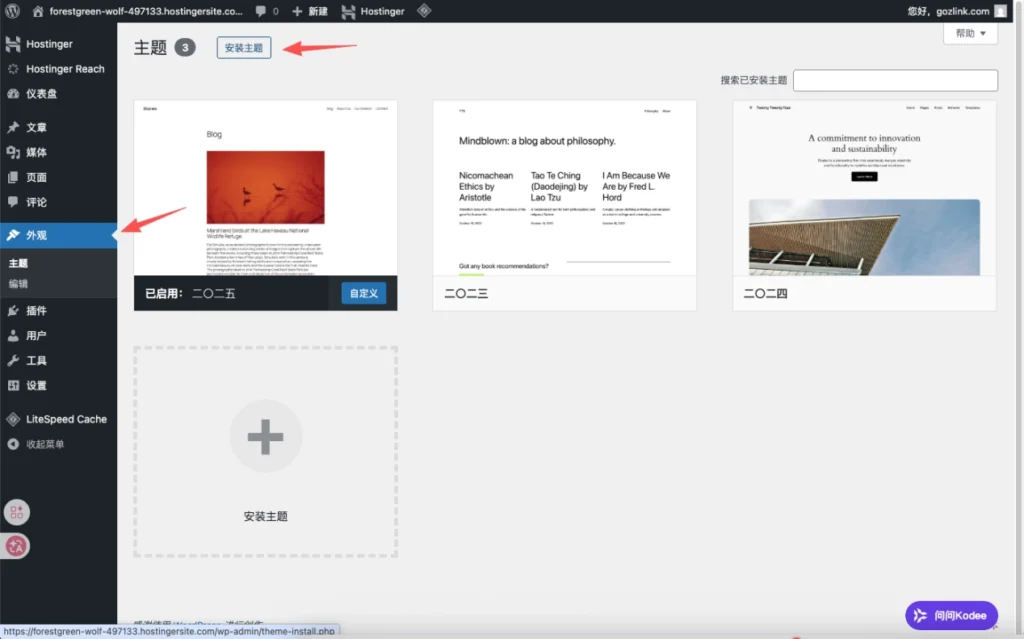
- Find and Install: On the theme library page, in the "Popular" list, find the one named “Hello Elementor”(which may appear as “Hello Elementor” on the Chinese interface) theme card. If you don’t see it on the homepage, you can use the search box on the right to find it.
- Enable Theme: Hover your mouse over the “Hello Elementor” theme card, then first click “Install” Button. Once the system has finished downloading, this button will change to “Enable”, click again to officially activate this theme.
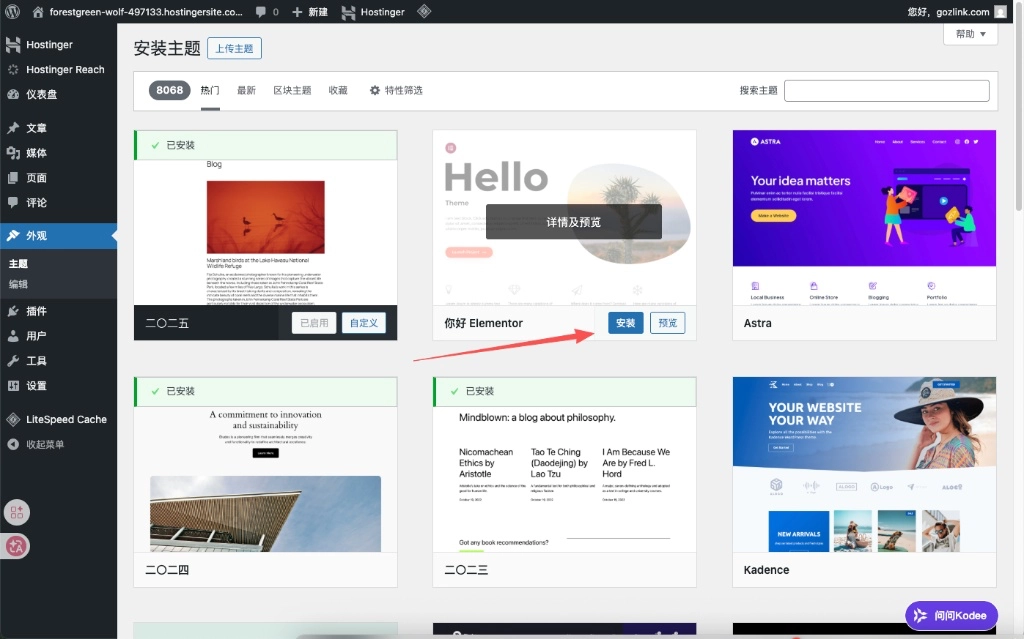
Operating Instructions and Technical Reasons: Hello Elementor is a “skeleton” theme developed by the official Elementor team specifically to work with its visual editor. It strips away nearly all preset style code and non-essential features, reducing the code size to a minimum. Using this theme is like getting a completely blank and clean “canvas.” Not only does it completely eliminate loading lag caused by redundant code, but it also provides the ideal underlying environment for achieving a high score on Google PageSpeed in the future.
2. Install the core website-building engine: Elementor Basic
First, you need to install the free basic version directly from the WordPress dashboard:
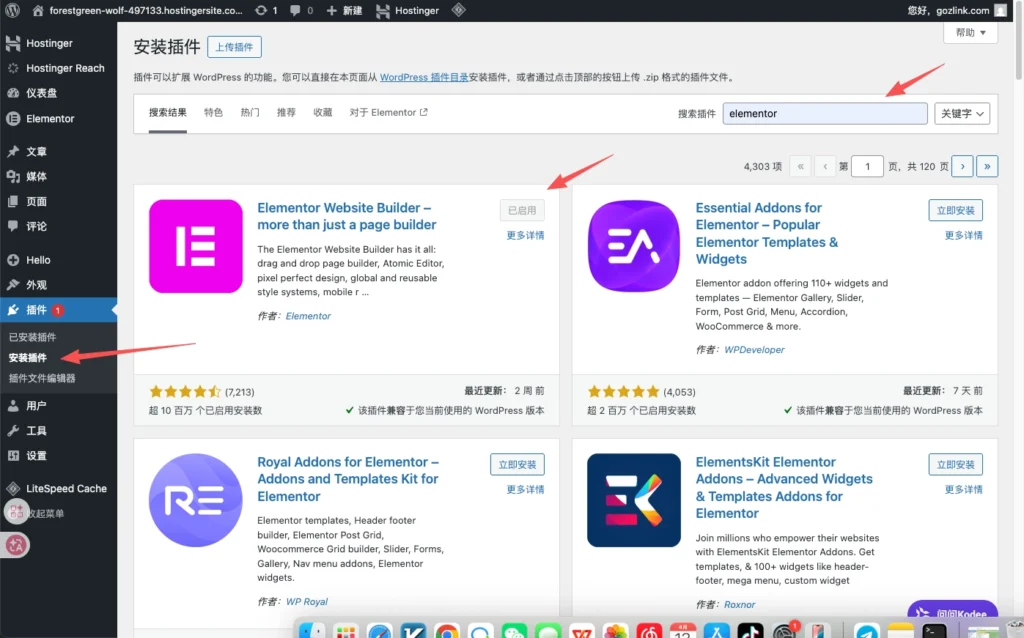
- Go to Plugin Management: In the left-hand navigation bar of the admin panel, click “Plugins -> Add New Plugin” 。
- Search and Install: Enter a keyword in the search box on the right “Elementor”. In the search results, find the plugin with the pink icon and the full name “Elementor Website Builder – more than just a page builder.”
- Install and Enable: Click the following items in order on the plugin card: “Install Now”, Once the installation is complete, click “Enable” 。
3. Download and install Elementor Pro
To achieve enterprise-level, high-end visual communication, full-site theme building (Theme Builder), and dynamic data retrieval, you must use Elementor Pro. There are two options for obtaining the Pro version:
- Option A: Subscribe through the official website (suitable for companies with a sufficient budget): You can purchase a genuine license on the official Elementor website; prices typically start at $59 per year (approximately 400+ RMB).
- Option B: In ZLink Resource CenterGet the GPL-compliant version (recommended for beginners to experiment and keep costs down): Here, you can download the Elementor Pro GPL open-source version—which has undergone a thorough security audit by our technical team and has all features fully activated—for free (or at a very low cost).
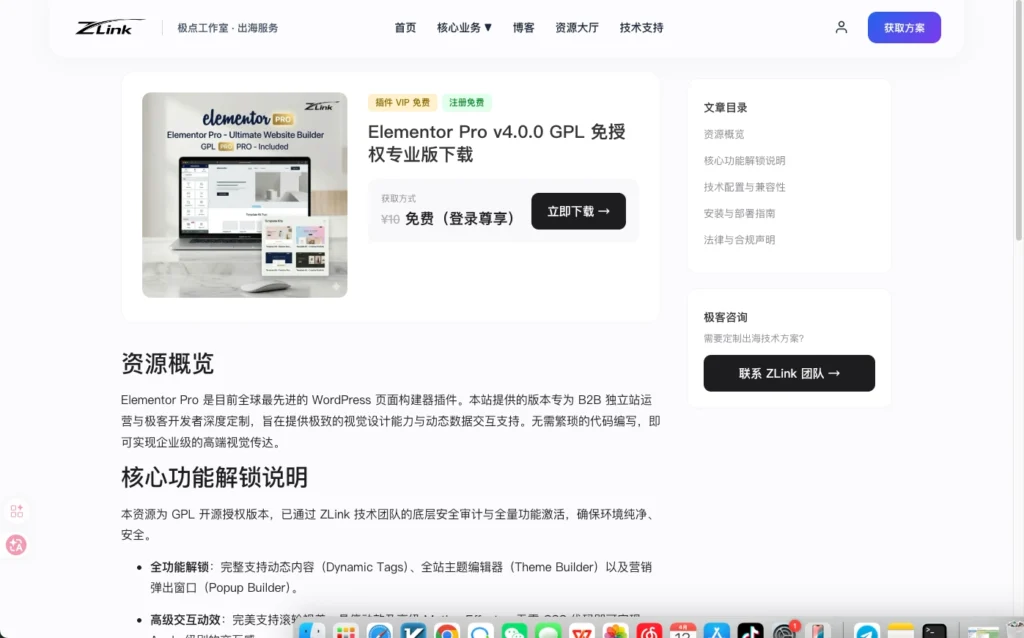
Once you have downloaded the Elementor Pro .zip file, please return to your website’s admin panel to complete the installation:
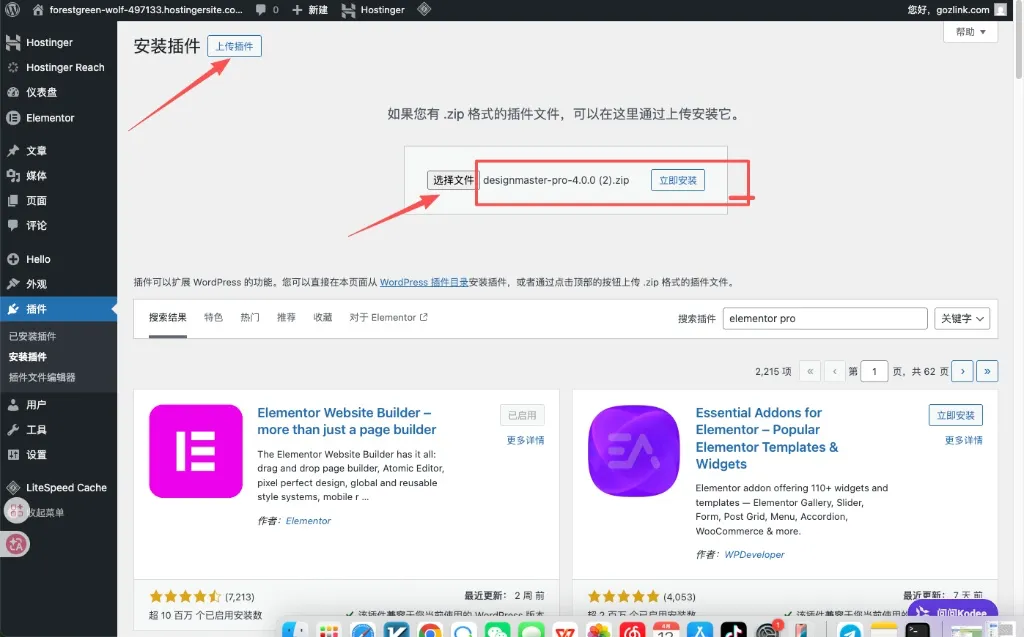
- Upload the compressed file: Enter again “Plugins -> Install Plugins” Page—this time, please click at the very top of the page “Upload Plugin” Button.
- Select and Install: Click “Select File,” locate the Elementor Pro .zip file you just downloaded on your computer (Note: Do not unzip this file), and then click “Install Now” 。
- Enable the plugin: Once the installation process is complete, click the button that appears on the page “Activate Plugin” Button. You have now fully unlocked all the features of the most powerful WordPress visual website builder available today.
🎨 Step 4: Import the Business Template Pack
To ensure optimal website loading speed and full compatibility with the Elementor plugin, we are firmly committed at this stage toNot using traditional WordPress themes... but instead uses a more modern, lightweight Template Kits 。
1. Go to ThemeForest to choose a template package tailored to your industry
ThemeForest is the world's largest marketplace for digital assets and web templates, featuring Elementor template bundles created by the world's top designers.
- Access the Platform: Open in a browser ThemeForest Official Website, or you can go toresource centerTake your pick—all kits are half price. If something isn’t available, contact zlink to have it listed for you, and you can save even more on template fees.
- Precise Categorization: In the top navigation bar or search box, explicitly specify the search category as “Template Kits” Or search directly “Elementor Template Kits” 。
- Combined Industry Search: Enter specific English keywords related to your industry in the search box. For example, if you’re in the machinery and equipment export business, you can search for “Machinery Elementor Template Kit.”
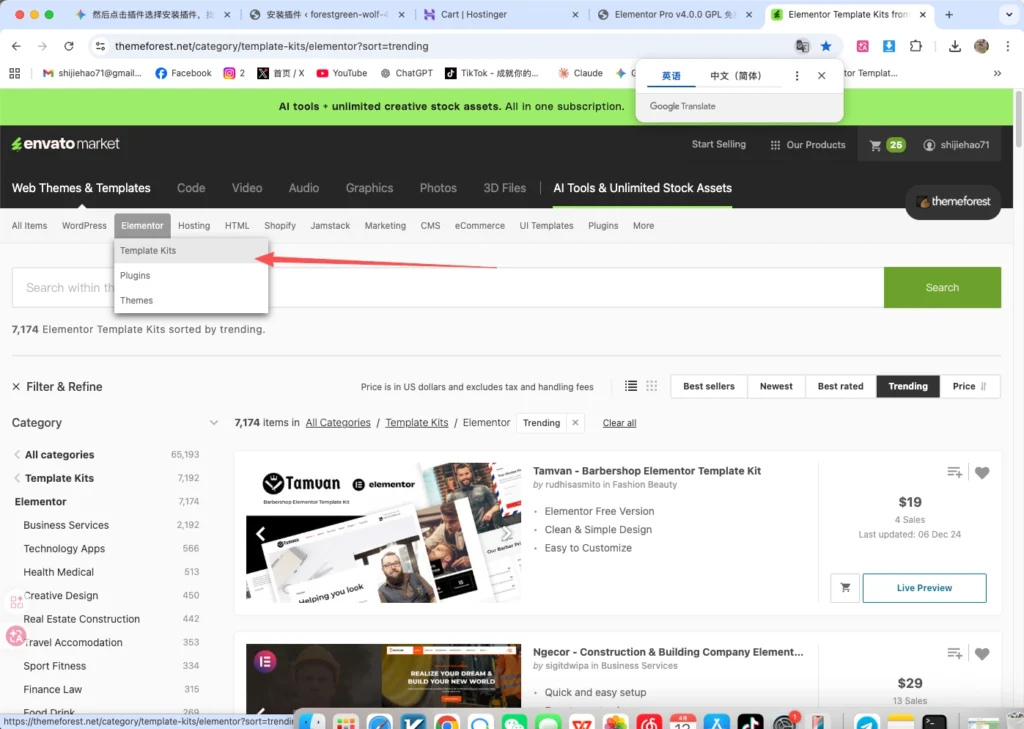
Evaluation and Selection Criteria:
- Look at the substance, not the appearance: When previewing a template, don’t let yourself be limited by its default demo images or primary color scheme. With Elementor Pro, you can replace all images, colors, and fonts later with just one click.
- Focus on the conversion logic: What you need to focus on when evaluating this template isTypesetting Framework(For example, whether the navigation bar is clear, whether there is a strong call-to-action button on the first screen, whether the product specifications section on the product details page is well-organized, and whether the inquiry form is prominently placed, etc.).
Once you’ve selected the template package you like, the next step is a detailed walkthrough on how to purchase and download it, and then import it seamlessly—just like “putting together building blocks”—into the blank WordPress dashboard we just set up.
In this tutorial, we'll start with Astrobot Industrial Robot Template KitAs a foundation for demonstrations. This kit features a clean, B2B-style industrial design and is ideal as a blueprint for high-conversion standalone websites.
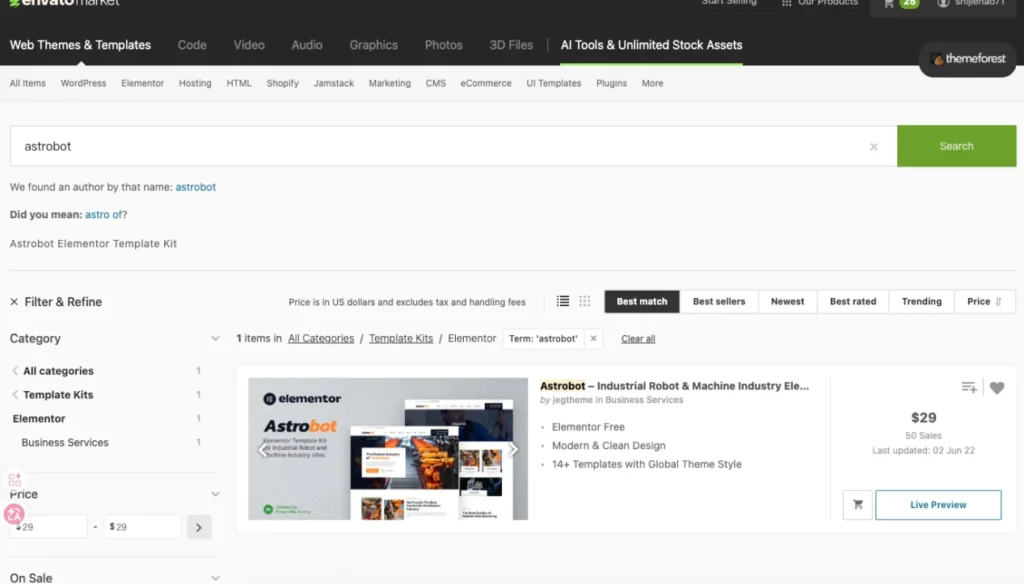
2. Install the import plugin: Envato Elements
Although we have already installed the Elementor engine, WordPress does not natively support directly reading template packs in .zip format. Therefore, we need to install this free, official add-on plugin.
- Go to the Plugin Marketplace: In the left-hand menu of the WordPress dashboard, click “Plugins -> Add New” 。
- Search Plugins: Enter a keyword in the search box in the upper-right corner:Envato Elements 。
- Install and Enable: Find the "Template Kit – Import" plugin with the green leaf icon, then click the following in order: “Install Now”, Once the installation is complete, click “Enable” 。
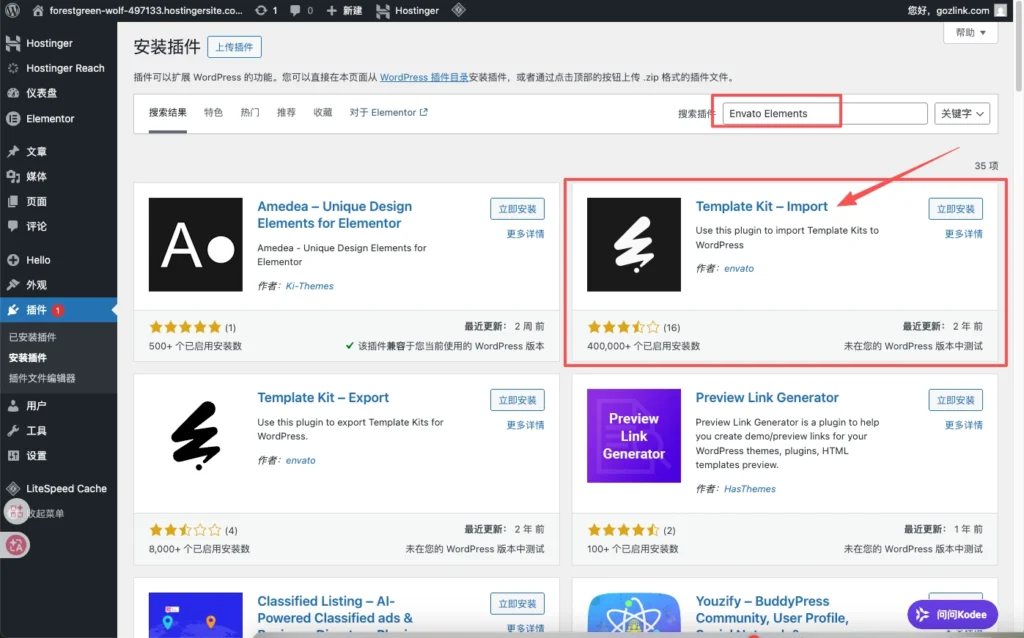
3. Compile and Upload the Package
In the WordPress dashboard, click “Tools -> Template Kit”. Click the upload area and select the downloaded Astrobot Core .zip package. Once the upload is complete, click “View Installed Kit” to access the management interface.
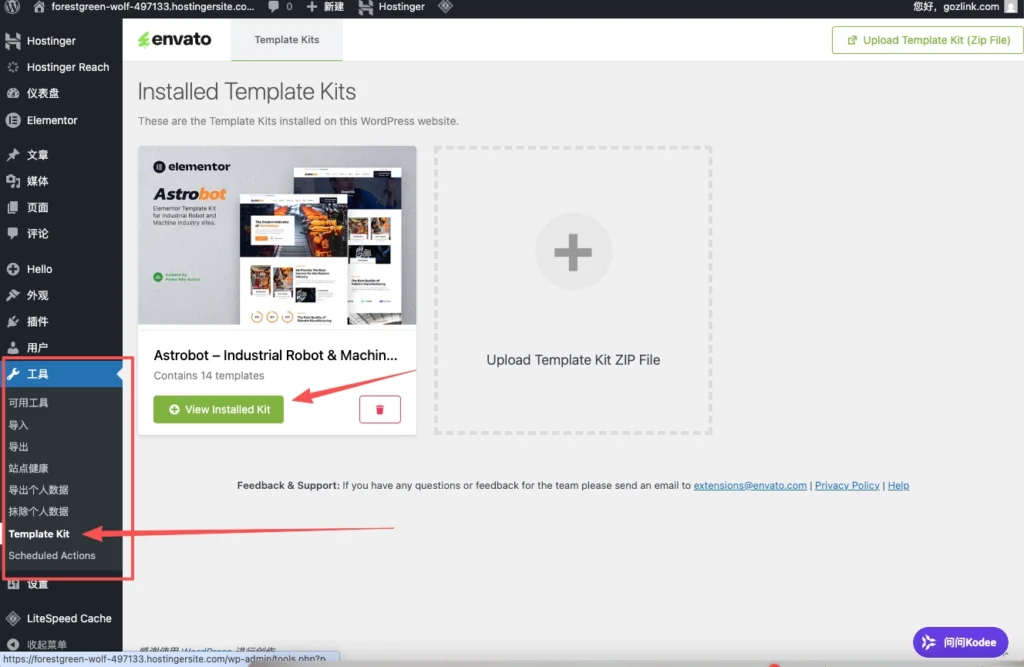
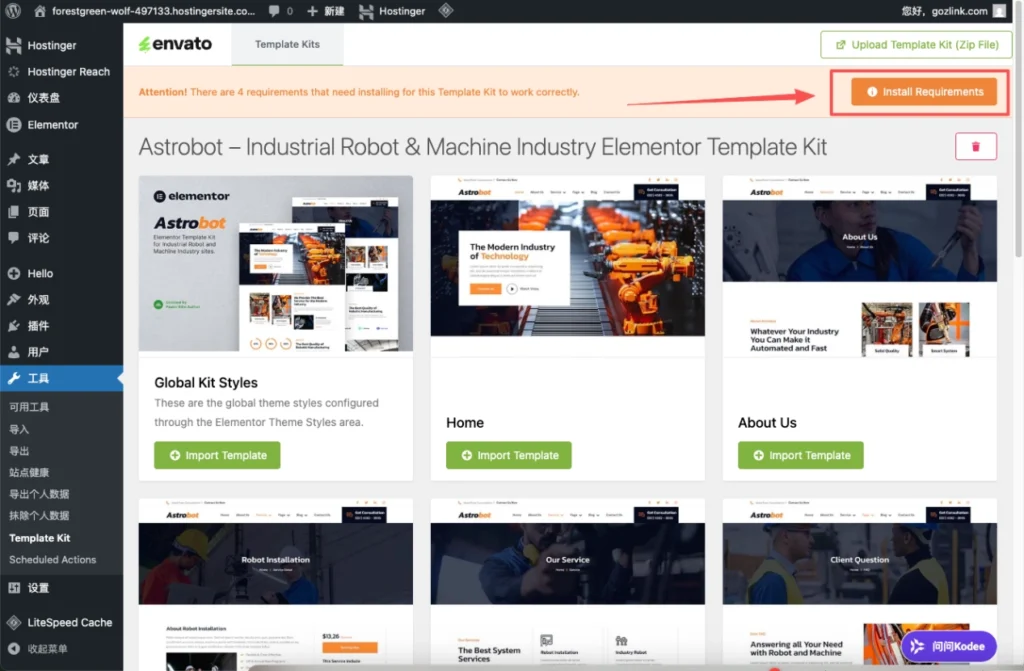
4. Configure Environment Dependencies (Install Requirements)
After importing the package, the system needs to check the runtime environment.
- Perform an action: Click the orange button at the top of the page “Installation Requirements” 。
- Install Components: In the pop-up window, click “Install Above” 。
- Technical Requirements: Wait for all progress bars to complete. This step will automatically install any required add-ons or icon libraries for this package to ensure the page functions properly. If an error occurs, simply click "Refresh" to resolve it.
5. Import Global Kit Styles
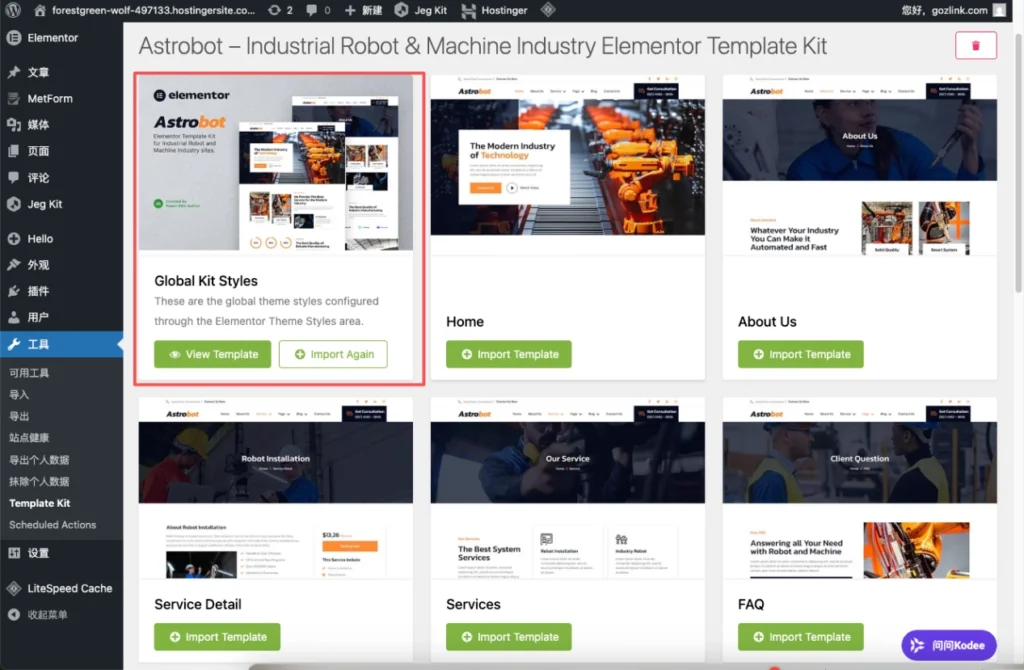
Before implementing specific pages, global visual standards must first be established.
- Operation: Find it in the template list “Global Kit Styles” 。
- Click to Import: Click the button below it “Import Template” 。
- Function: This step synchronizes the global color variables, font scales, and button styles defined in the kit. If you skip this step, pages imported later will not display the preset visual effects.
6. Import page templates as needed
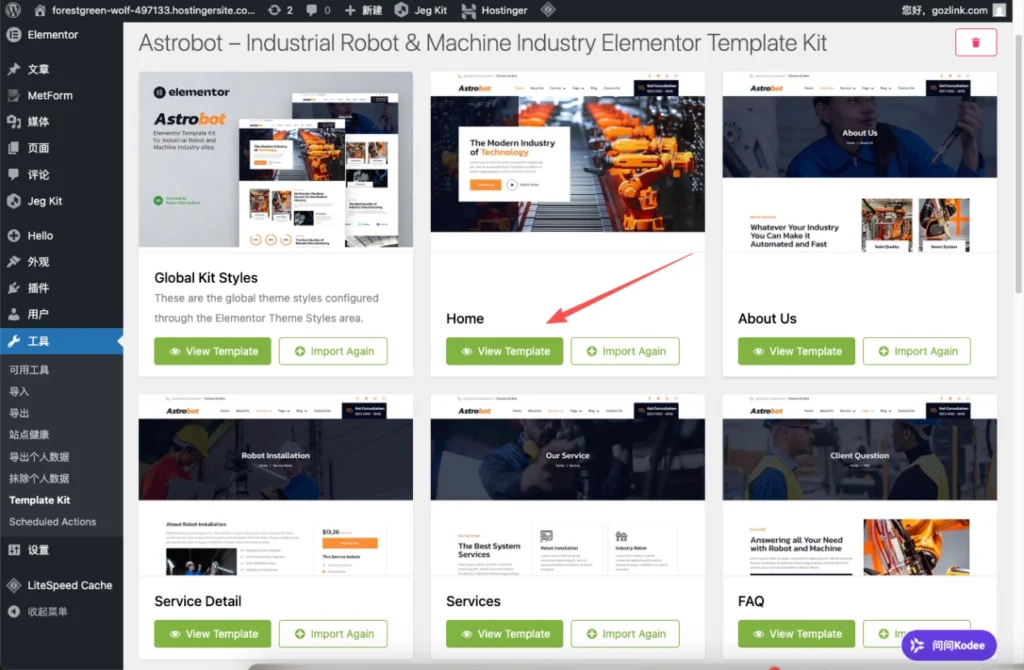
Once the global style configuration is complete, you can import specific page templates one by one according to your website development needs.
- Select a Template: Locate the desired page (such as Home, About Us, or Services) in the template list.
- Execute Import: Click below the corresponding card “Import Template” 。
- Storage Location: Imported templates will be automatically saved in Elementor's “My Templates” library.
Technical Notes: We recommend importing only the pages needed for the current phase to keep the database clean. The import operation does not directly create WordPress pages; instead, it stores them as “drafts,” which you’ll need to call upon when creating new pages later.
7. Create a formal page and call the template
After importing the assets, you need to apply them to the actual web links.
- Create a New Page: Click the menu in the admin panel “Page -> New Page” 。
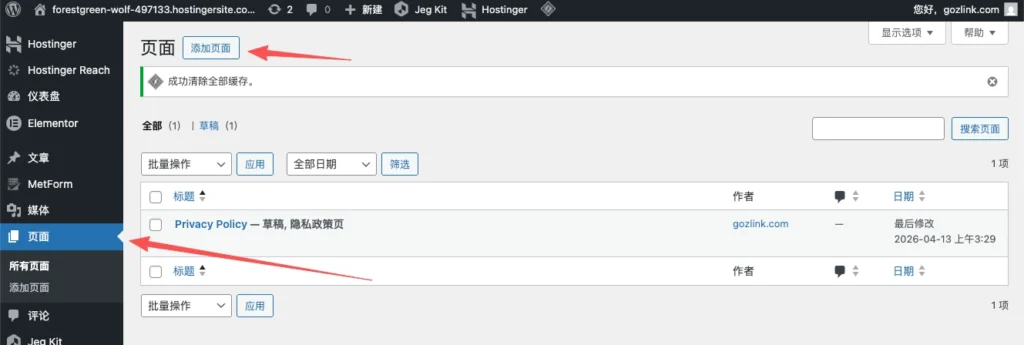
- Basic Configuration: Enter a page title (such as “Home”), and in the settings on the right, change "Template" to “Elementor Full Width” 。
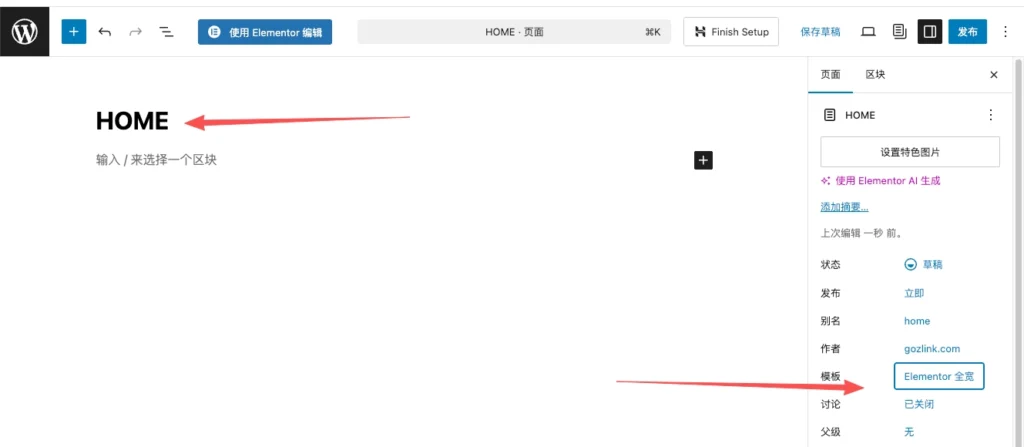
- Open the Editor: After clicking "Publish," click the button at the top “Edit with Elementor” 。
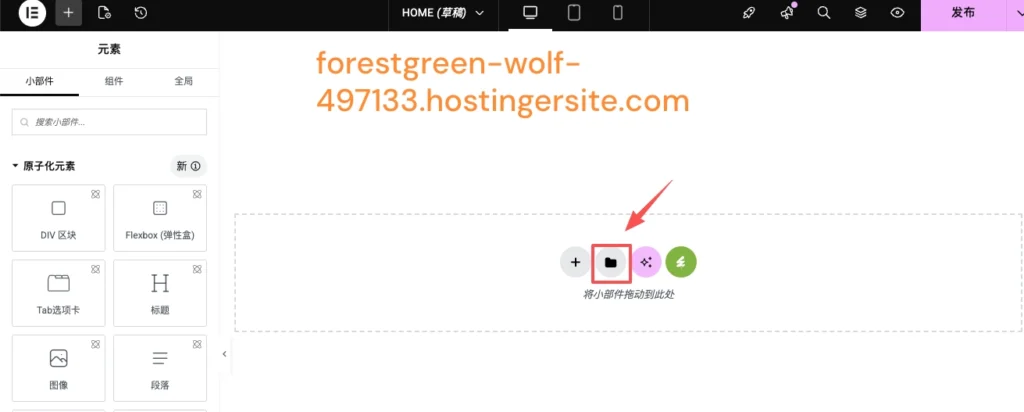
- Insert Template :
- In the editing area, click the gray folder icon (Add Template).
- Switch to “My Templates” Tab.
- Find the page template you imported earlier, then click “Insert” 。
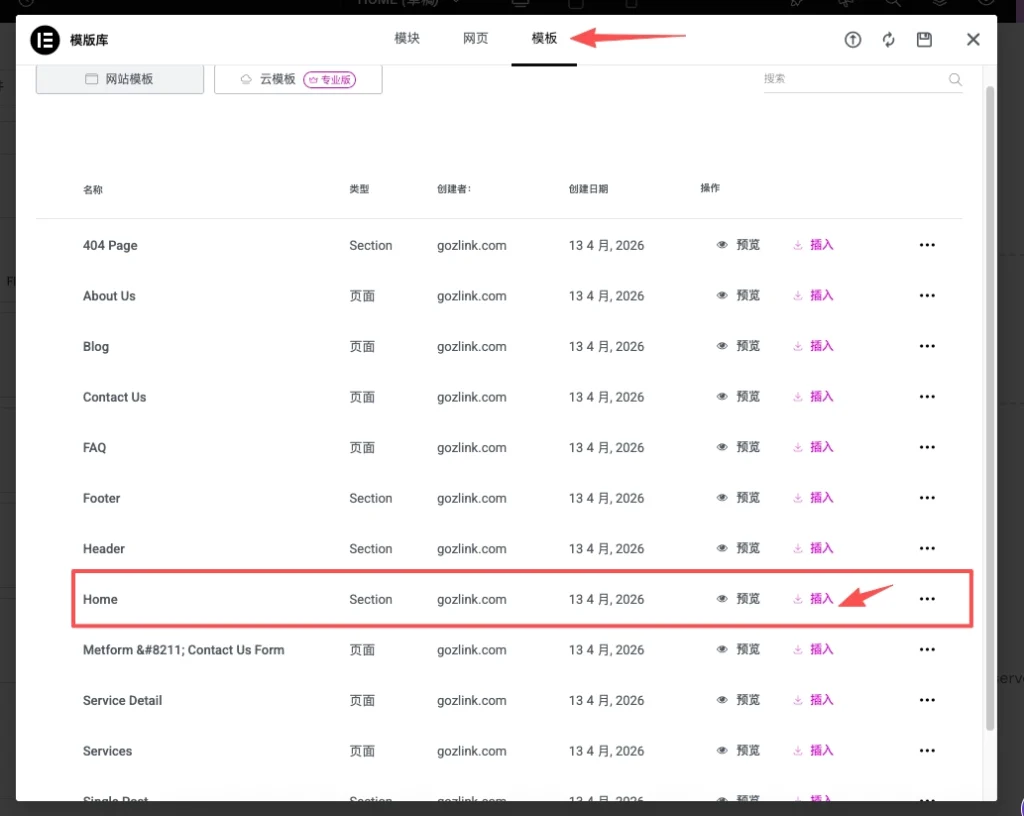
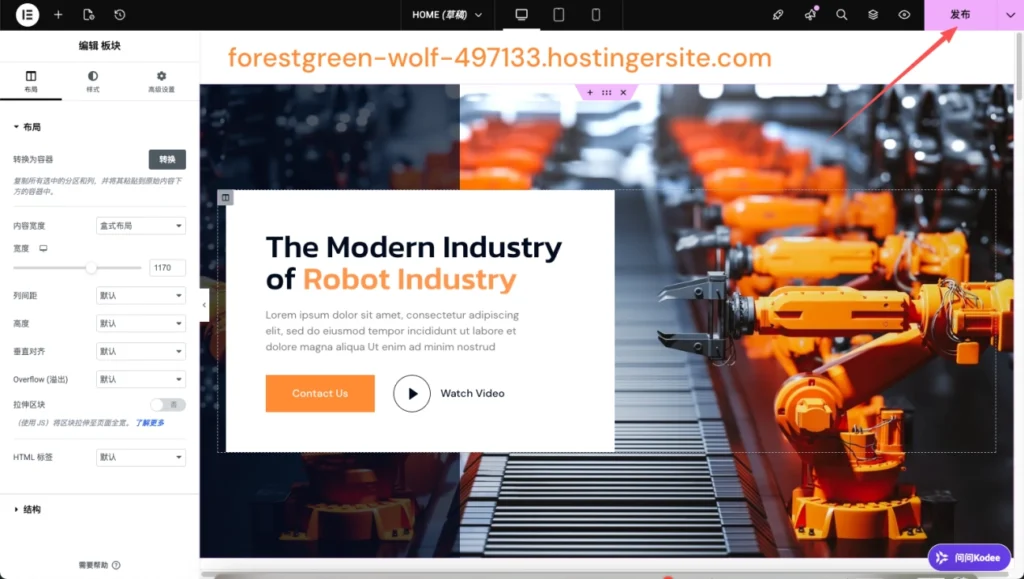
- Bulk Operations: Once the insertion is complete, click "Publish" to save. Follow the same steps to import the "aboutus," "service," "team," "faq," and "contactus" pages.
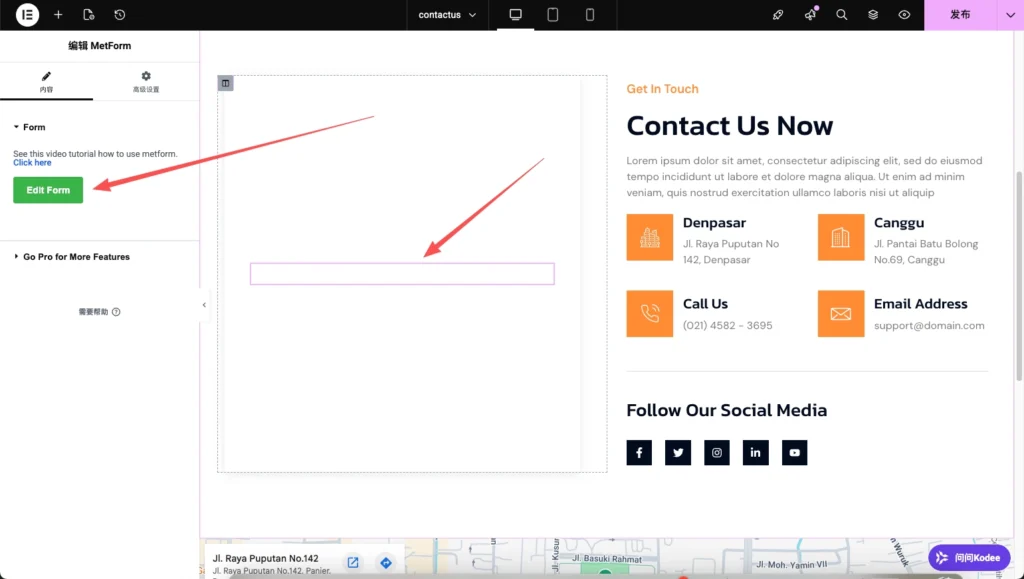
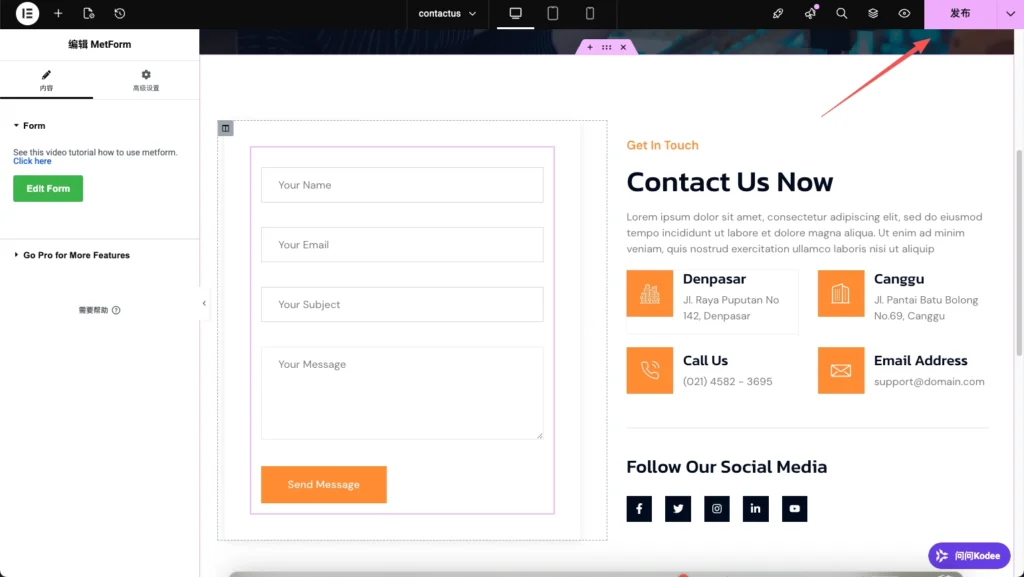
⚠️ Note: Special Handling of Form Pages On the "contactus" page, locate the form area after importing, then click edit form Insert our form style.
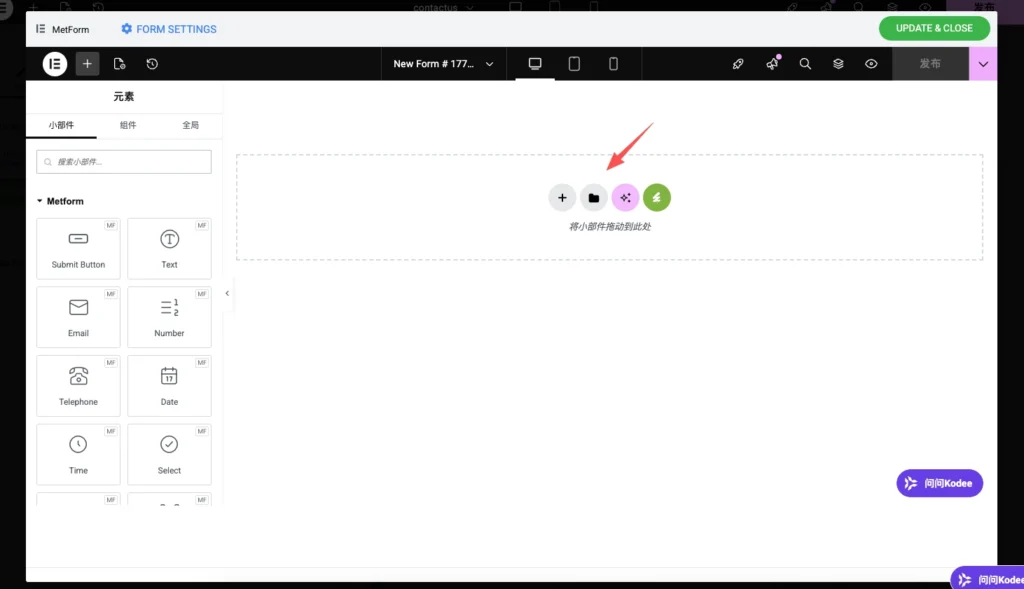
Similarly, click the folder to find metform Insert the opening template.
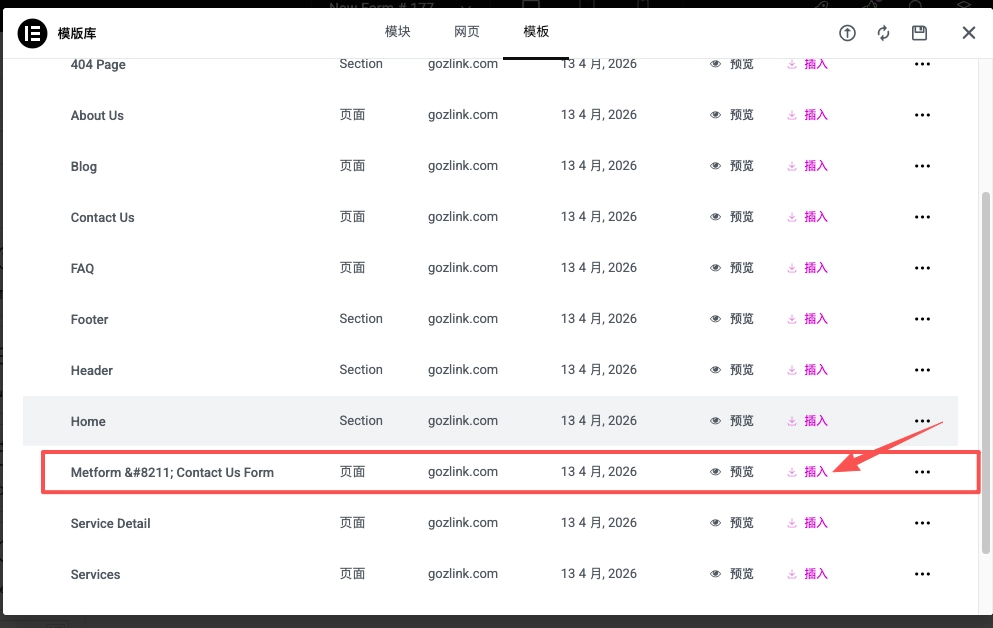
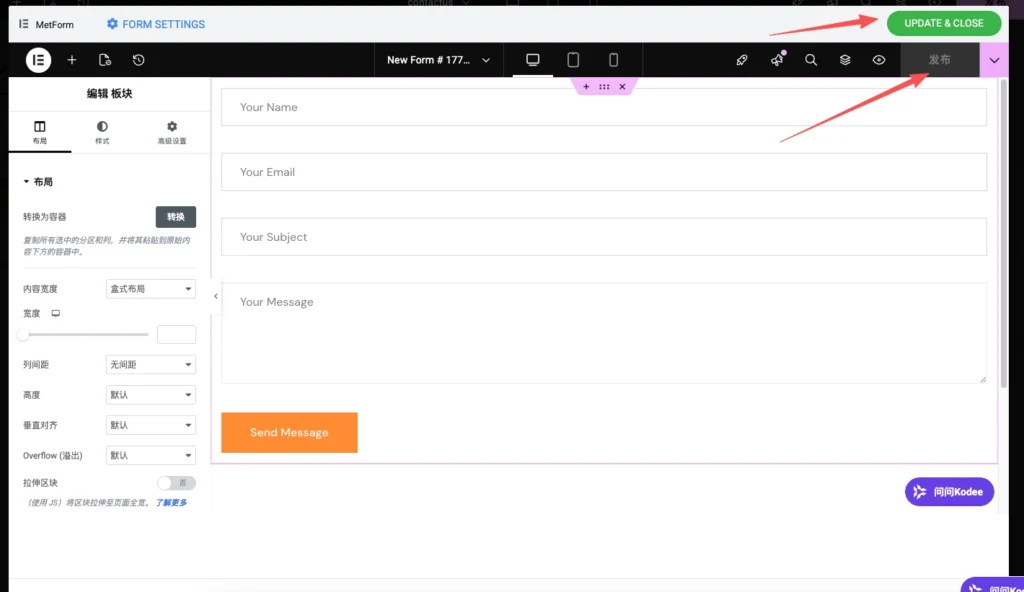
After inserting the content, click "Publish," then click Update & Close . A form will then appear; click "Publish" on this page.
📂 Step 5: Configure Product Categories and Menus
1. Establish an article categorization structure (B2B product management logic)
B2B standalone websites typically use WordPress’s “Posts” system to centrally manage news and products, making it easy to retrieve and format them later using Elementor’s Posts Widget.
Create Core Categories
- Path: Click the menu in the admin panel “Articles -> Categories” 。
- Create a Blog Category: Enter “Blog” (or “News Center”) in the "Name" field, then click Add.
- Create a "Product" Category: Enter “Product” (or “Product Center”) in the "Name" field, then click "Add."
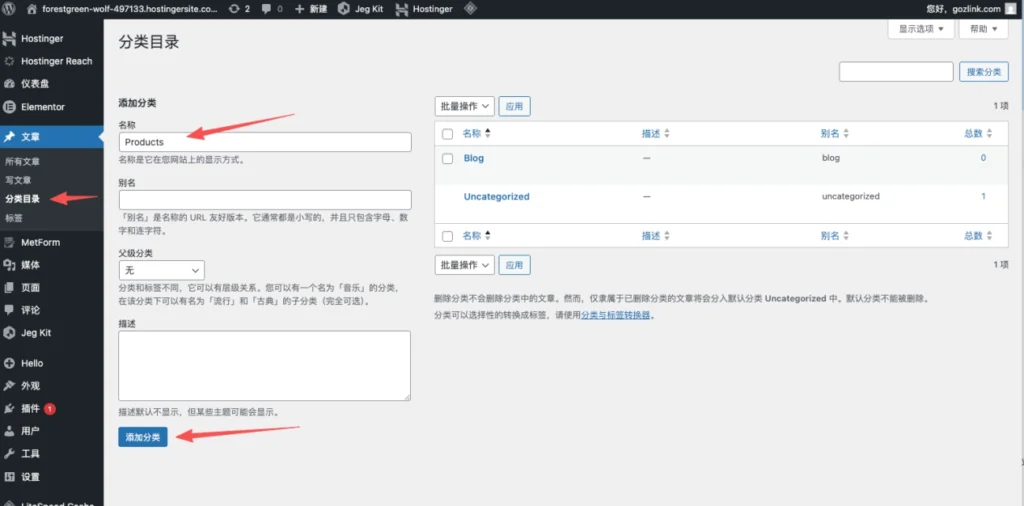
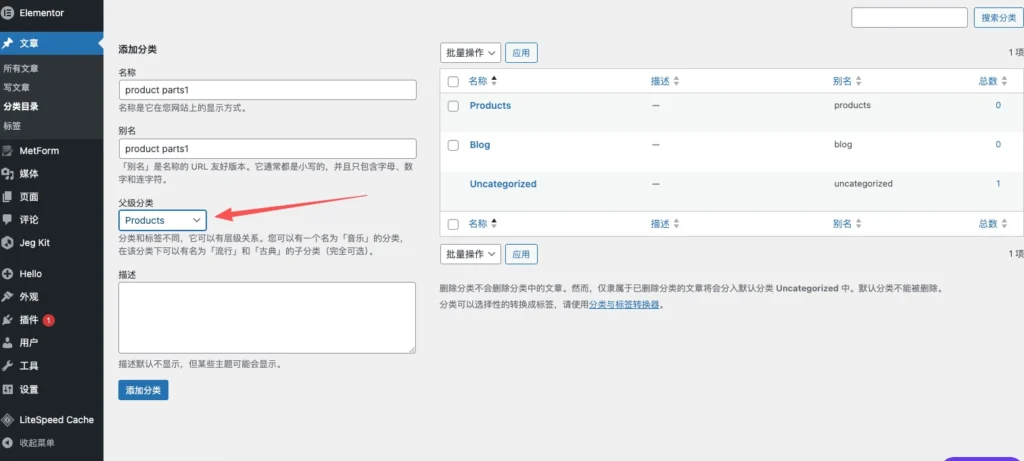
Set Up Product Categories (Parent-Child Hierarchy) To make it easier for customers to search by category, create subfolders under "Product":
- Operation: Enter the subcategory name (e.g., product parts1).
- Set Parent: Select “Product” from the "Parent Category" drop-down menu.
- Repeat the operation: Follow this pattern to create other second-level categories.
Technical Advantages: * Easy to Manage: When publishing products as “posts,” you can use WordPress’s built-in category filtering features. * SEO-friendly: A clear hierarchical structure (such as /product/robots/) is more search engine-friendly. * Flexible Access: Later, within the Elementor page, you can specify that only content under the "Product" category be displayed, thereby creating an automatically updated product list page.
2. Create the main navigation menu
After importing the pages and setting up the categories, you need to configure the website’s navigation structure so that users can navigate between front-end pages.
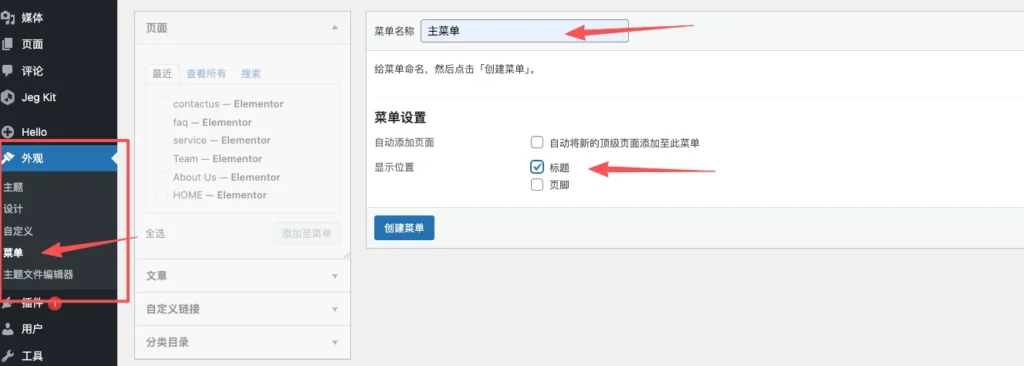
- Go to Menu Management: Click the menu in the admin panel “Appearance -> Menus” 。
- "New" and "Name" Menus :
- Menu Name: Type in the text box Main Menu(or Primary Menu).
- Display Location: In the “Menu Settings” section, check the box “Title”(Some themes display this as “Header” or “Header”).
- Execute Create: Click the blue button “Create Menu” 。
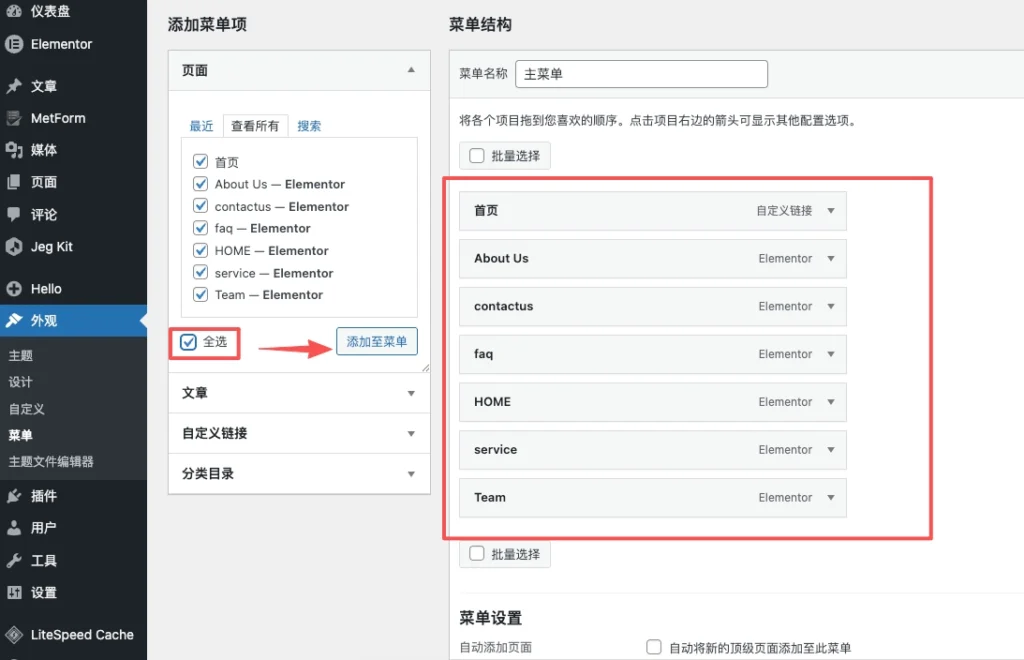
- Add a Navigation Item :
- Selection Page: In the “Pages” pane on the left, switch to “View All.”
- Checked items: Check the boxes next to the pages you created and called earlier (such as HOME, About Us, Services, etc.).
- Add to Menu: Click “Add to Menu” 。
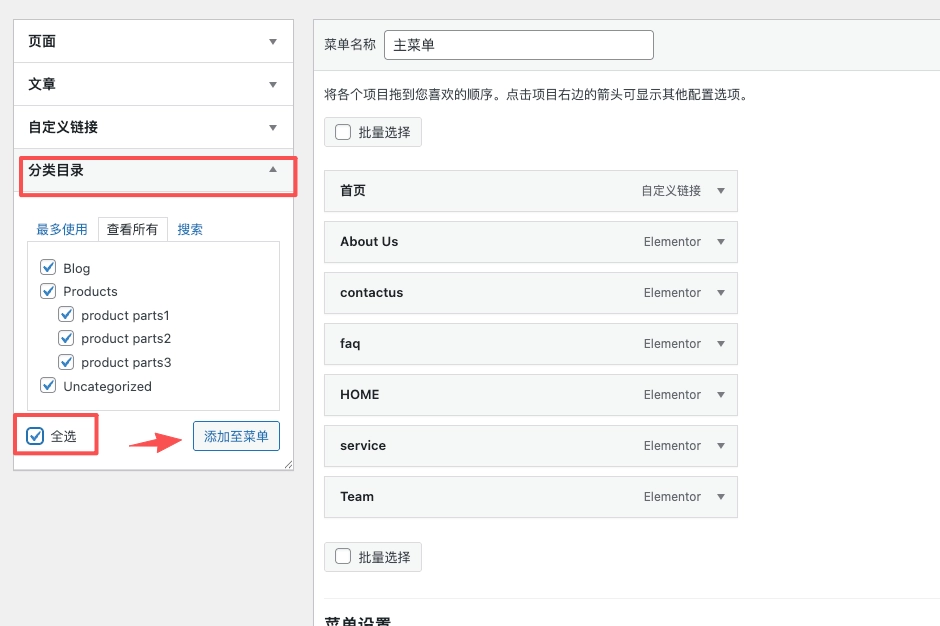
Click on "Categories" and add the category you just created to the list.
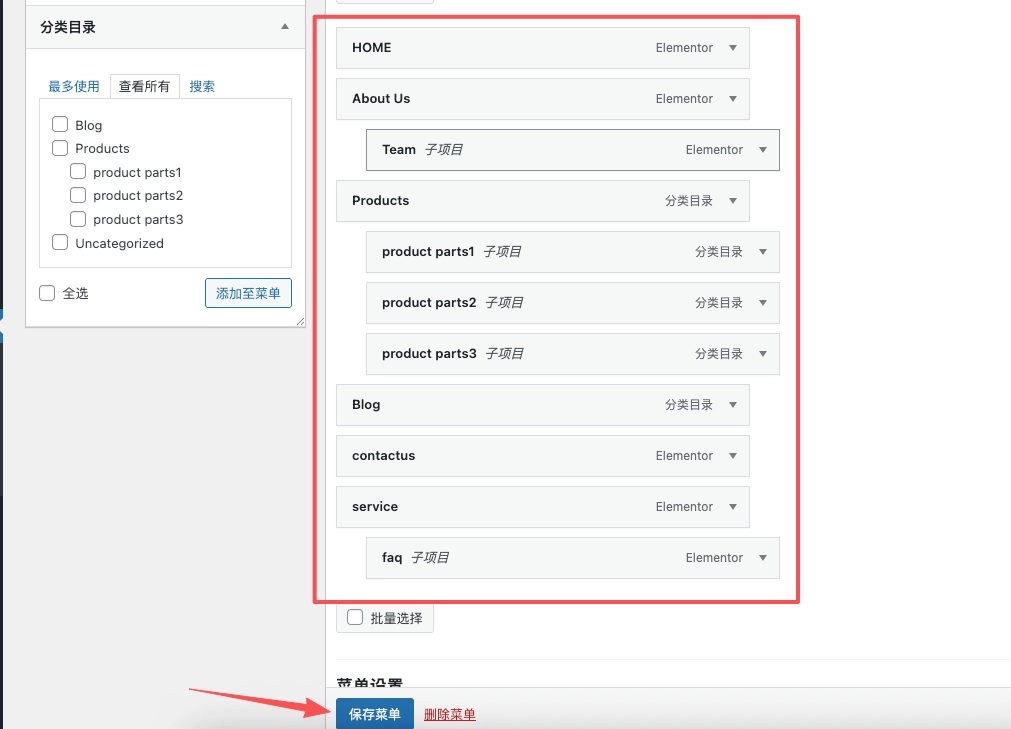
- Save Configuration: Drag and drop menu items in the right-hand pane to reorder them (drag submenus to the right to create a hierarchical structure). When finished, click “Save Menu” 。
🏗️ Step 6: Coordinate the Site-Wide Visual Framework
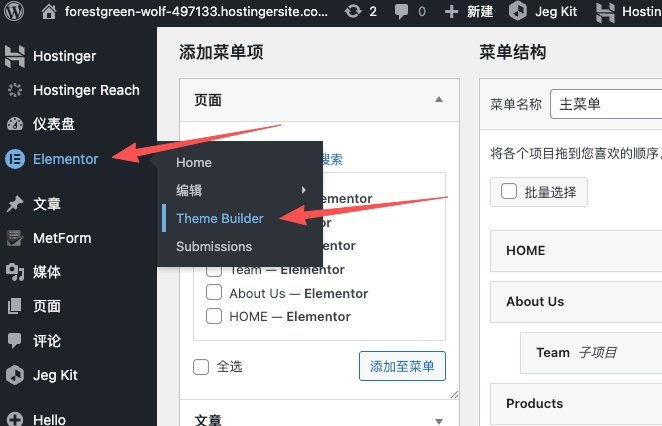
After importing the basic pages, you'll need to use Elementor's Theme Builder Assemble the individual templates into a complete website system, ensuring a highly consistent style across the header, footer, category pages, and detail pages.
1. Implement site-wide headers and footers
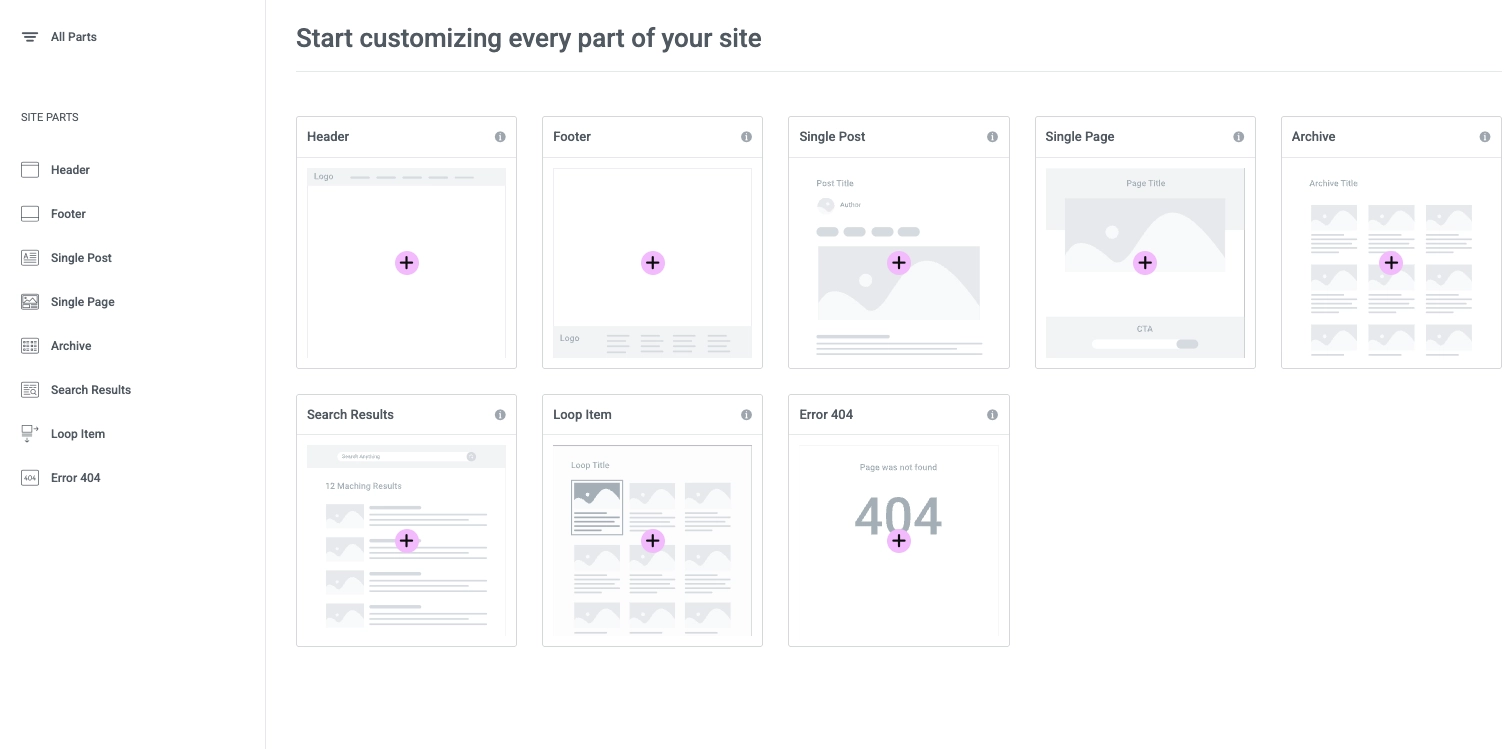
- Path: Click the menu in the admin panel “Elementor -> Theme Builder” 。
- Related Templates :
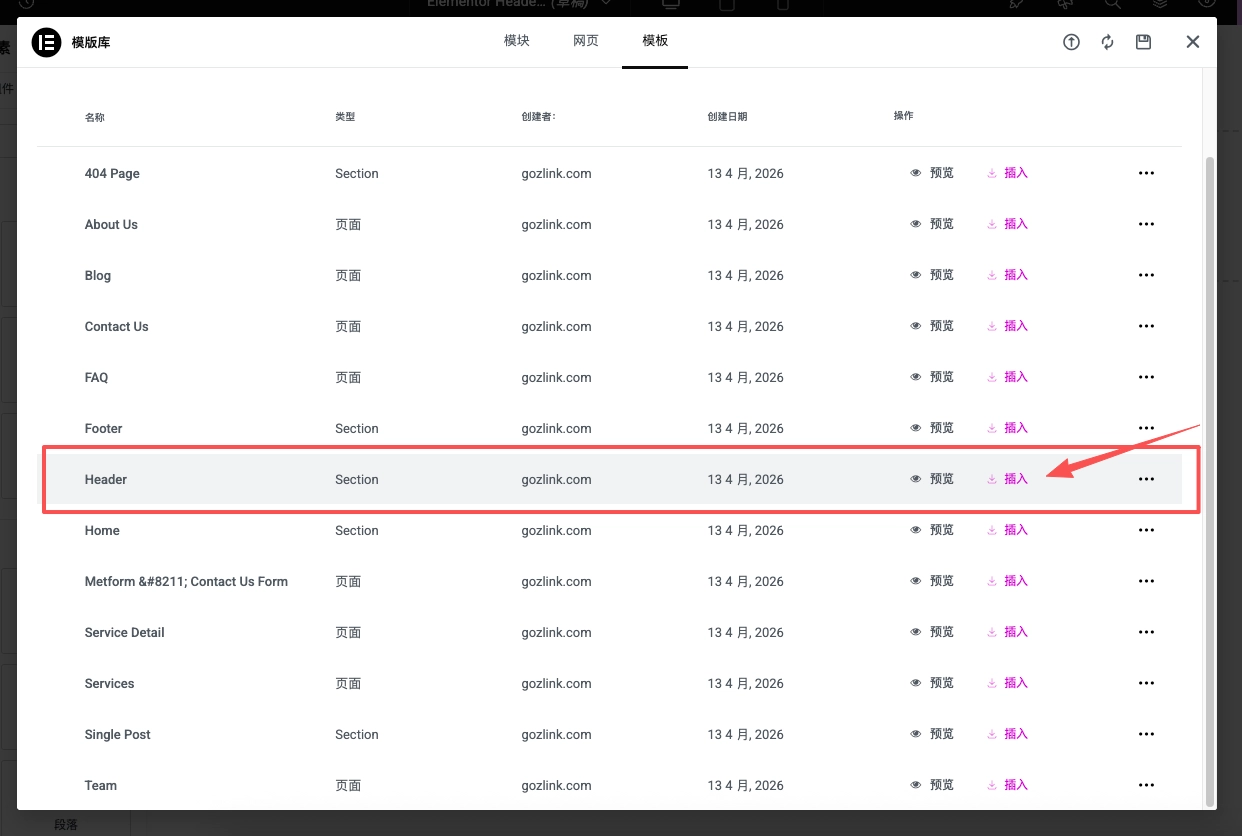
- Click the "Header" module and select the "Header" template you previously imported from the Astrobot kit.
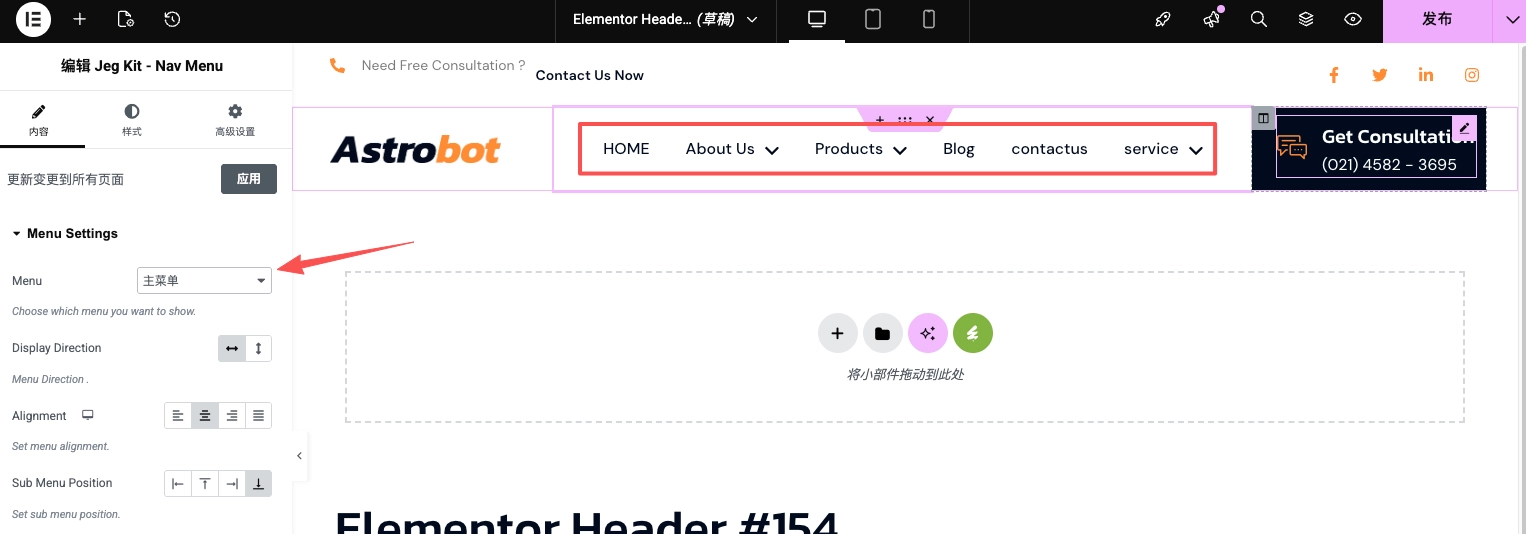
- In the editor, verify that the navigation menu (Nav Menu) is linked to the “Main Menu” you created earlier.
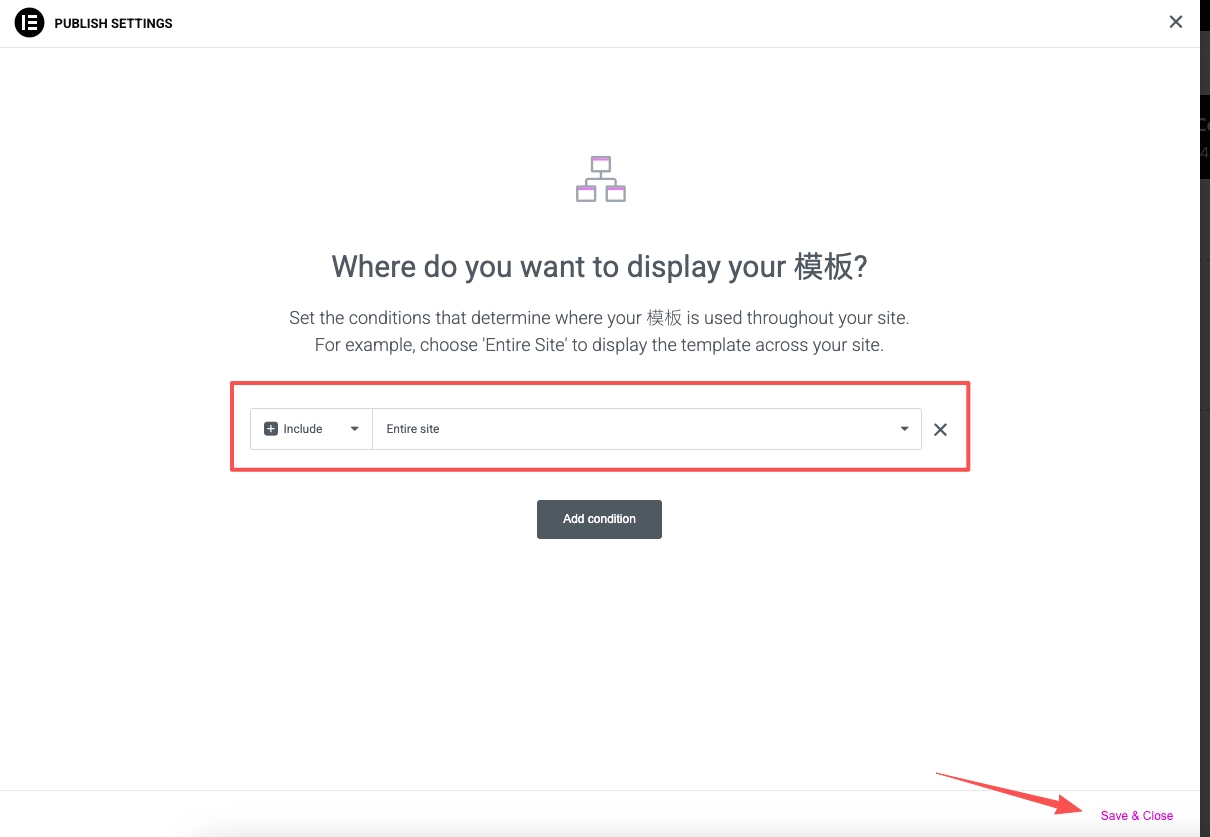
- Click “Publish,” and in the “Display Conditions” pop-up window, add “Entire Site”(The entire website).
Repeat the above steps for the Footer module to ensure the footer appears on all pages of the site. You can click on the left side to edit the text content, etc., and replace "#" with the actual page link to navigate to the corresponding page.
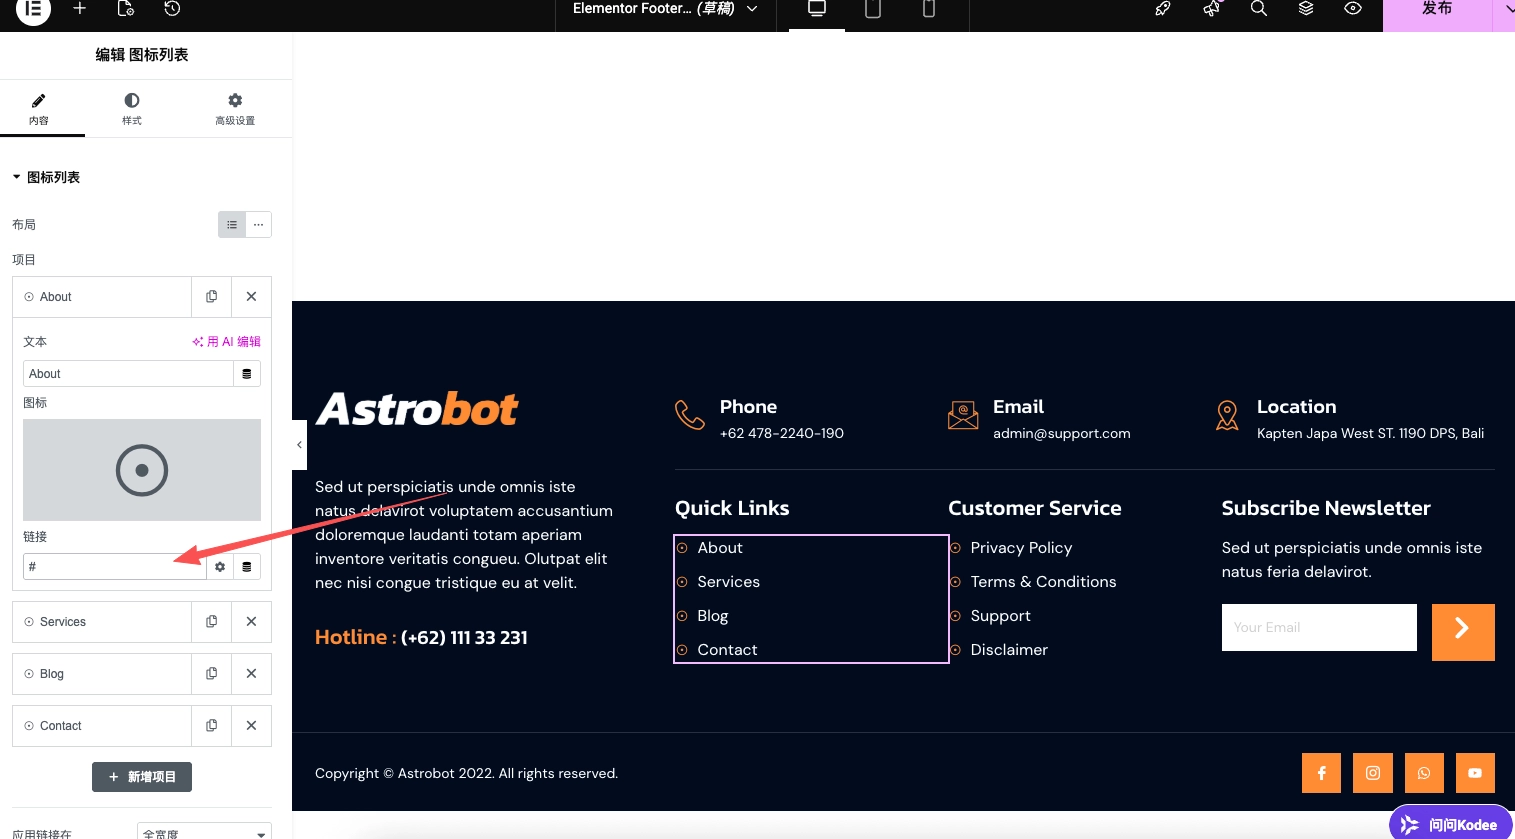
2. Create a category page template (Archive)
The category page template determines how the list is displayed when a user clicks “Product Center” or “News Categories”:
- Create a New Template: In Theme Builder, click Archive Module -> Add New 。
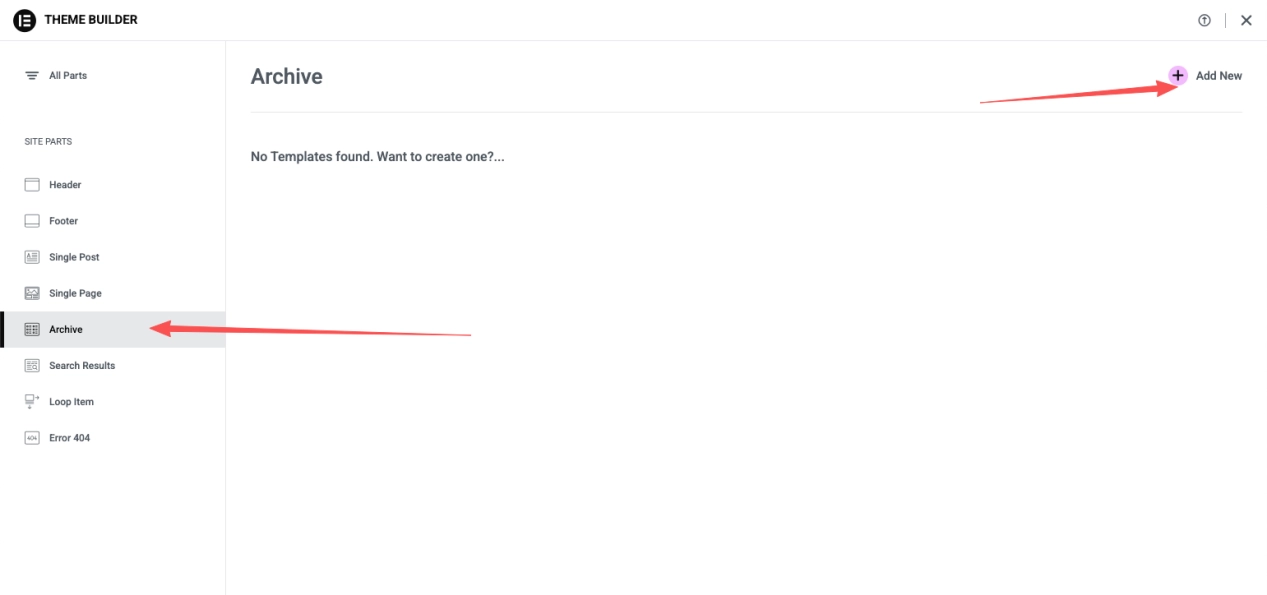
- Calling Styles: Insert the Archive template from the package.
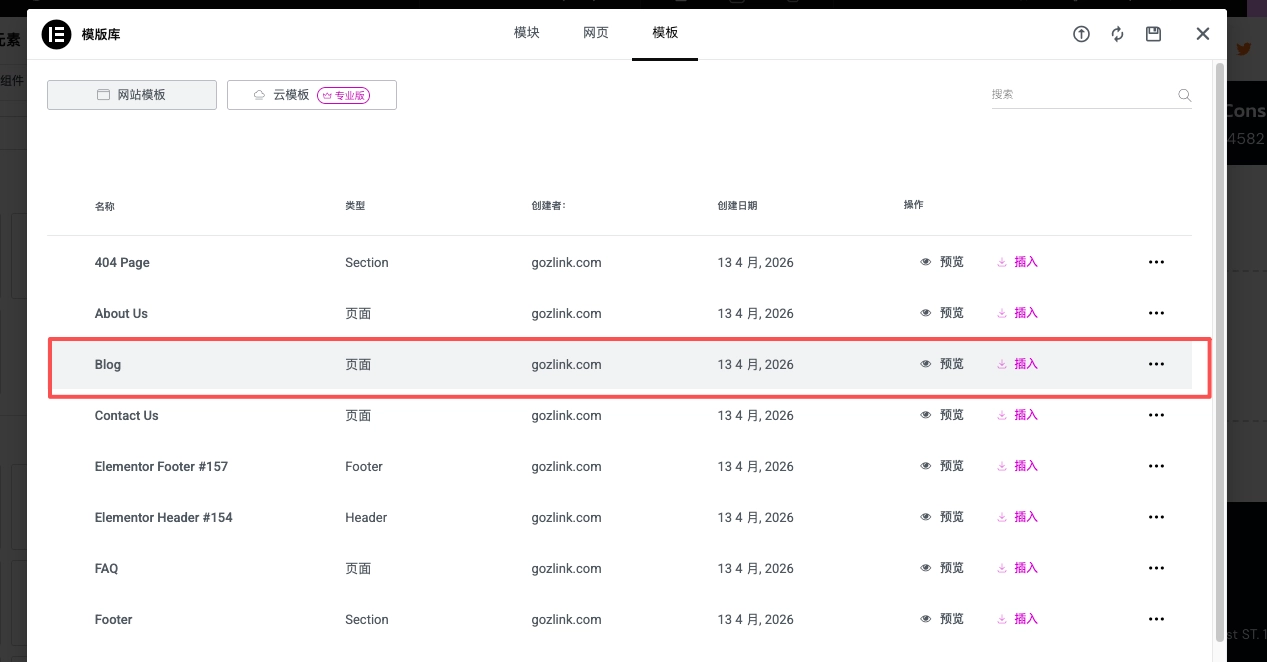
- Click the "Posts" section, find "Include Category" in the settings, and select the "blog" category you just created.
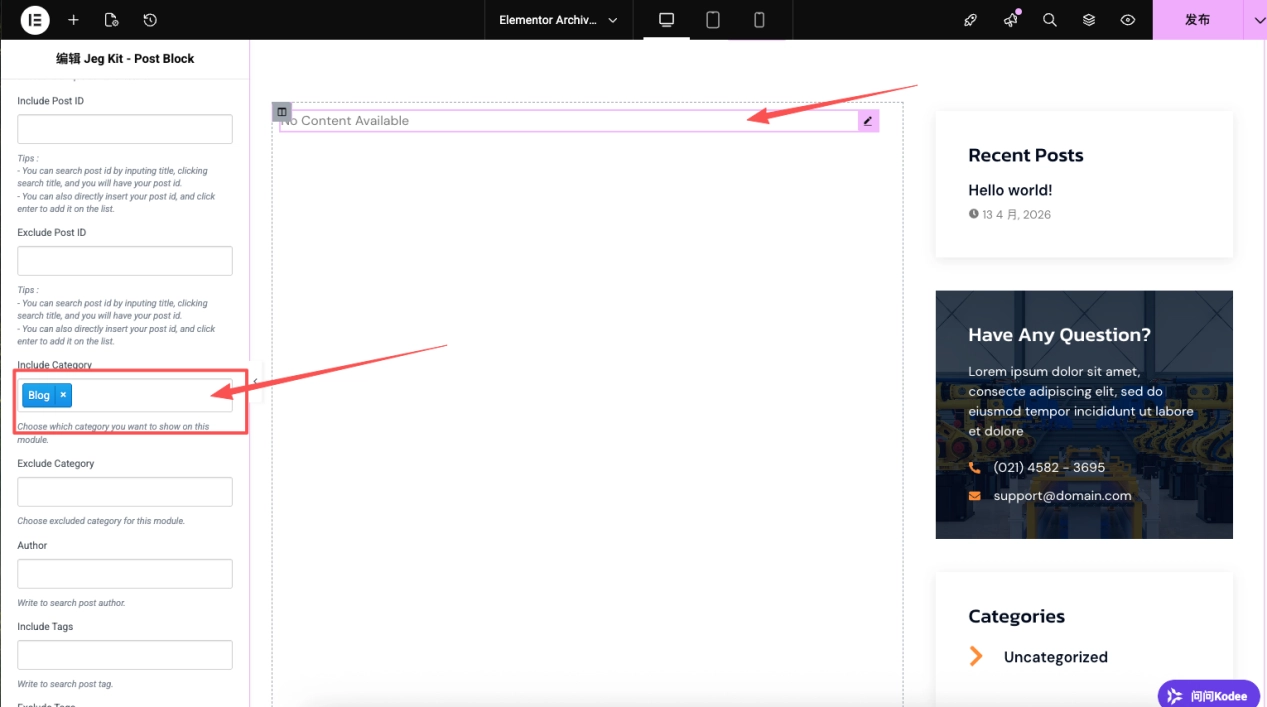
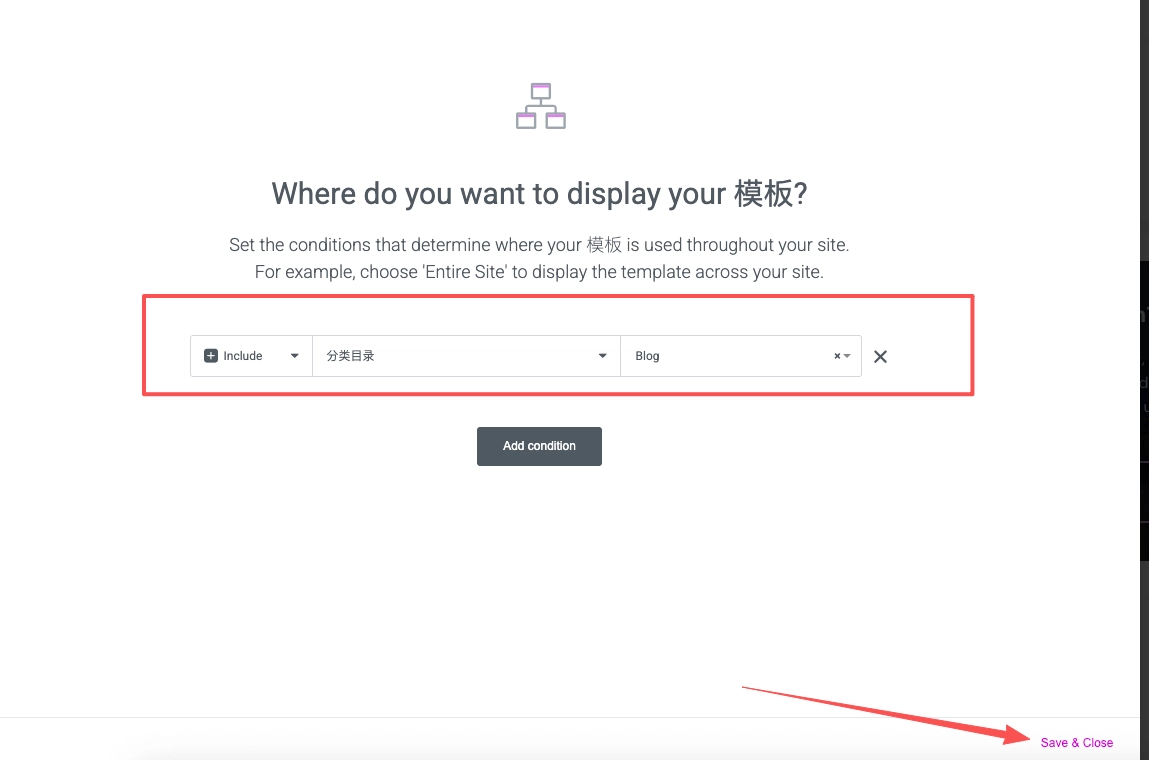
- Set Conditions: Click "Publish" and set "Display Conditions" to "Category" ➡ "blog." At this point, the "Blog" category will use this visual structure.
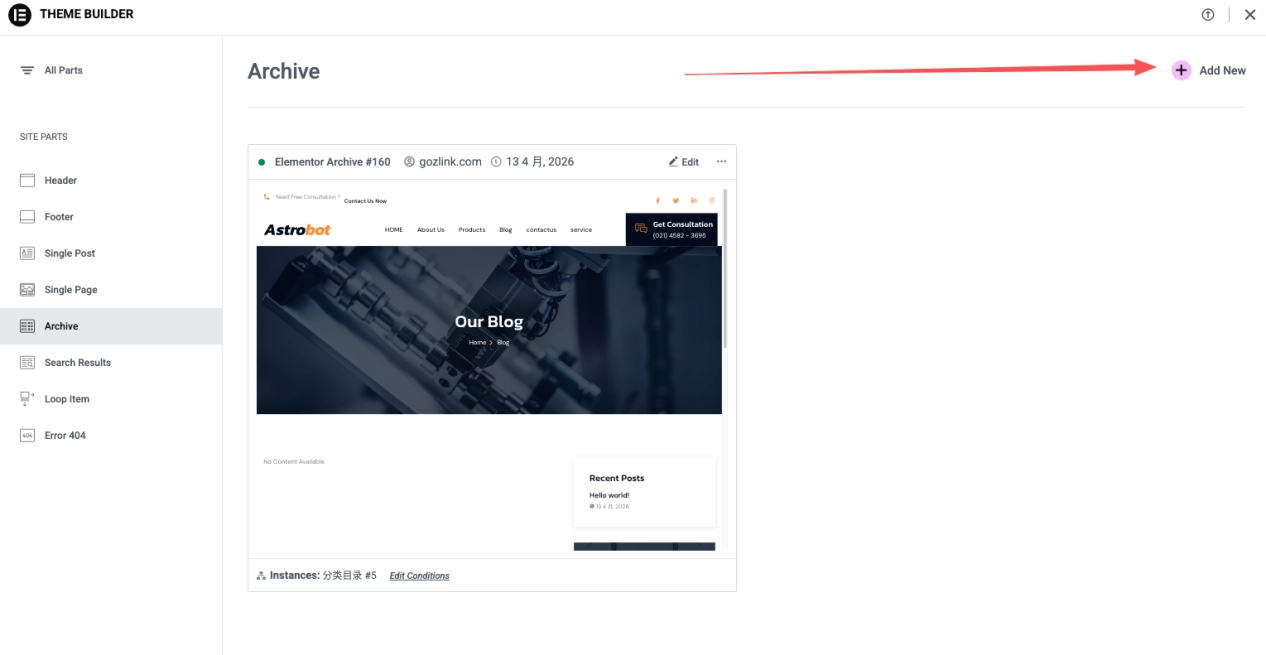
Manually Creating a Product Category Page: Since many showcase website templates do not include product listings, we’ll manually create a product category page here. Go back to the Theme Builder, locate “Archive,” and click “Add New.”
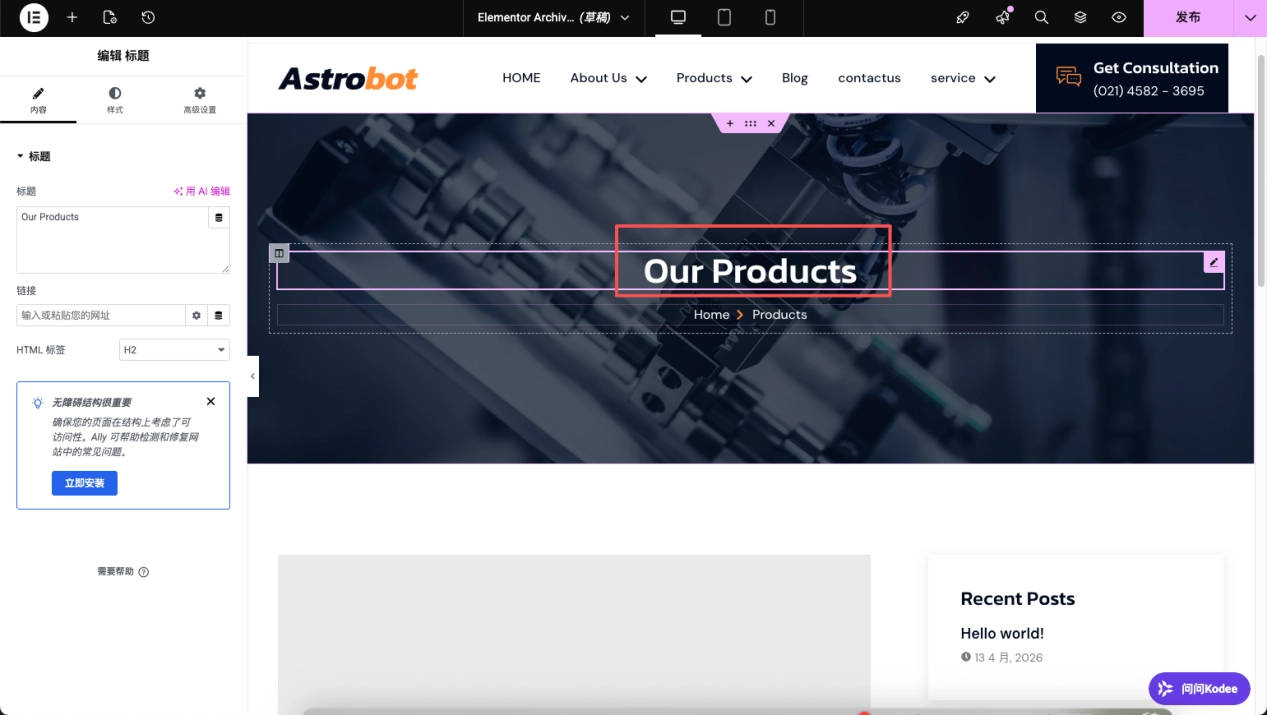
Insert it into the blog template as well, and change the title and other elements to "our products."
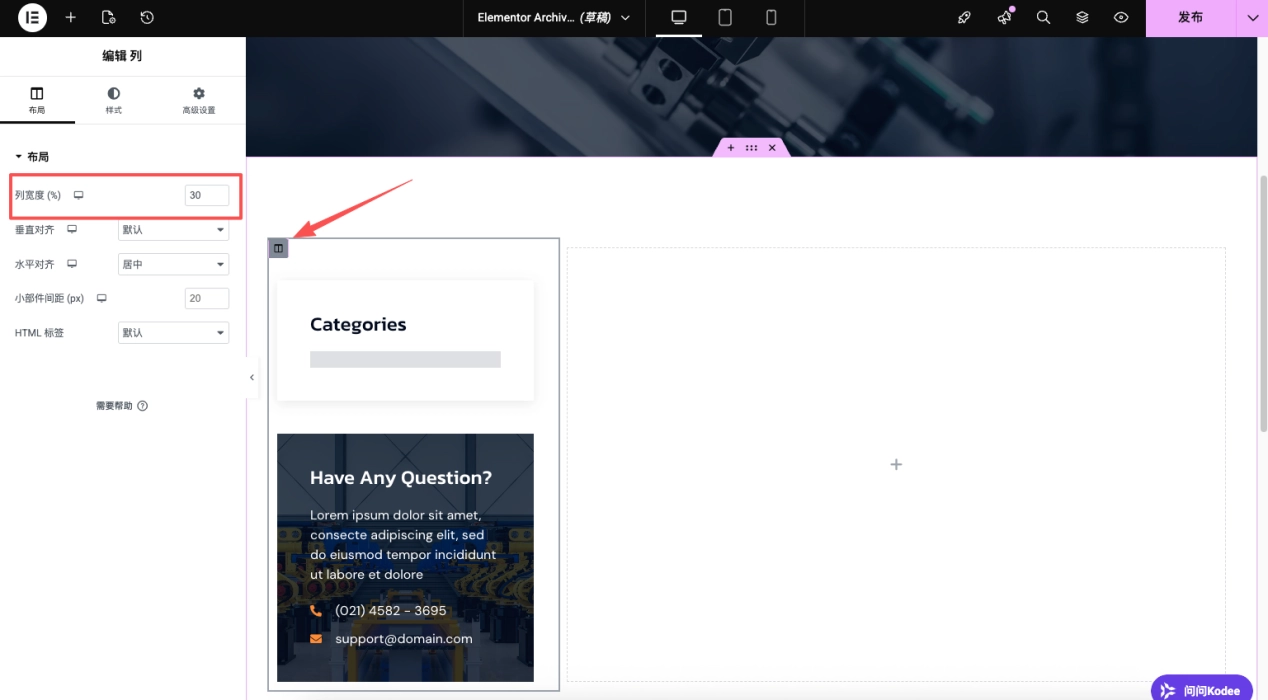
Make some adjustments to the original template: remove the controls on the left and drag the directory and contact information sections from the right to the left.
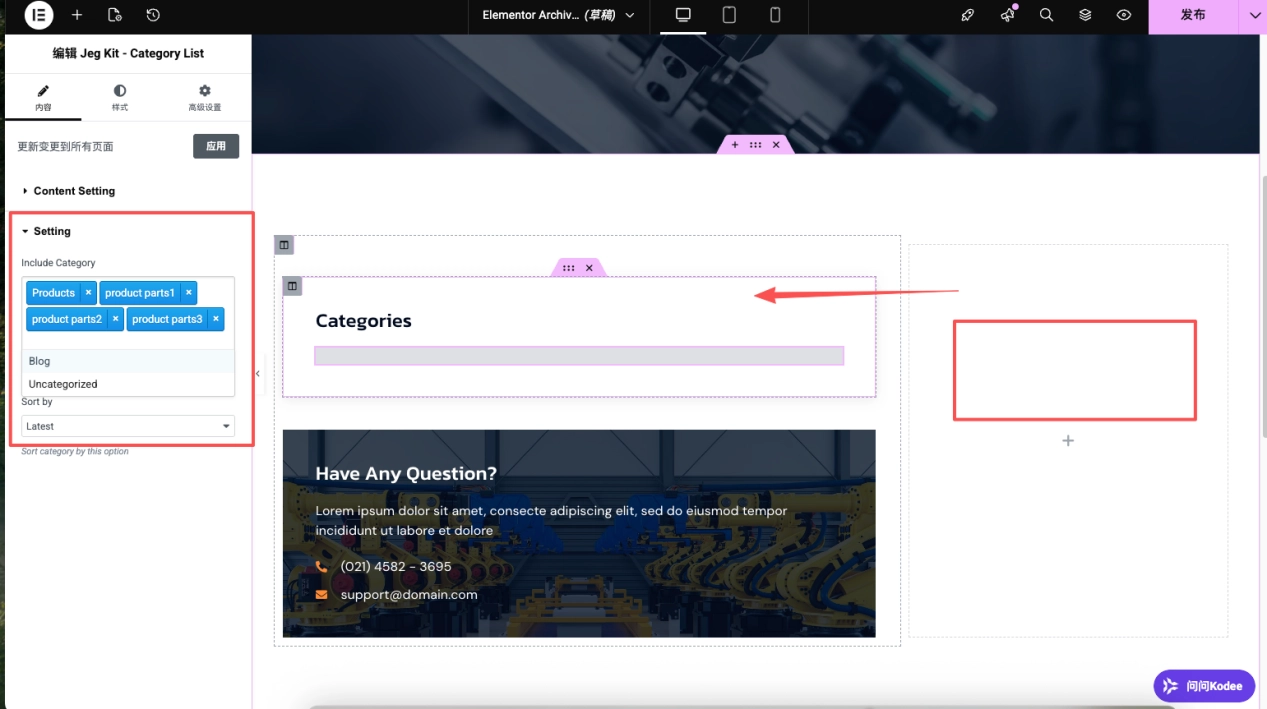
Click the gray square in the left-hand container, then adjust the column width to 30 in the left-hand edit column; the right-hand column will automatically adjust to 70.
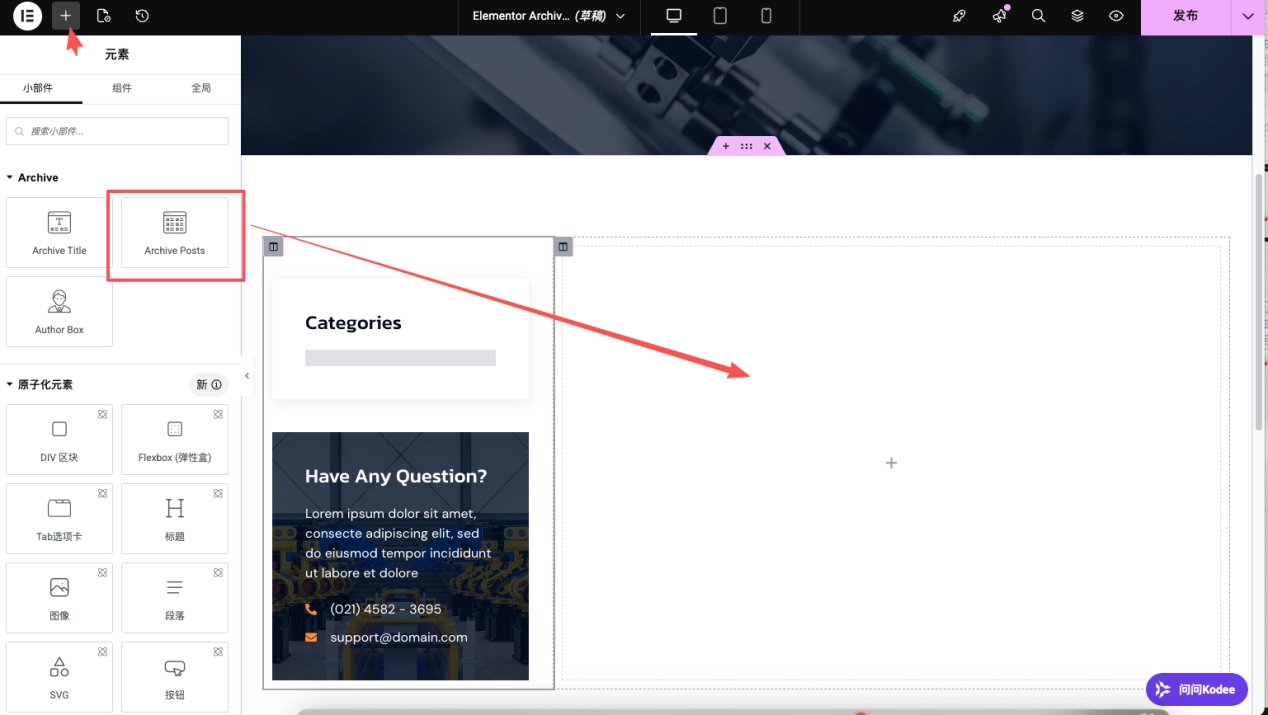
Then tap the plus sign in the upper-left corner to find Archived Posts Drag it to the right.
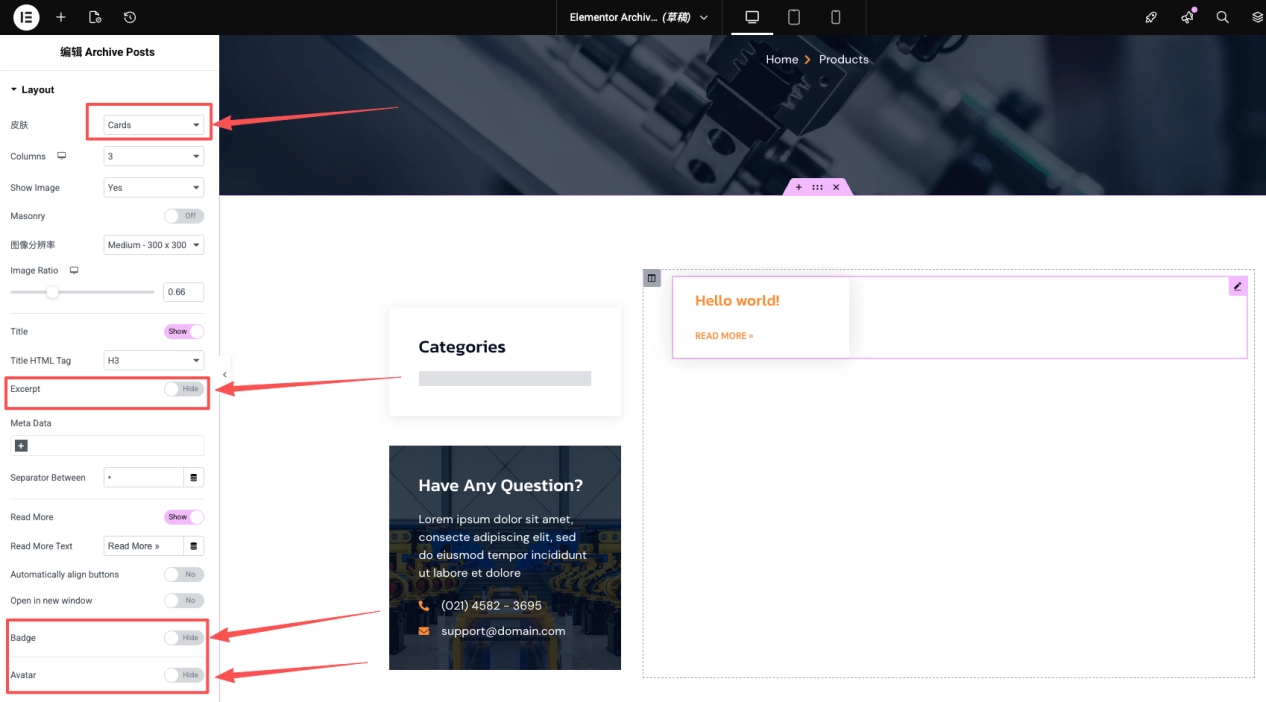
Click the control you just dragged in to change the skin to cards, Remove all metadata. Disable excerpt, badge, avatar, etc.
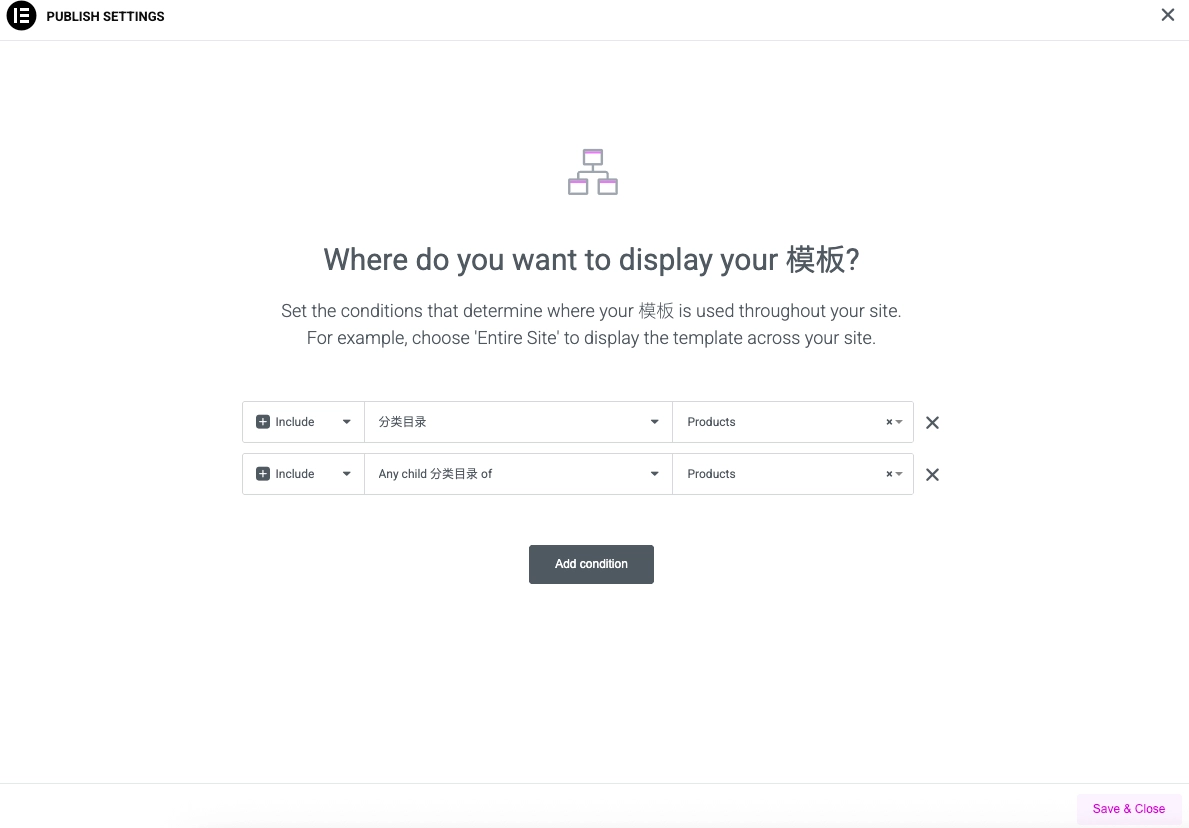
Publish, select the display criteria as shown in the figure, and select "products" and all subdirectories under that directory.
3. Consistent Design: Blog and Product Detail Page (Single)
The detail page template is responsible for rendering the content of specific articles or products:
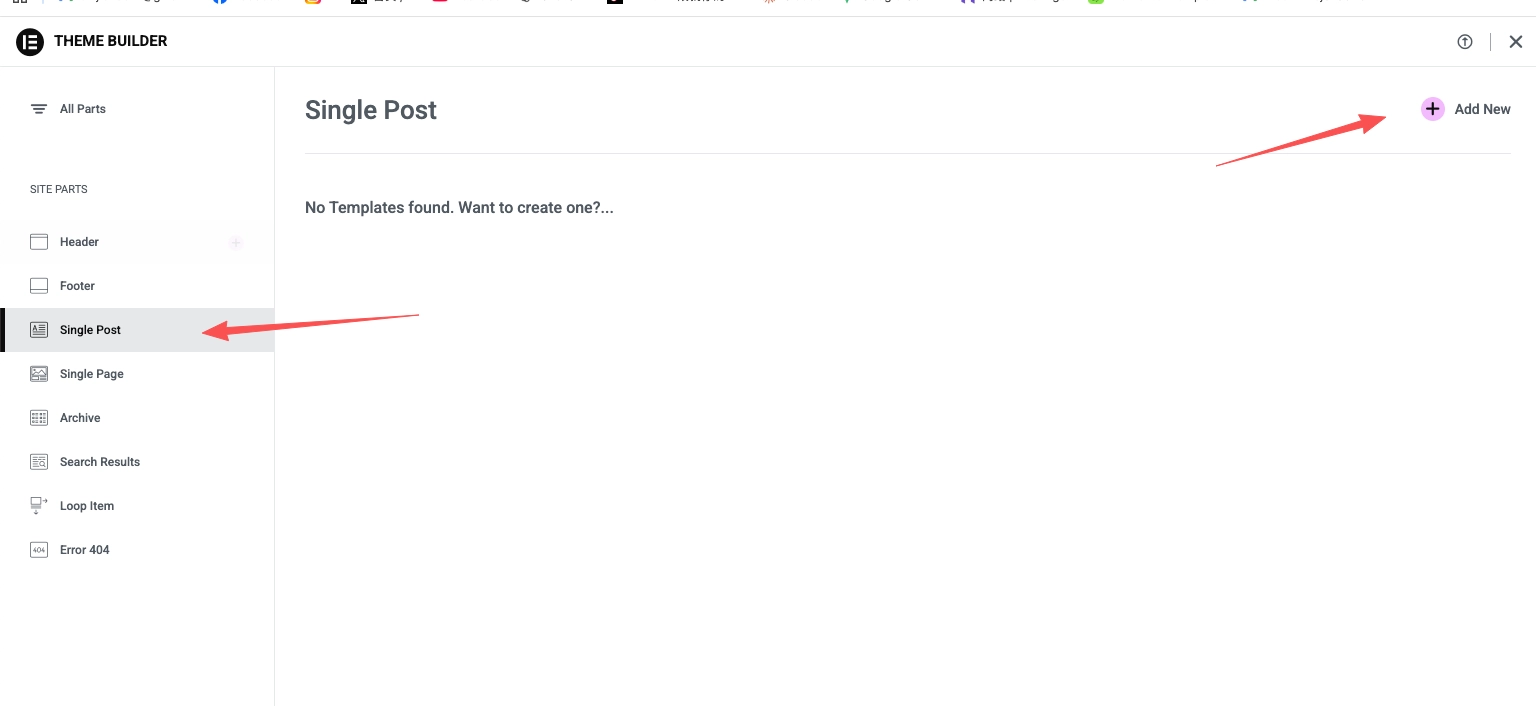
Single Post (Blog Details):
- Click Single Post Module -> Add New 。
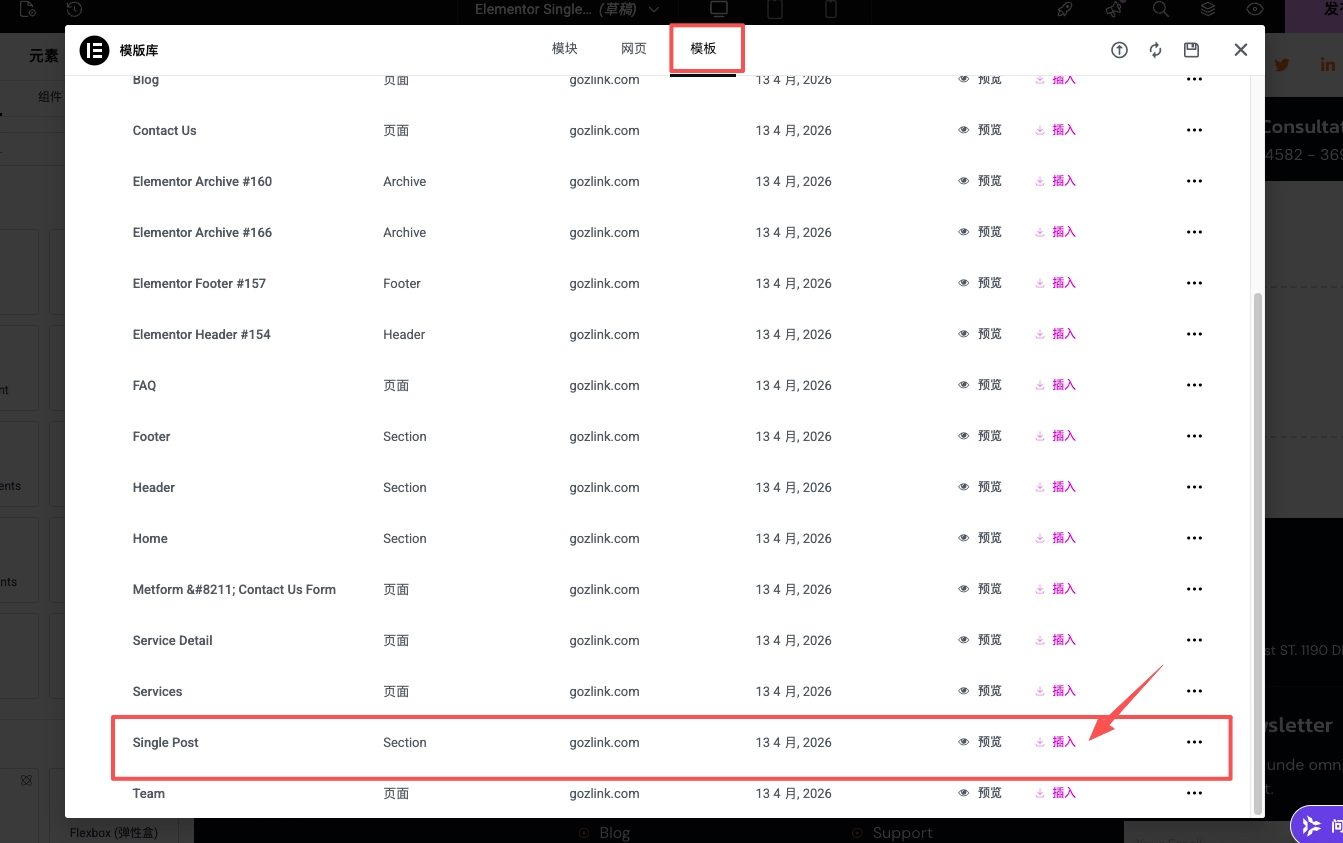
- Insert the corresponding Single Post template and configure the dynamic components (such as Post Title and Post Content).
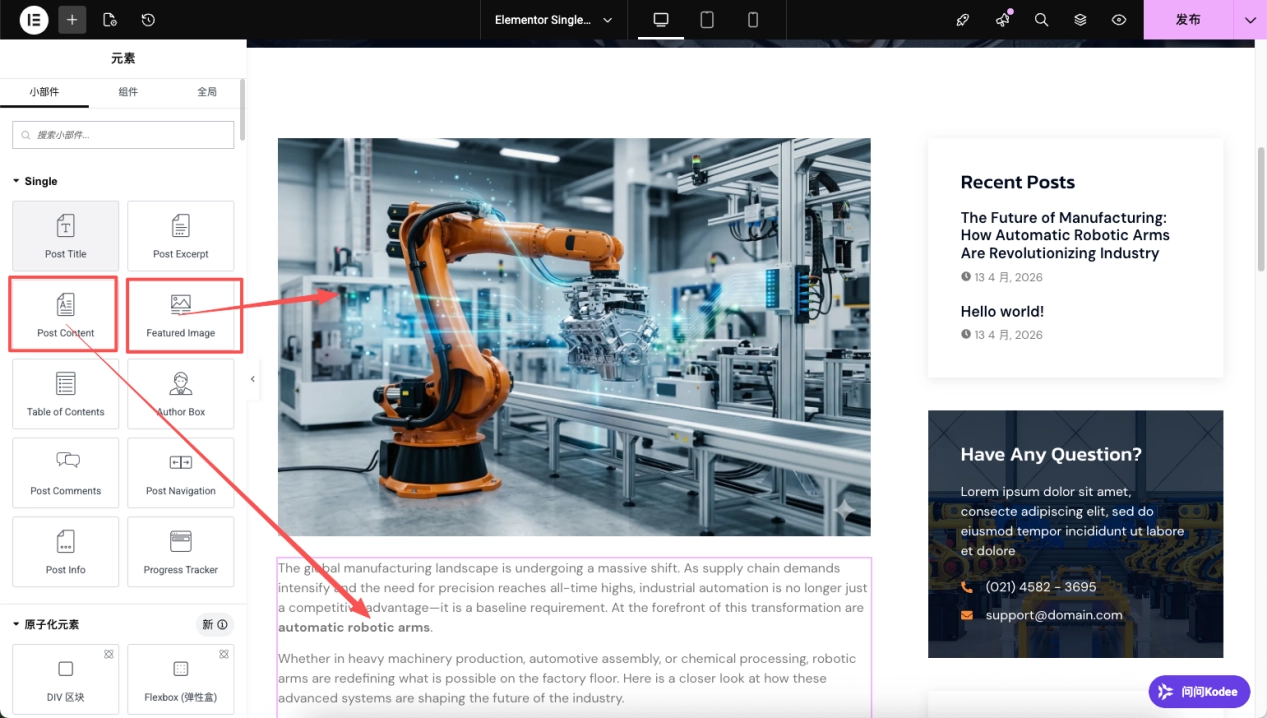
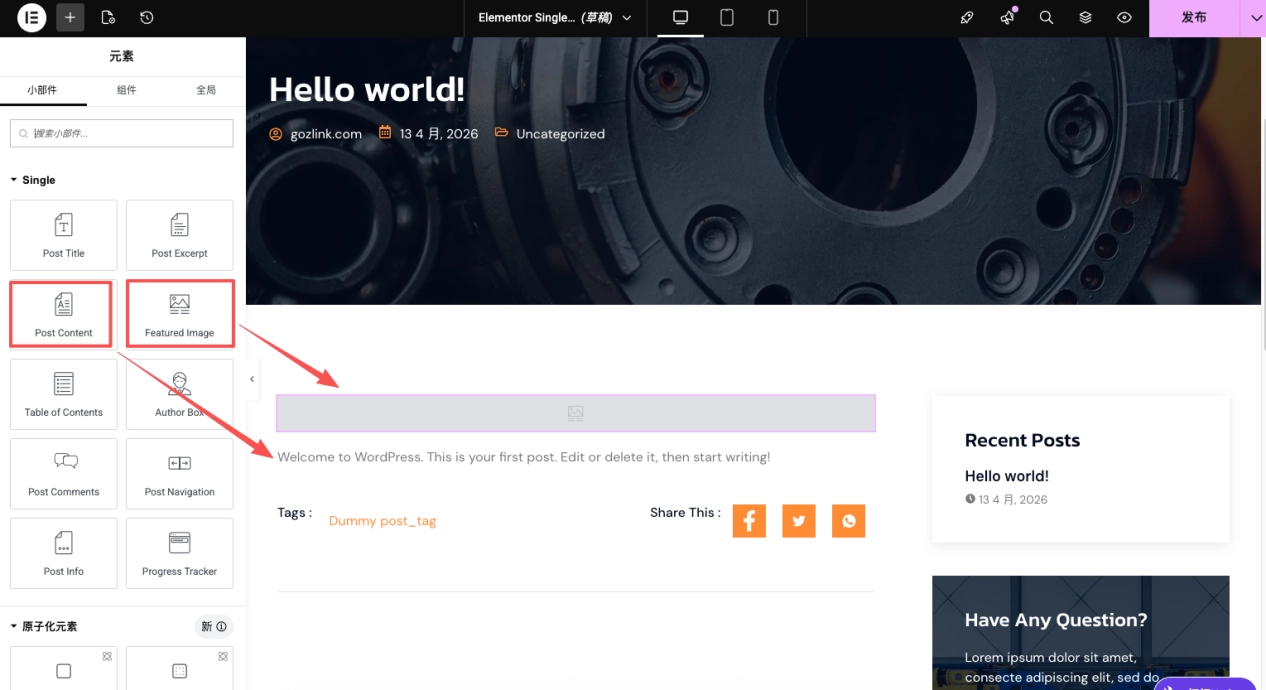
- Delete the component to the left of the inserted template and replace it with a more stable one. Featured Image 和 Post Content Components.
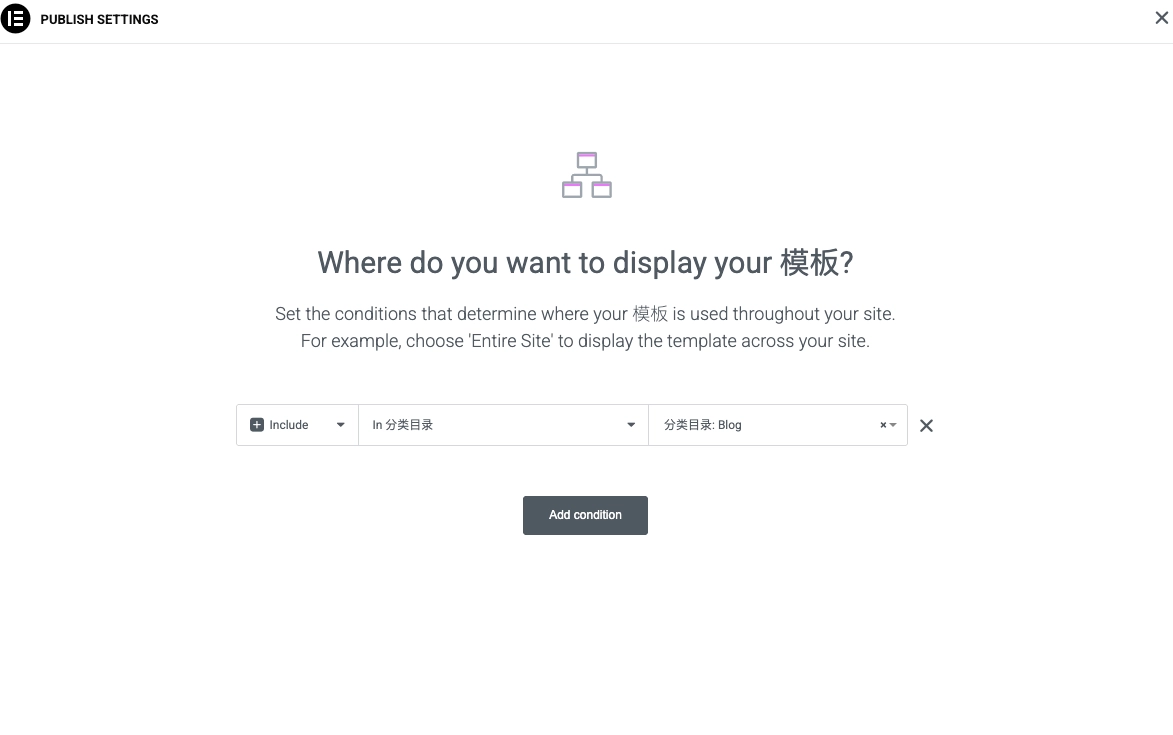
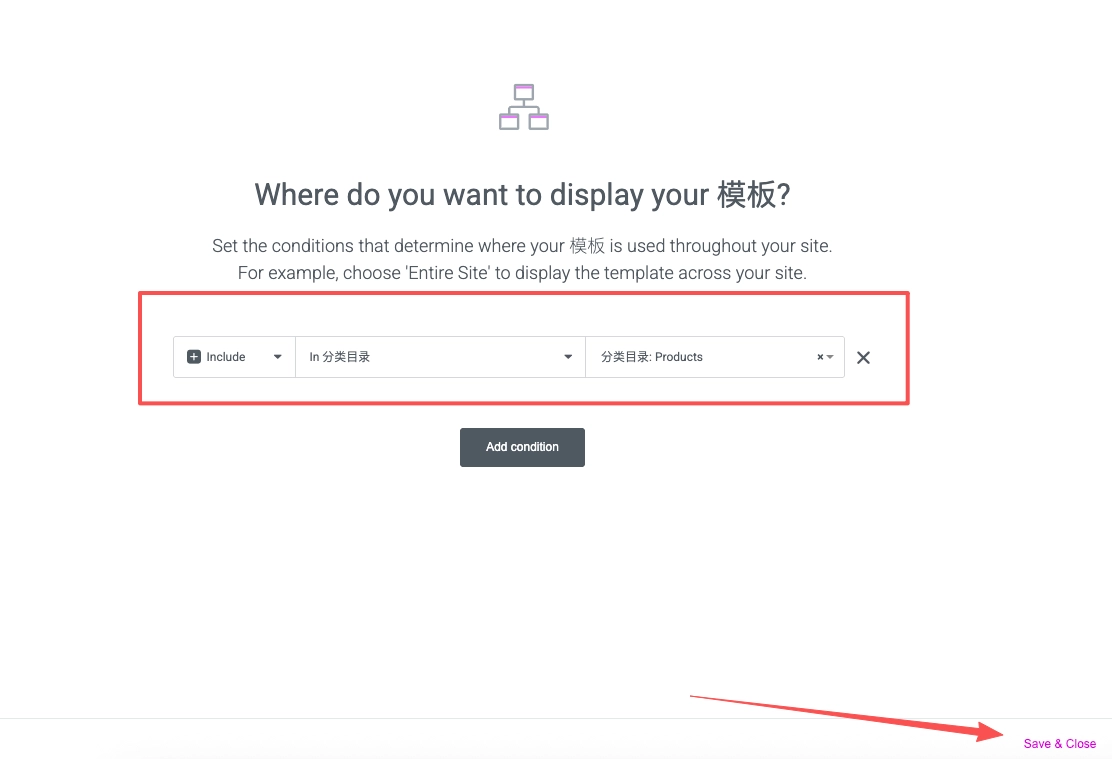
- Set Conditions: Categories ➡ blog.
Single Post (Product Details): Using the same logic, let's create the product details page.
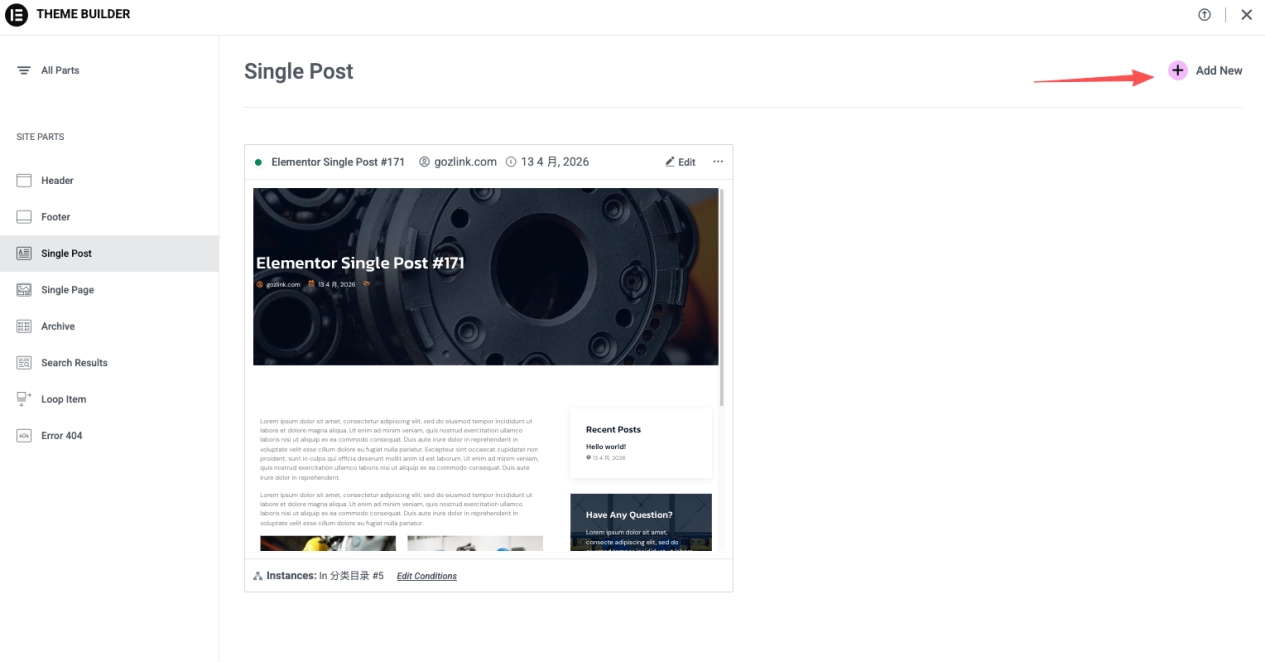
After inserting the single post template, we’ll delete all the content from the left-hand panel. Then, we’ll insert the featured image and post content components. This will serve as a simple product detail page.
Publish and save; display conditions: the "products" category.
Core Technology Value * Global Synchronization: Modify the template once, and the styles of hundreds or thousands of related pages across the entire site will be updated simultaneously. * Visual Closed Loop: Ensure that the headers, footers, and layout logic are completely consistent from the home page to the deepest-level product detail pages. * Dynamic Population: The system automatically extracts text and images from the “Articles” section in the backend and populates them into preset templates, achieving a complete separation of content management and visual presentation.
At this point, the website’s underlying architecture, content categorization, and overall visual system have all been fully integrated.
📝 Step 7: Add Product and Blog Content
1. Publish Blog Posts
The blog is primarily used to share industry news, technical insights, and company updates, with the aim of establishing professional credibility.
- Create a New Post: Click in the admin panel “Articles -> Write an Article” 。
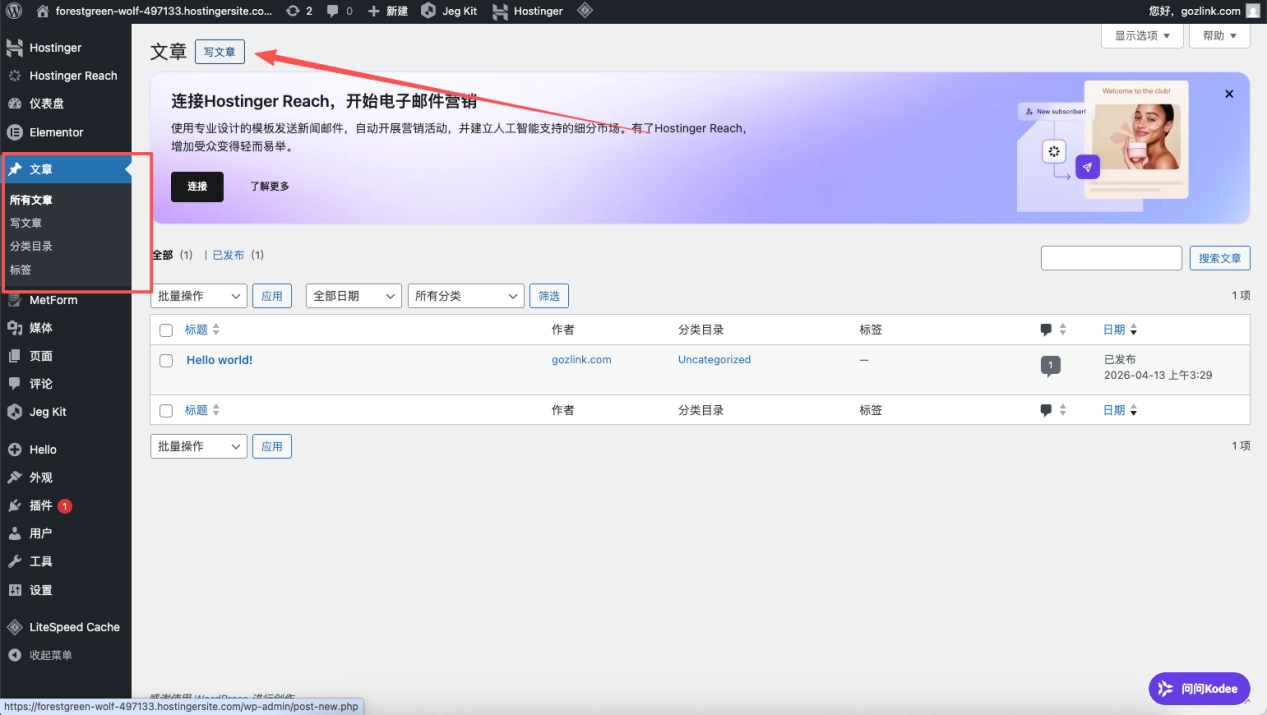
- Input Content :
- Title: SEO-friendly titles that include industry keywords.
- Main Text: Write using the native WordPress editor or Elementor; we recommend including H2/H3 subheadings. Here, we’re using Gemini to help us write a blog post, and you can see that Gemini automatically generates the title and body text. The body text also includes strictly formatted H2/H3 subheadings.
When it comes to handling long SEO articles and generating professional-grade product images, Gemini Pro is in a league of its own—it’s definitely the top choice for website builders. Many beginners might get stuckCan't upgrade to these Pro versions of AI accounts without an international credit card?Here’s a top-up service I’d like to share with everyone—Interstellar Screening Room . This is an extremely reliable platform for sharing and subscribing to overseas accounts; they can top up your account directly, which is very convenient.

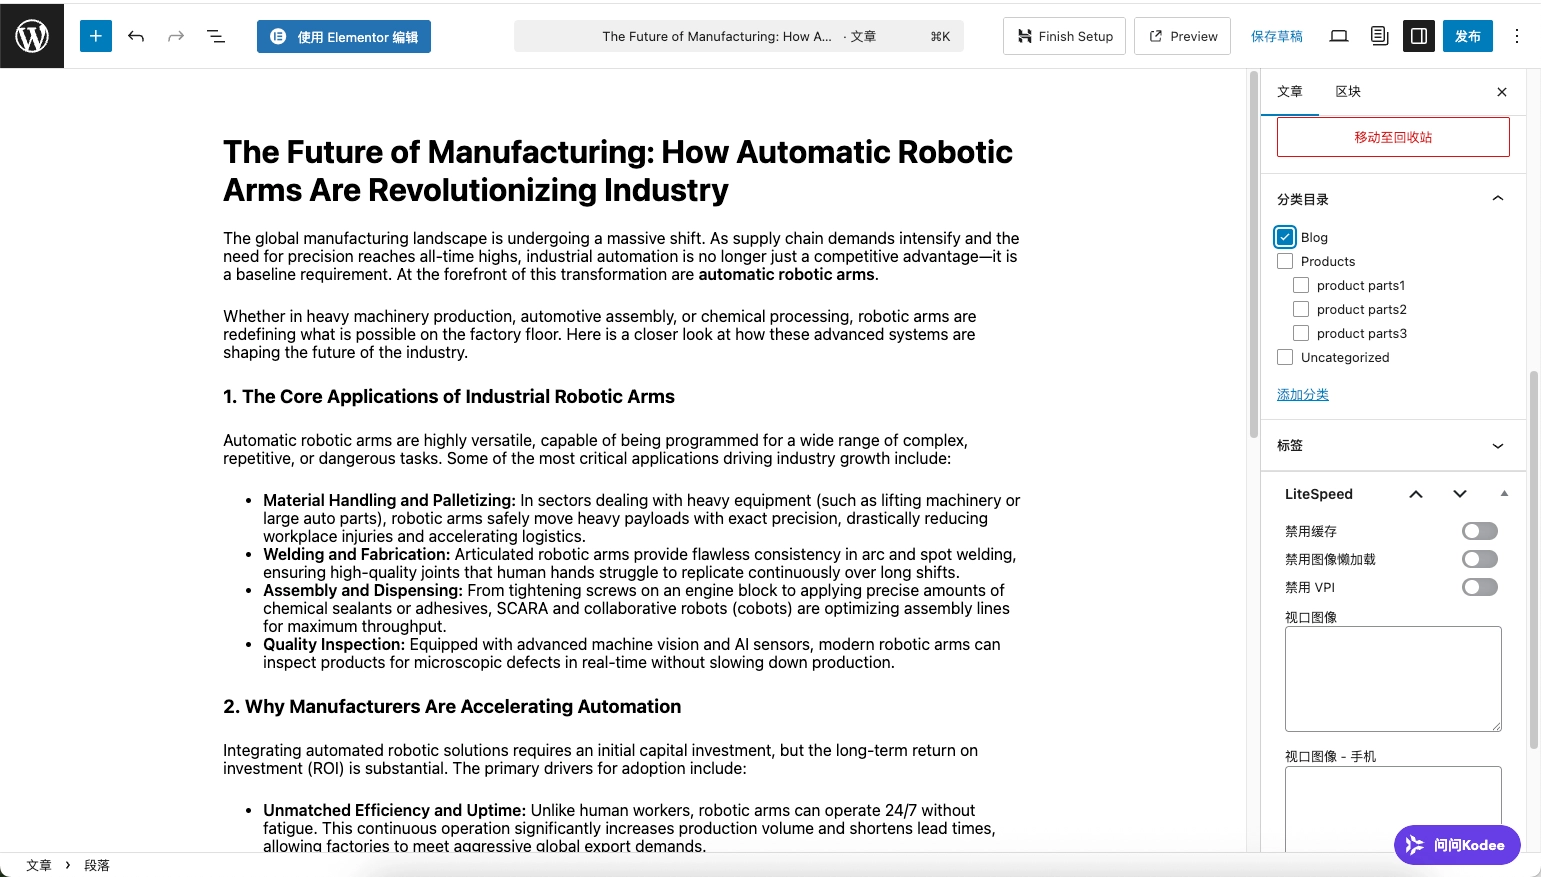
- Paste the blog title and body text into the admin panel,Category: Be sure to check "Blog". The post will only appear on the blog list page if this option is checked.
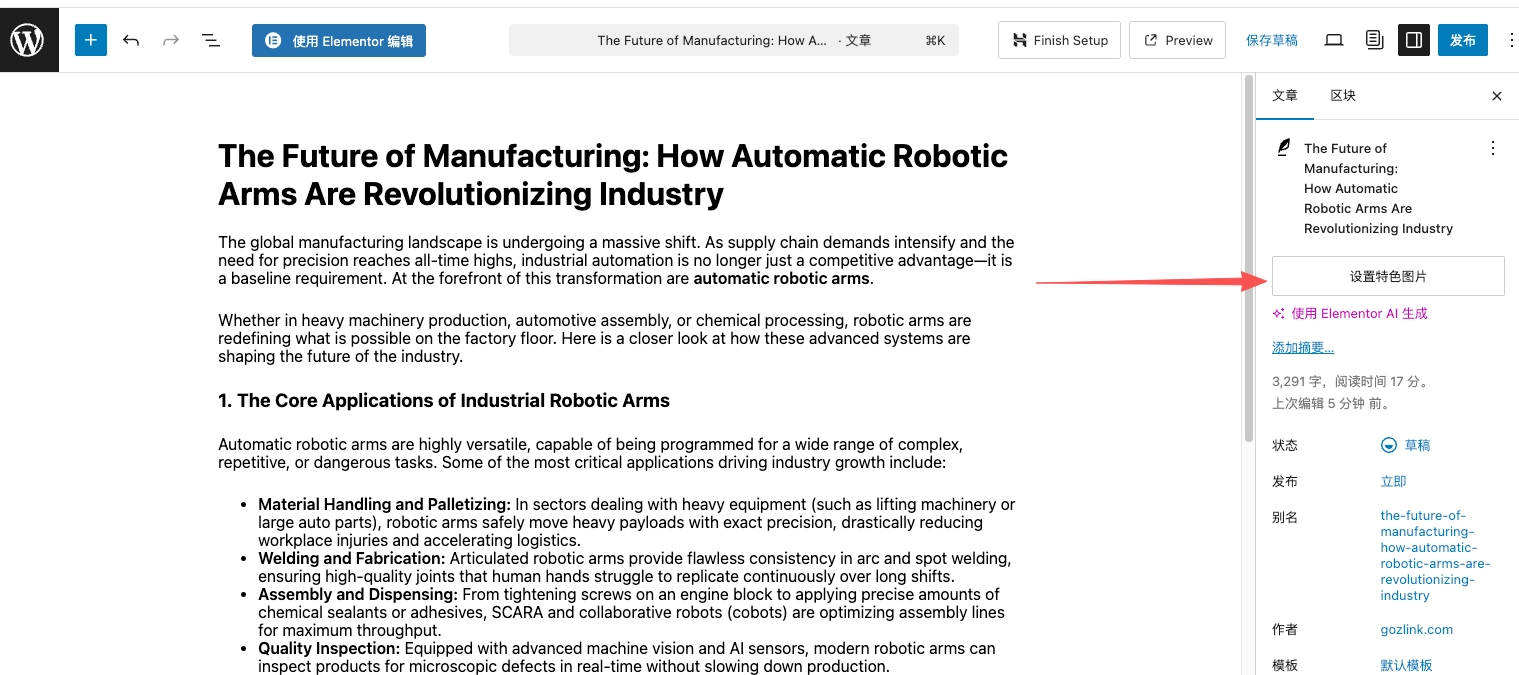
- Featured Image: Upload a cover image that is approximately 1200×800px. This is the only source used for the preview image displayed on the list page.

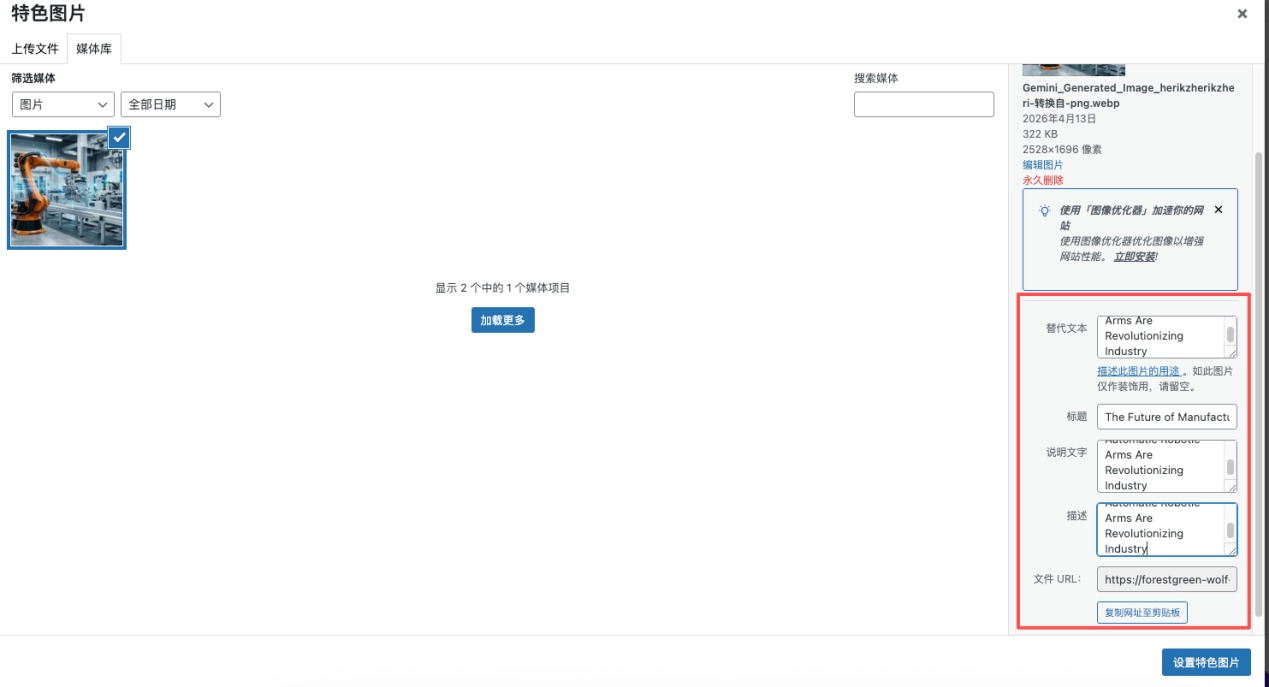
- Drag and drop the image you just created for your blog post. We recommend converting the file to WebP format to improve your website’s loading speed. You can directly set the “Alternative Text” and “Title” fields on the right to match your blog post’s title, which helps with SEO optimization.
- Published: Click “Post” in the upper-right corner.
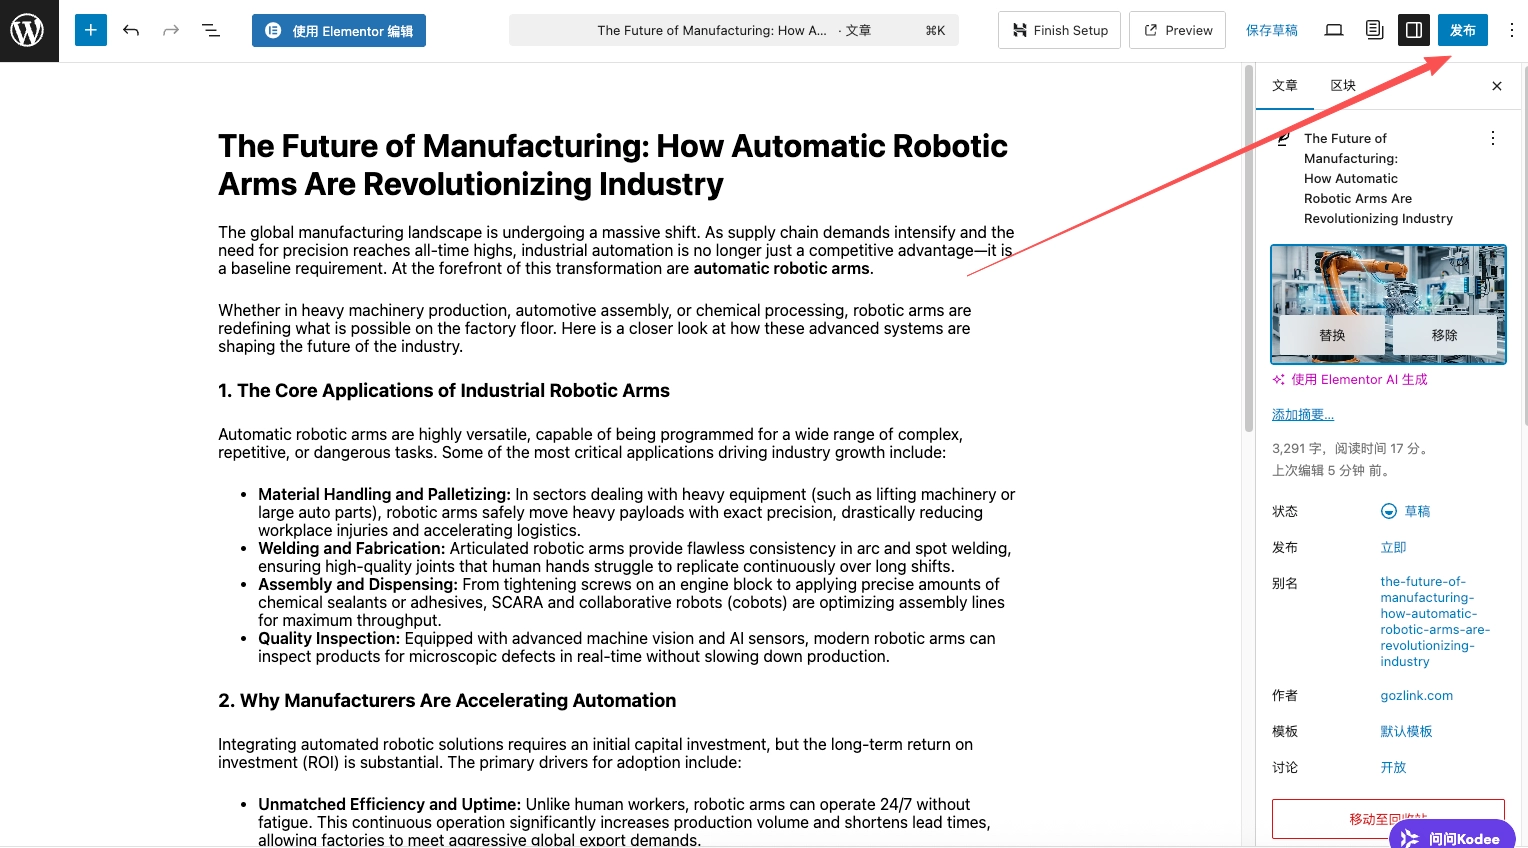
- After publishing, click "View" to confirm that the app has been assigned to a category.

2. Post Product Content (Product Posts)
Under the B2B model, we publish our products as “articles” to take advantage of their excellent SEO crawlability and categorization and filtering capabilities.
- Create a New Post: Click in the admin panel “Articles -> Write an Article” 。
- Data Entry Specifications: For this demonstration, we’ll also use AI to write the product details. When building your website, you can send your product’s basic information and images to Gemini—this will help generate more authentic product descriptions.
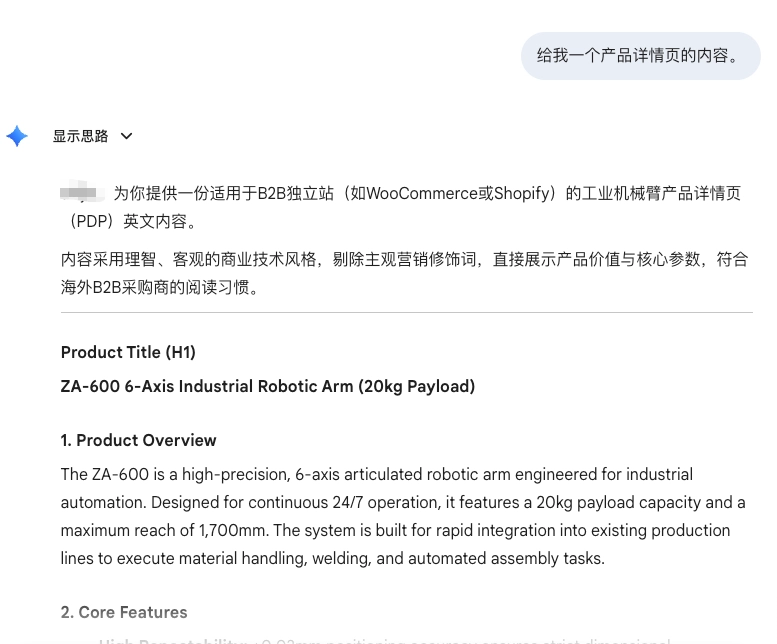
- Title: Full Product Name + Core Model Number.
- Main Text: We recommend entering the parameters (Technical Specifications) in a table format and inserting product detail images.
- Key Settings :
- Category List: Check the box next to "Product" and its corresponding subcategory (such as "Industrial Robots").
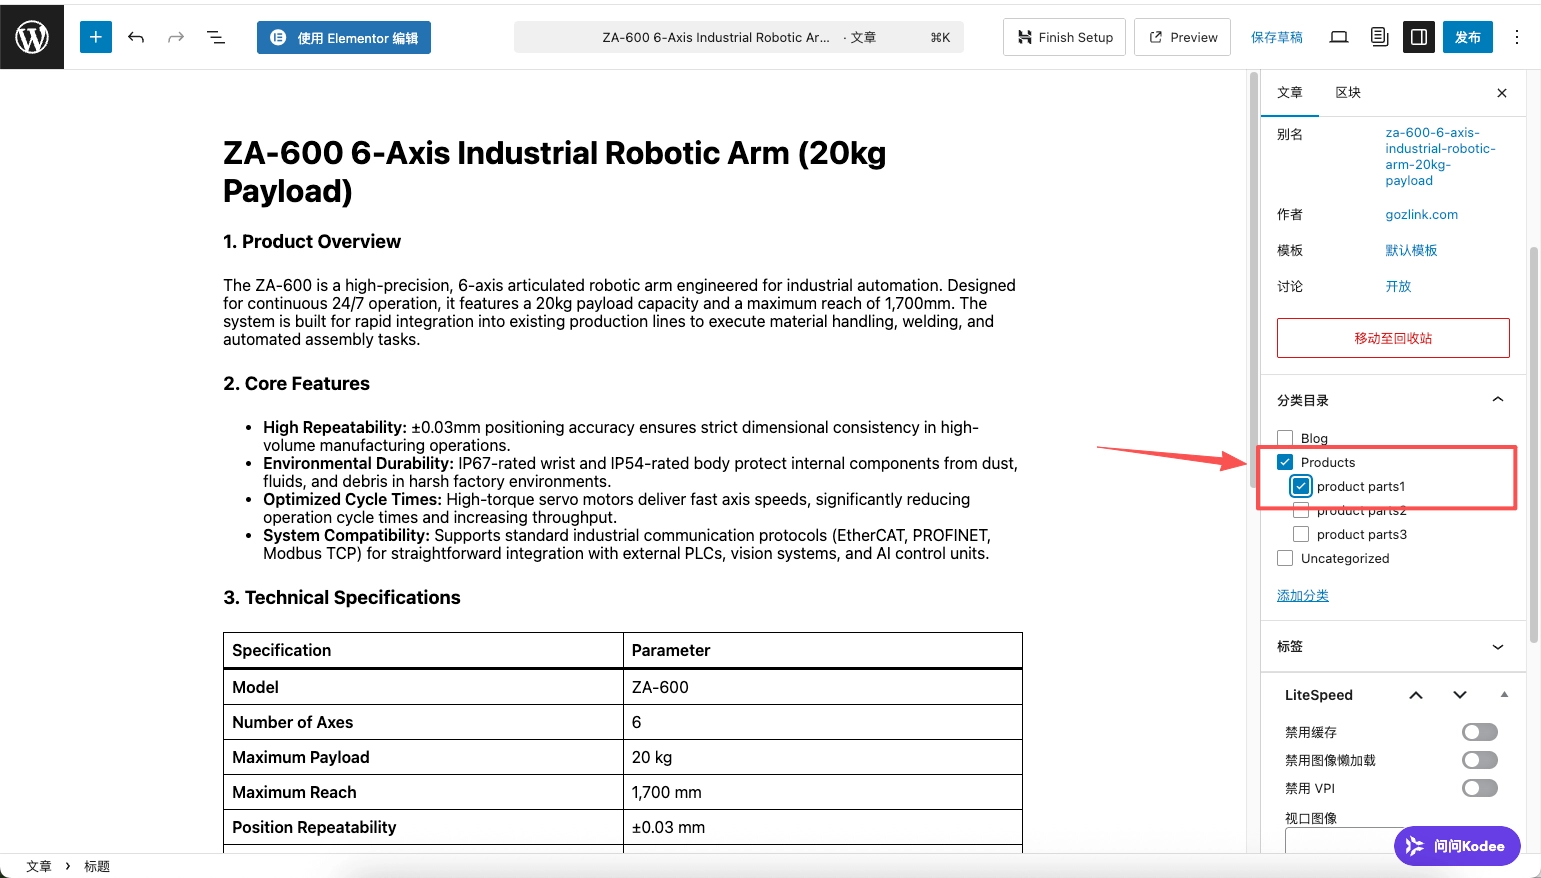
- Featured Image: Use a white background or a clean, real-life background image (for this demonstration, we’ll continue using the image generated earlier). The aspect ratio of product cover images across the entire site must be consistent (e.g., uniformly set to 1:1 or 4:3) to prevent misalignment on list pages.
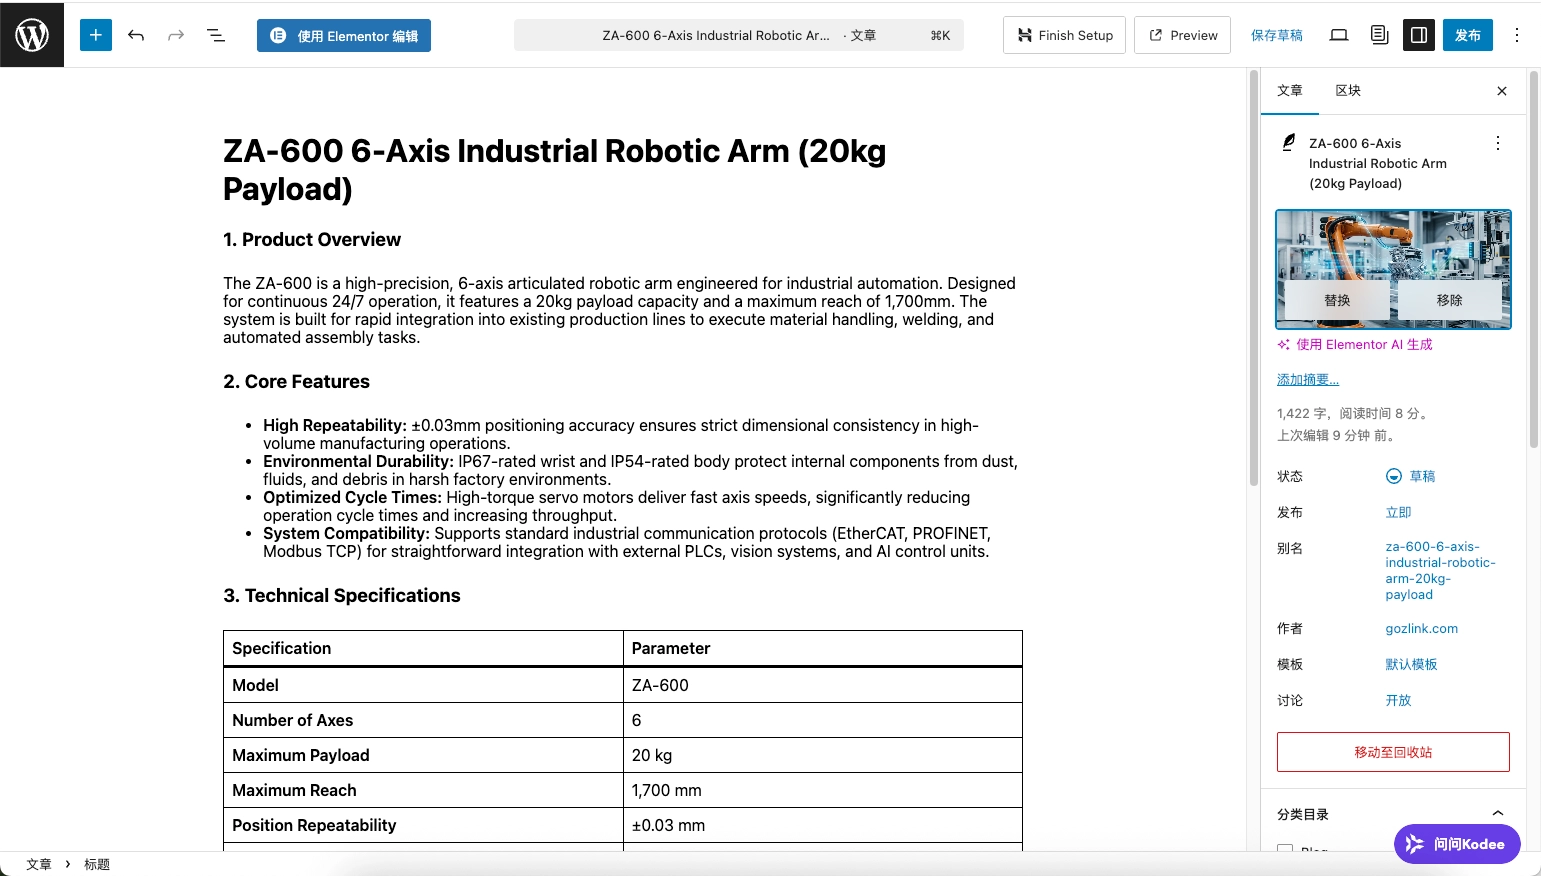
- Published: Click “Publish.” With that, the basic content framework of the website is now fully set up.
🌐 Step 8: Site-wide Branding and Final Launch Configuration
1. Site-wide Identity and Site Settings (Site Identity)
Log in to the WordPress admin panel and findSettings - General, add the site title, subtitle, and site icon.
- Site Title: Enter a brand or company name (for example, ZLink Studio). This title will appear at the top of the browser tab.
- Site Tagline: Enter a one-sentence description (for example, “Professional B2B Industrial Solutions”).
- Site Icon (Favicon): Instructions: Upload a square image that is at least 512×512 pixels.
- Presentation Results: This icon will appear on the left side of the browser tab, in the bookmarks bar, and as a shortcut icon on your phone's home screen.
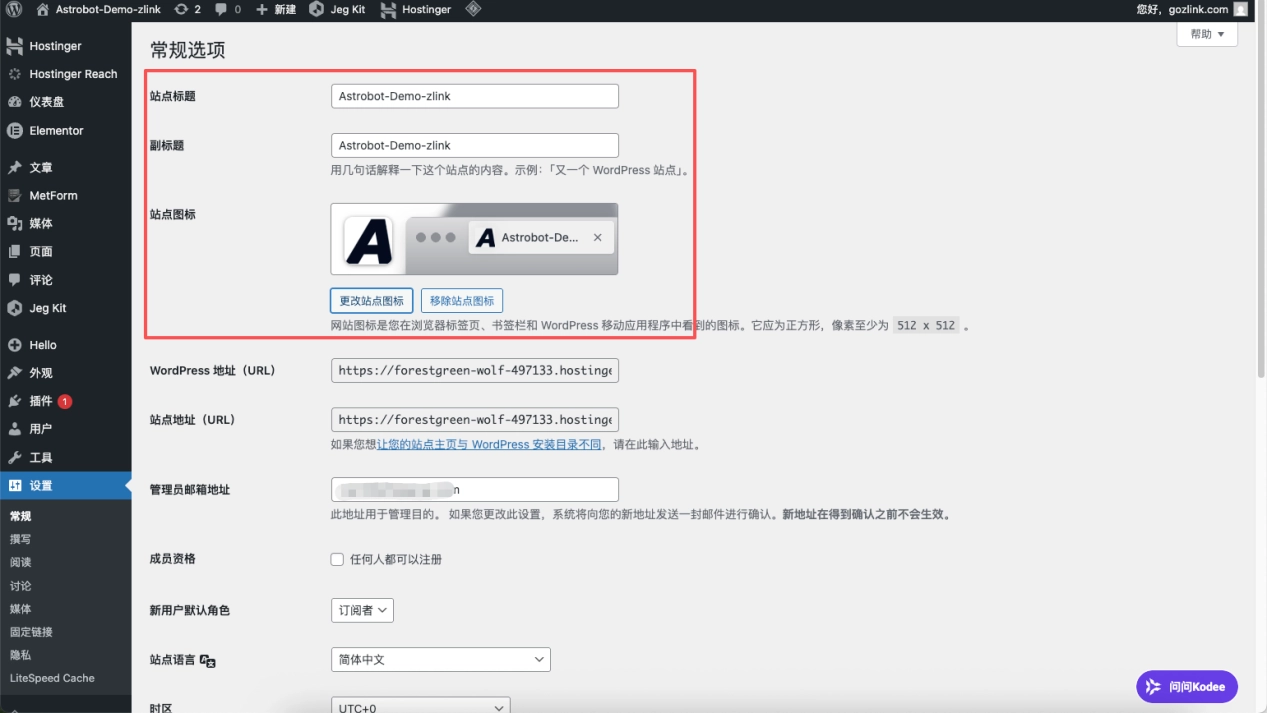
Click "Save Changes" at the bottom.
2. Set a Static Front Page
To ensure that when visitors enter the main domain (such as gozlink.com), they are directed to the designated home page rather than the default article list page, configure the following:
- Path: Return to the WordPress dashboard and click “Settings -> Reading” 。
- Core Settings :
- Under “What appears on your home page,” select “A static page” 。
- Home: Select the "Home" page you created from the drop-down menu.
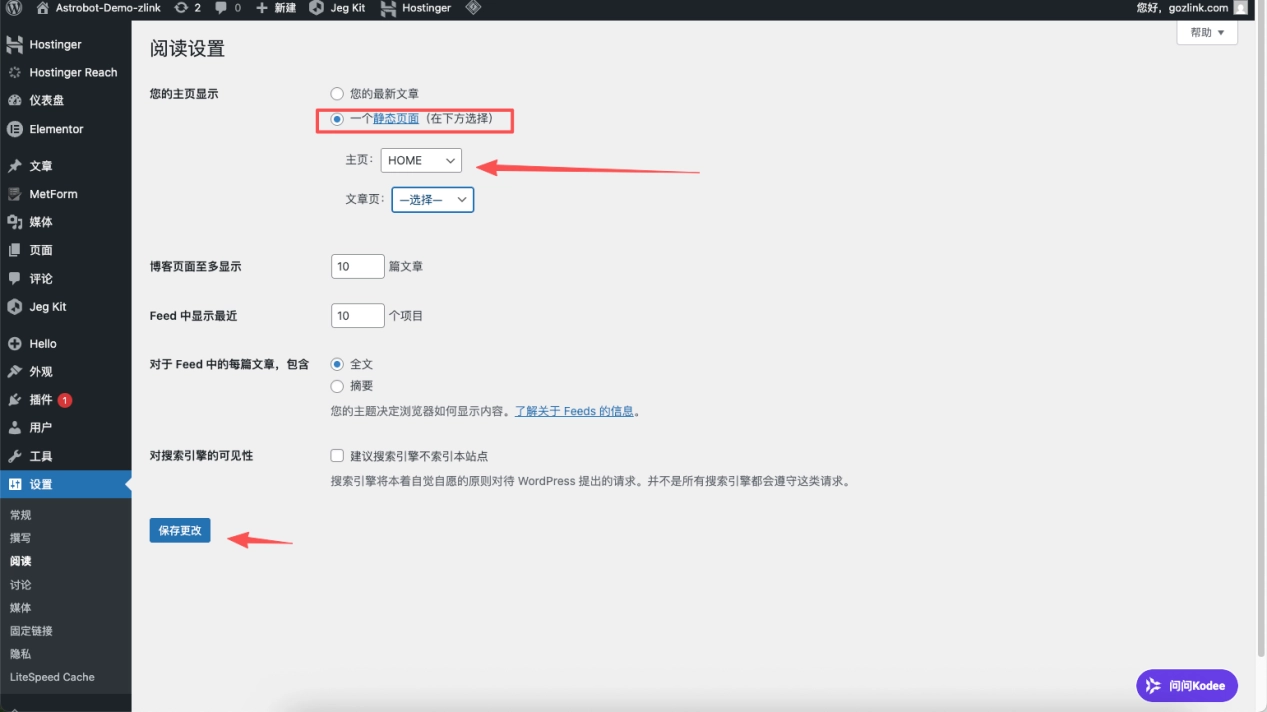
- Save: Click “Save Changes” at the bottom of the page.
3. List of Basic Site Settings
Before the official release, we recommend double-checking the following general WordPress settings:
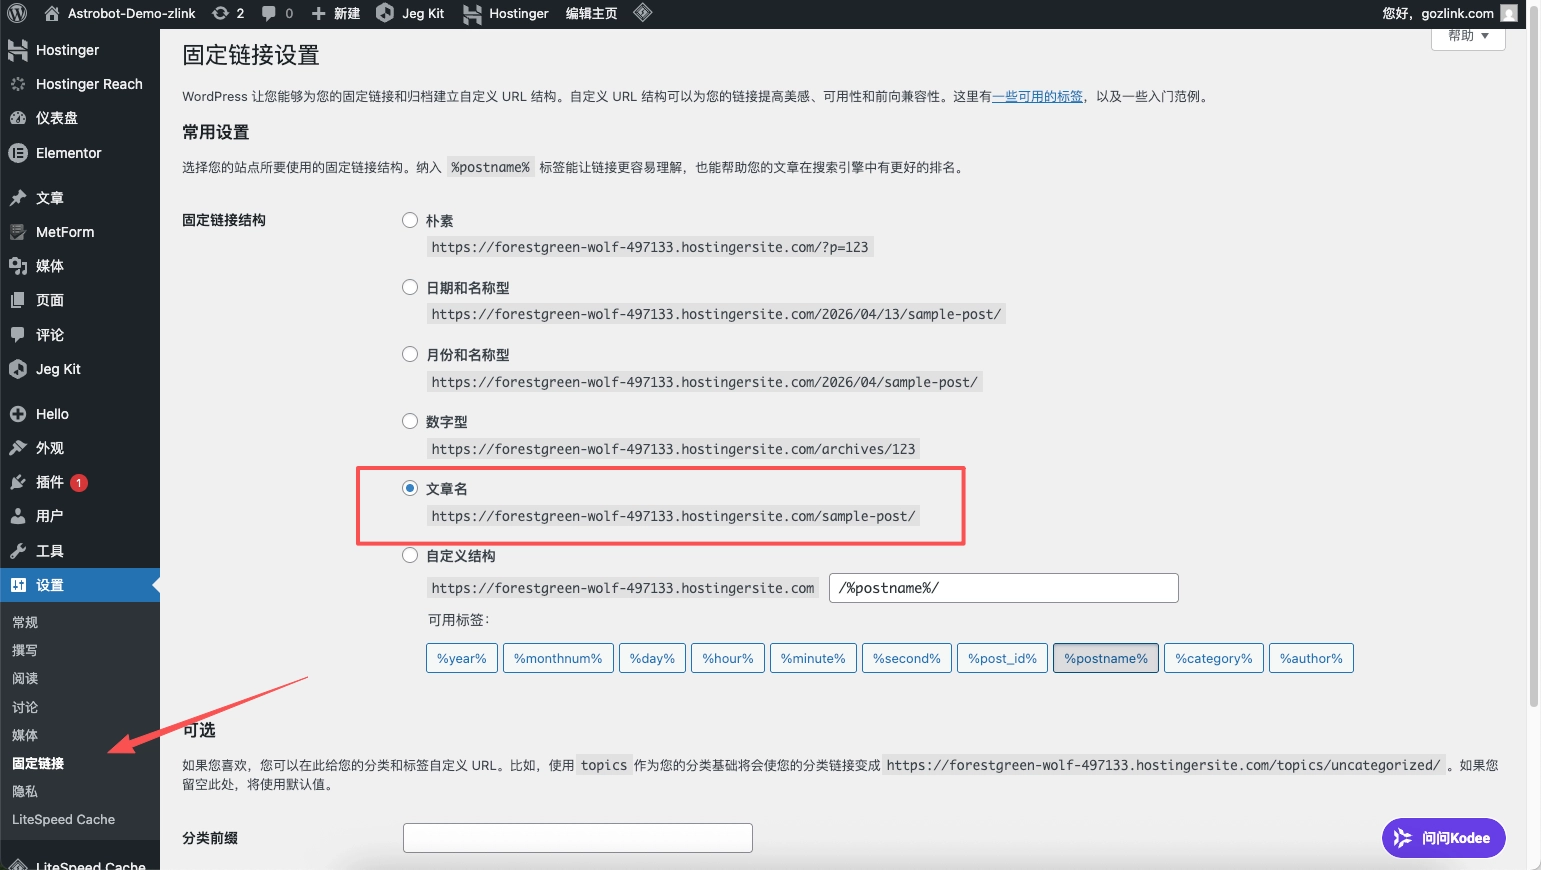
- Permalinks: Go to “Settings -> Permalinks”, making sure to select “Post Name”. This ensures a clean URL structure (such as /product/robots/), which is beneficial for SEO.
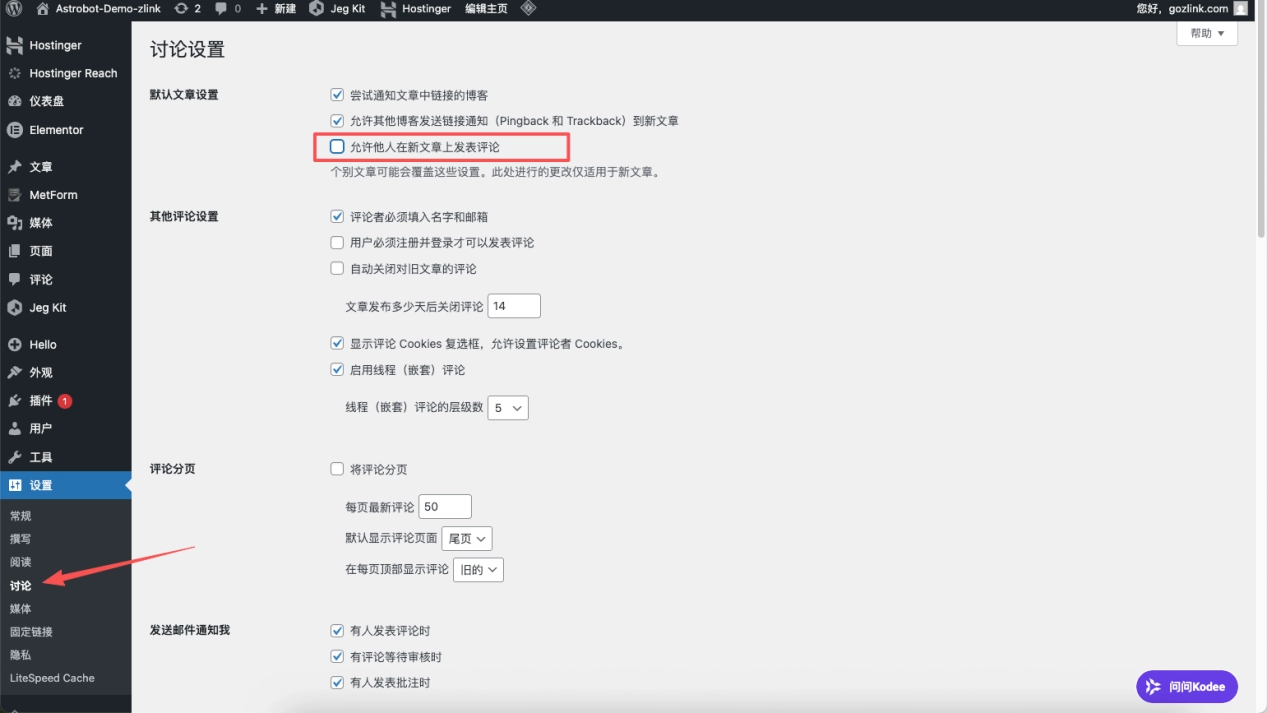
- Discussion Settings (Discussion): Go to “Settings -> Discussion”, For a purely showcase-style B2B website, we recommendUncheck“Allow others to post comments on new articles” to prevent spam comments from piling up.
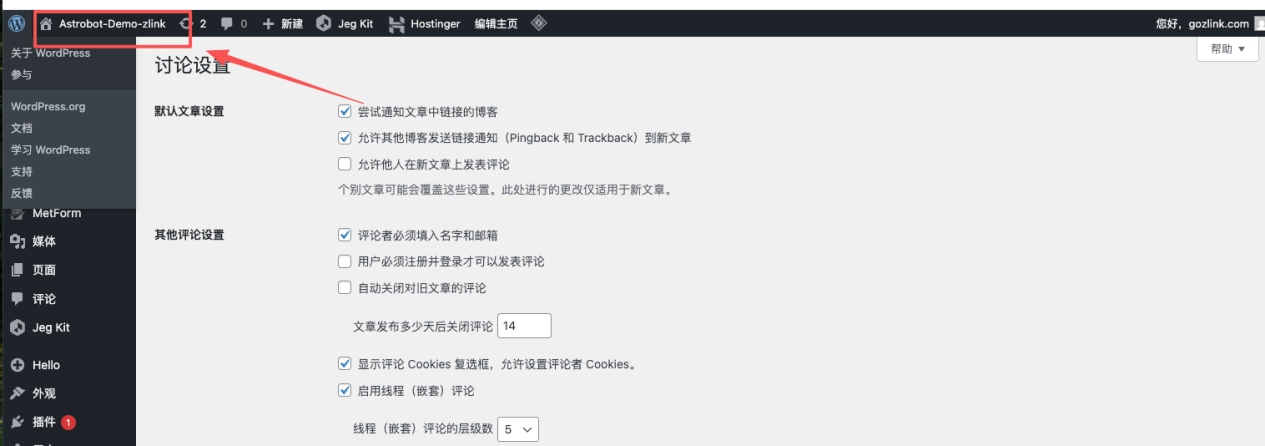
Your B2B standalone website now features a complete brand identity, a clear hierarchical structure, and a dynamic content publishing system. Click on the site name in the WordPress dashboard to view your website.
4. Adjustments and Content Replacements Before Final Launch
- Content Replacement and Link Proofreading : Log in to the WordPress dashboard, click “Pages,” and perform the following steps for core pages such as Home and About Us:
- Launch the editor: Click “Edit with Elementor” below the page title.
- Replace Text/Image: Simply click on the placeholder text or image on the page, then enter your actual copy or upload new media in the left-hand panel.
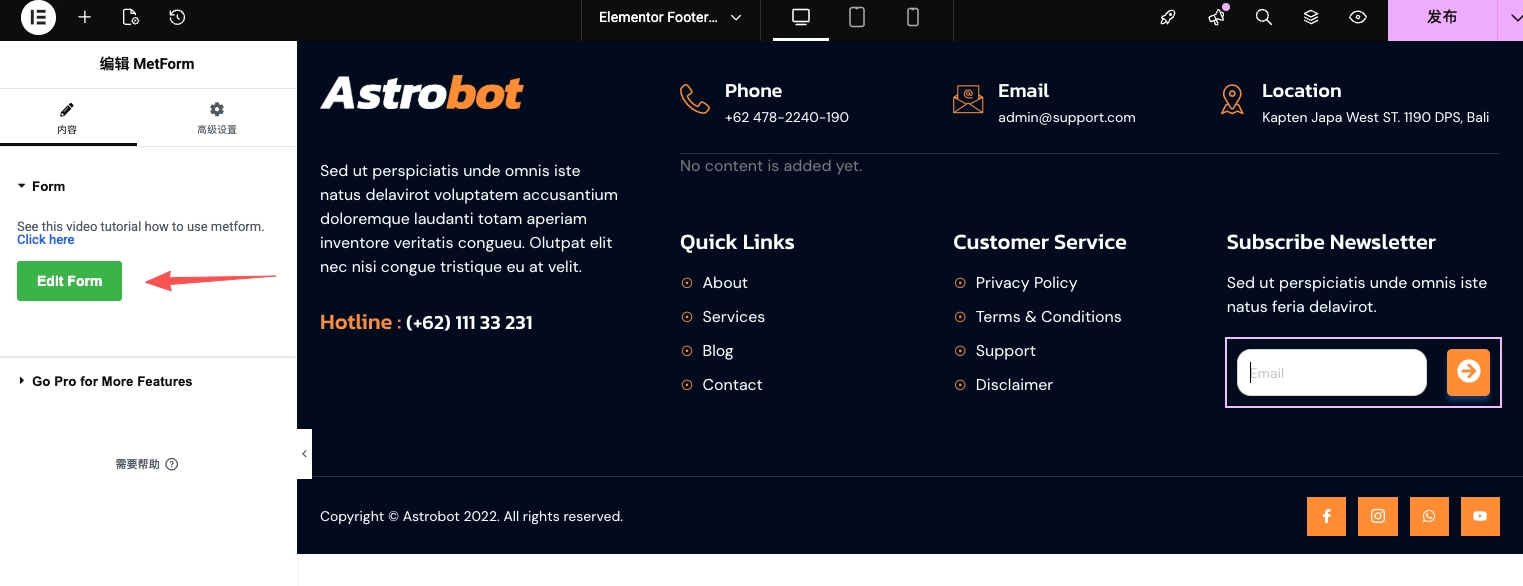
- Edit Button Link: Click the button (CTA) on the page, and enter the corresponding internal page URL (e.g., /contact/) or external link in the “Link” field on the left.Ensure that the `metform` tag is used in all contact forms. For example, in the footer, you need to use Metform to create a new form containing an email field and a submit button to replace the original one, ensuring that all forms are managed through Metform.
- Save: Once you've finished making changes, be sure to click the blue “Update” button in the lower-left corner.
5. Configure SMTP Outgoing Mail Functionality (Key to Preventing Lost Messages)
To ensure that inquiry forms submitted by customers are sent accurately to your email address, you must configure SMTP (rather than relying on the server’s default email sending functionality):
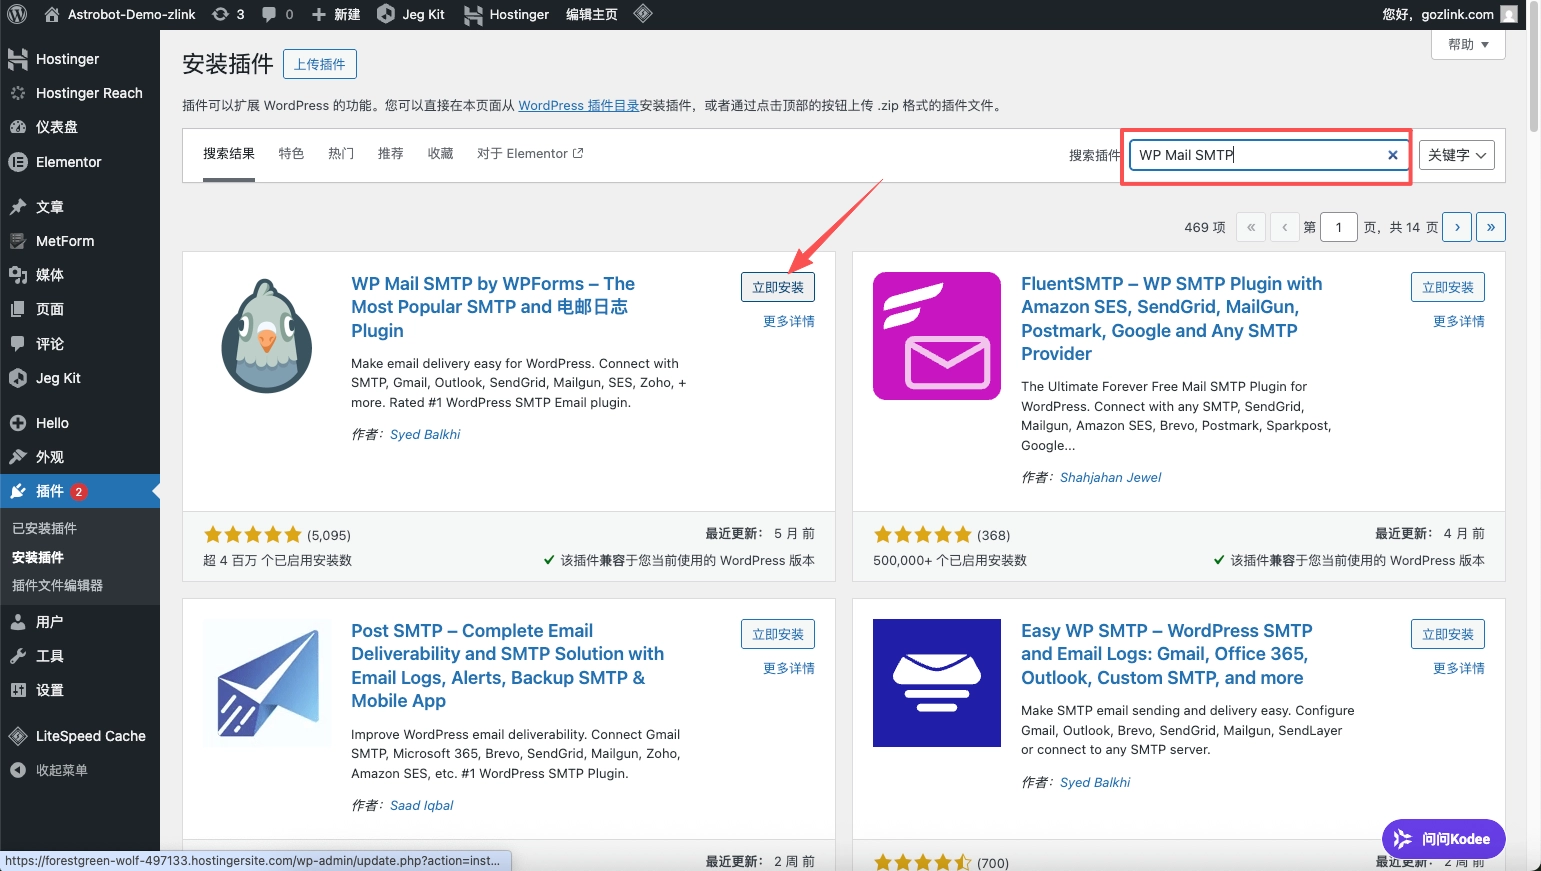
- Install the plugin: Search and install WP Mail SMTP 。
- Configuration Parameters :
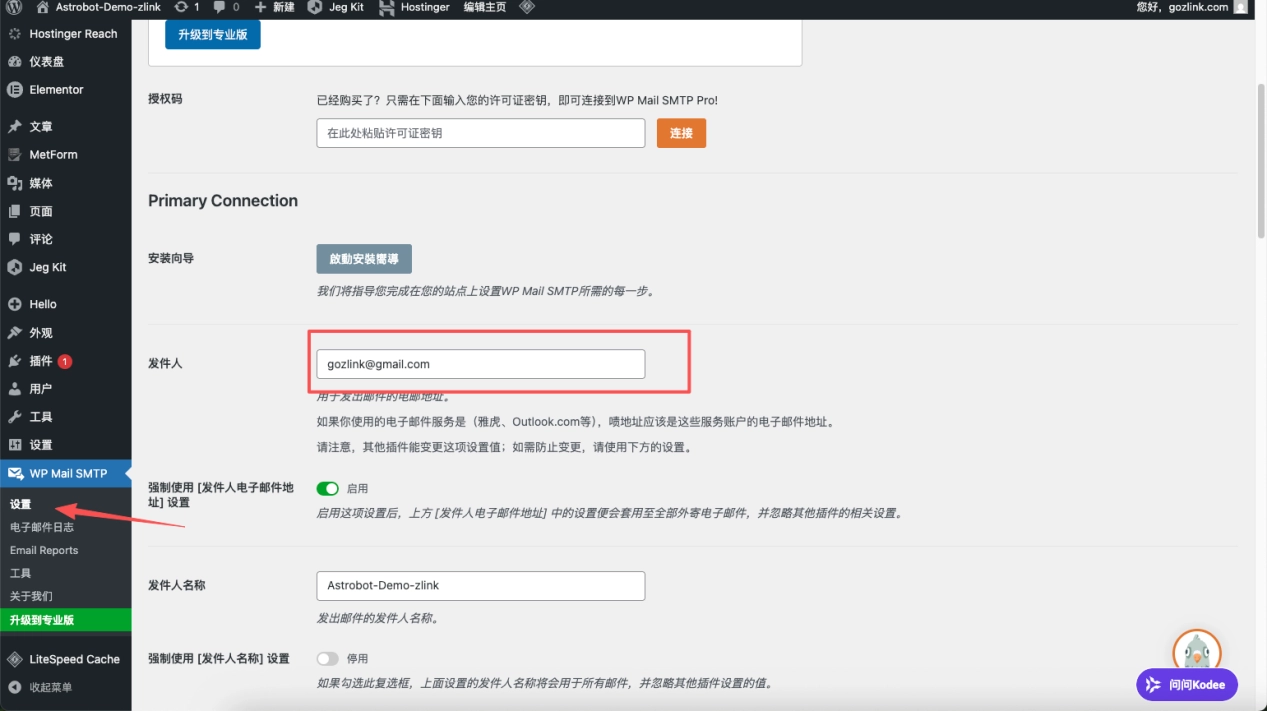
- Select your email service provider (such as Gmail, Outlook, or corporate email).
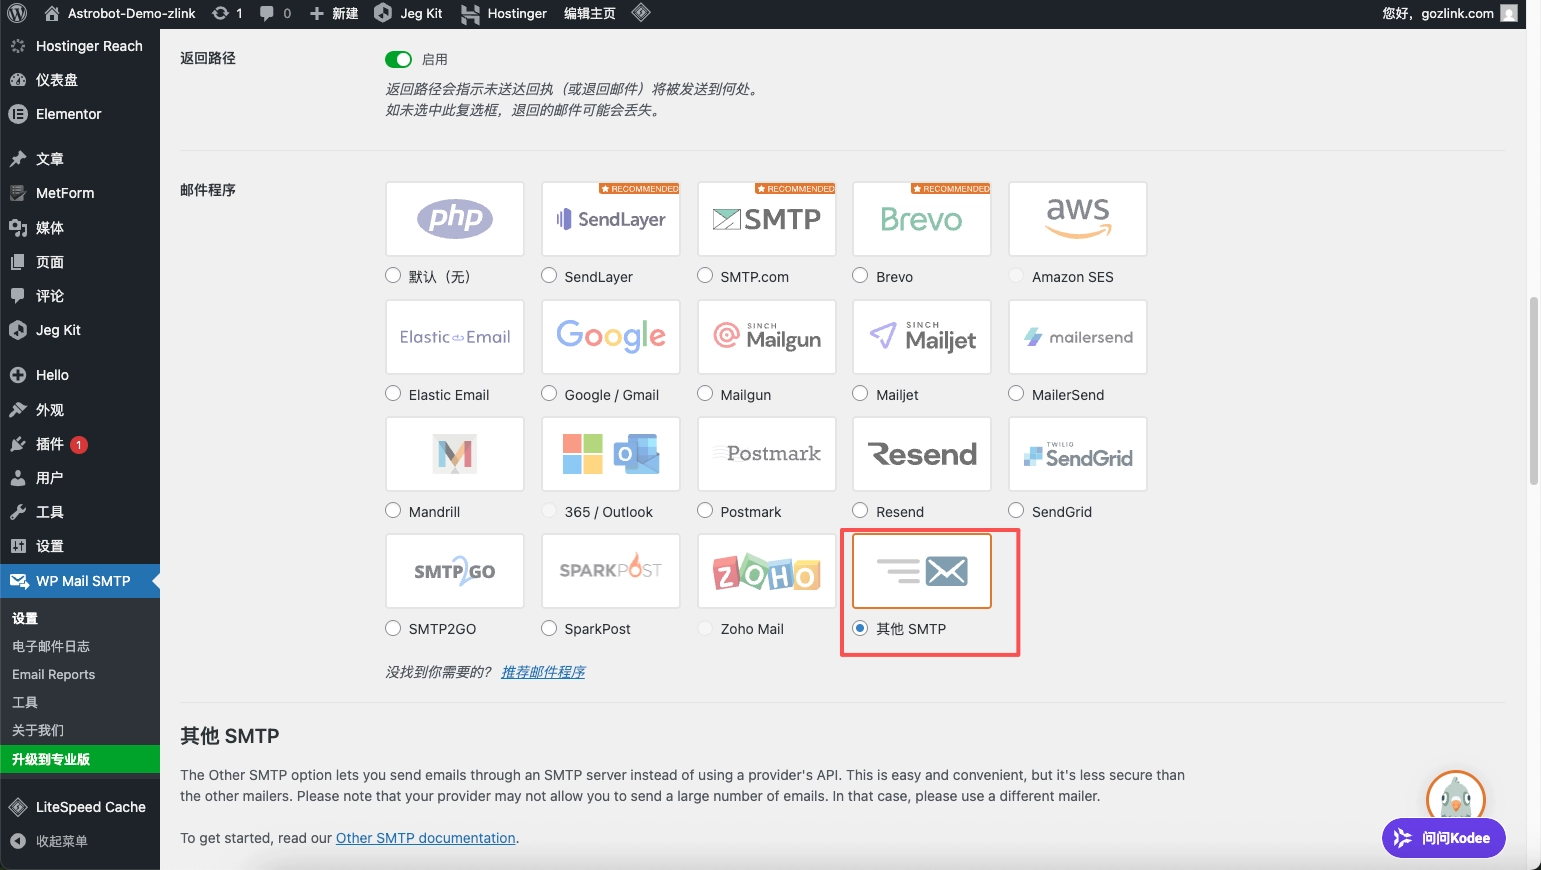
- Enter the SMTP server address, port, and authentication password. Here, we'll use AliMail as an example.
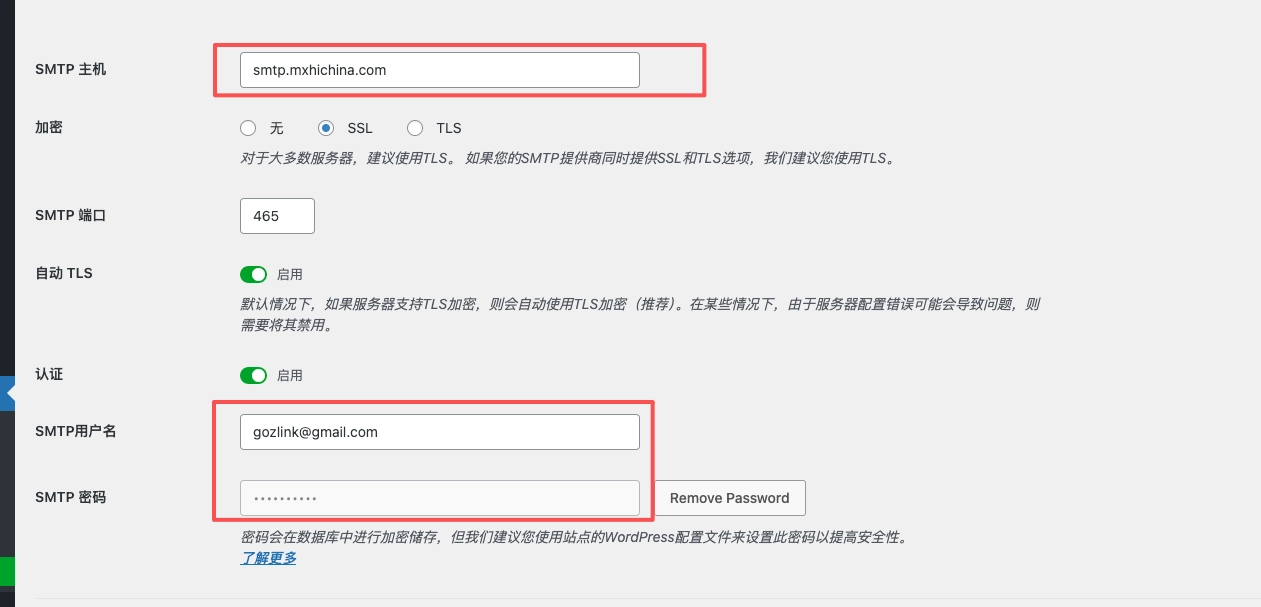
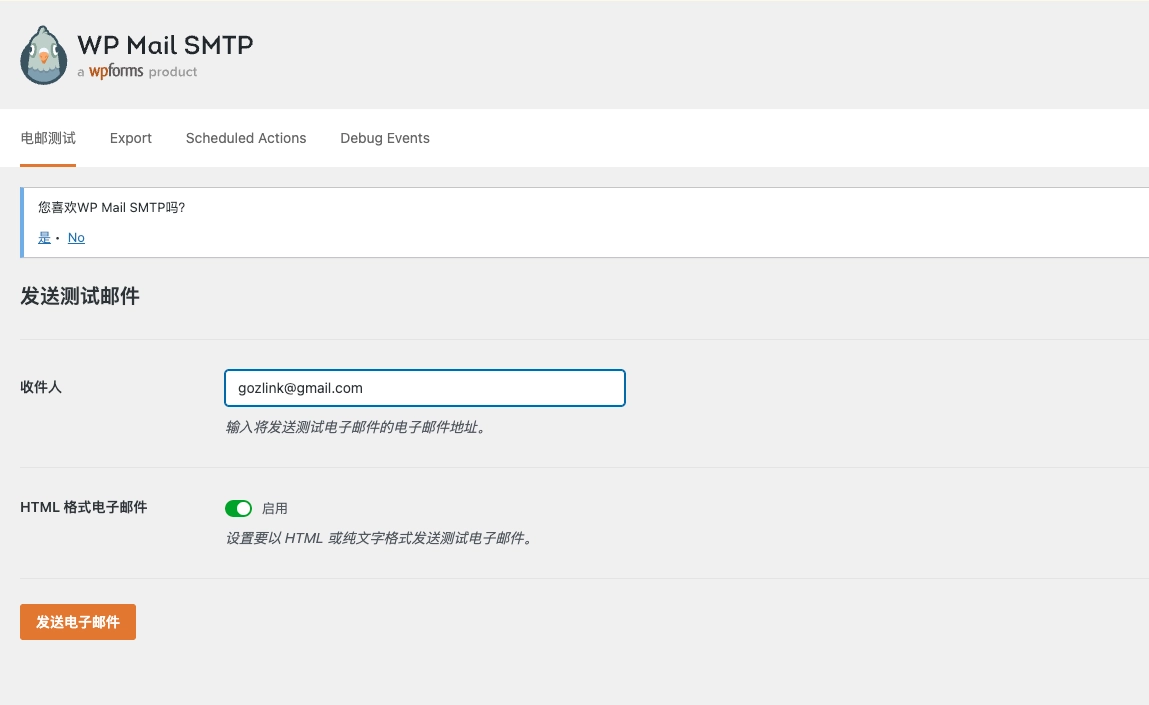
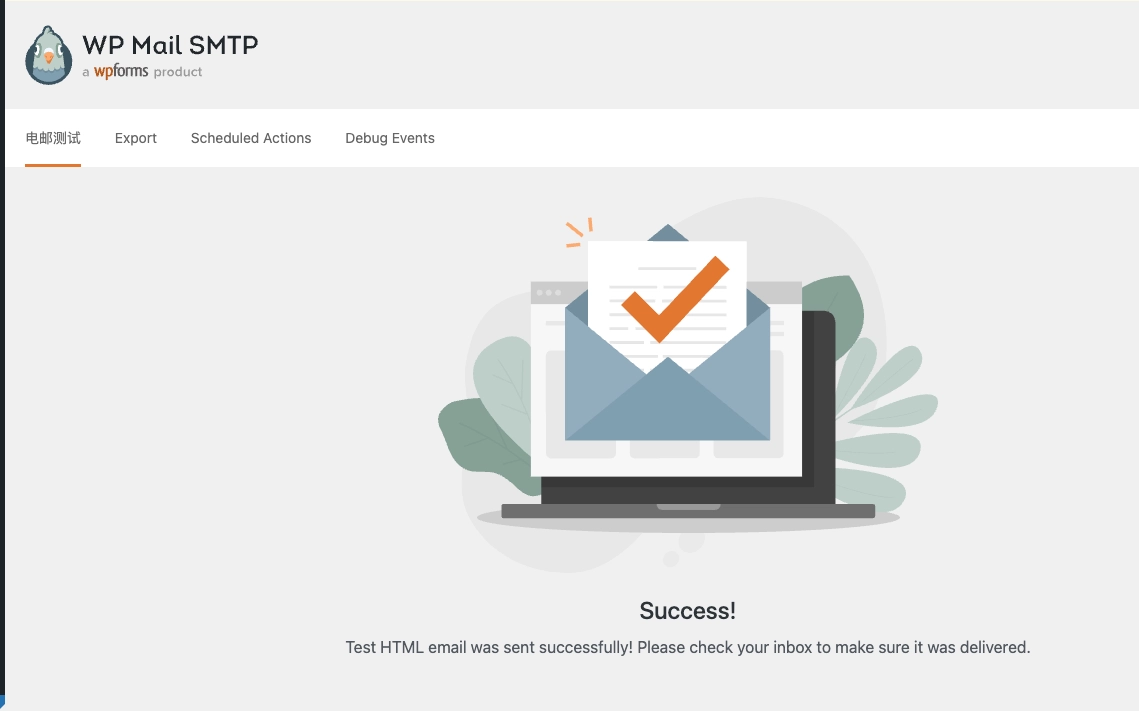
- Test Email: Send a test email via Tools > Email Test to verify that it arrives in the recipient's inbox (including the Junk folder) to ensure that business leads are not lost. A "success" message indicates that the SMTP settings are correct.
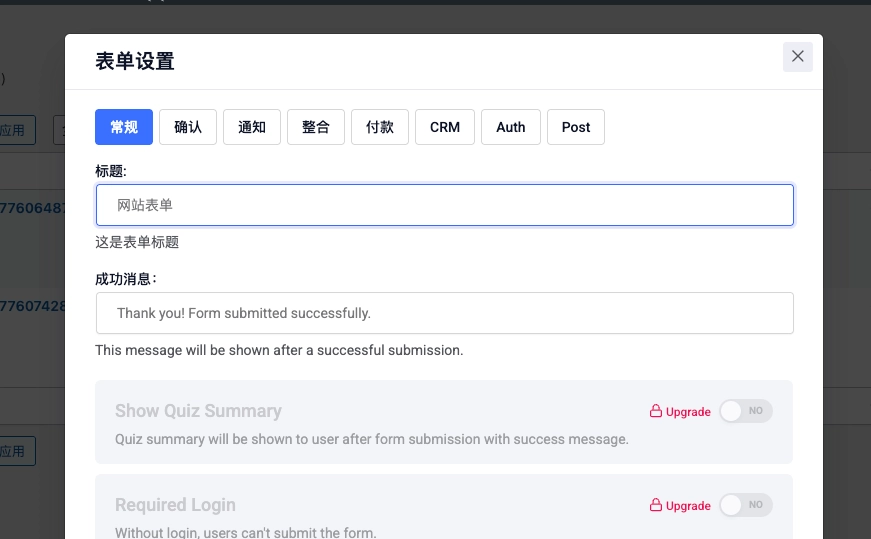
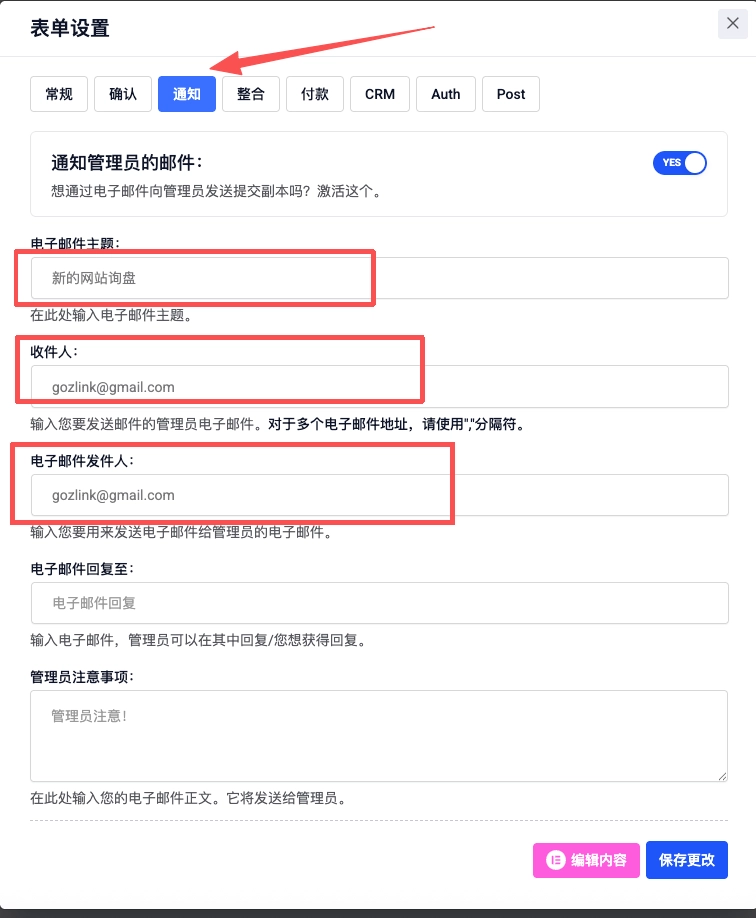
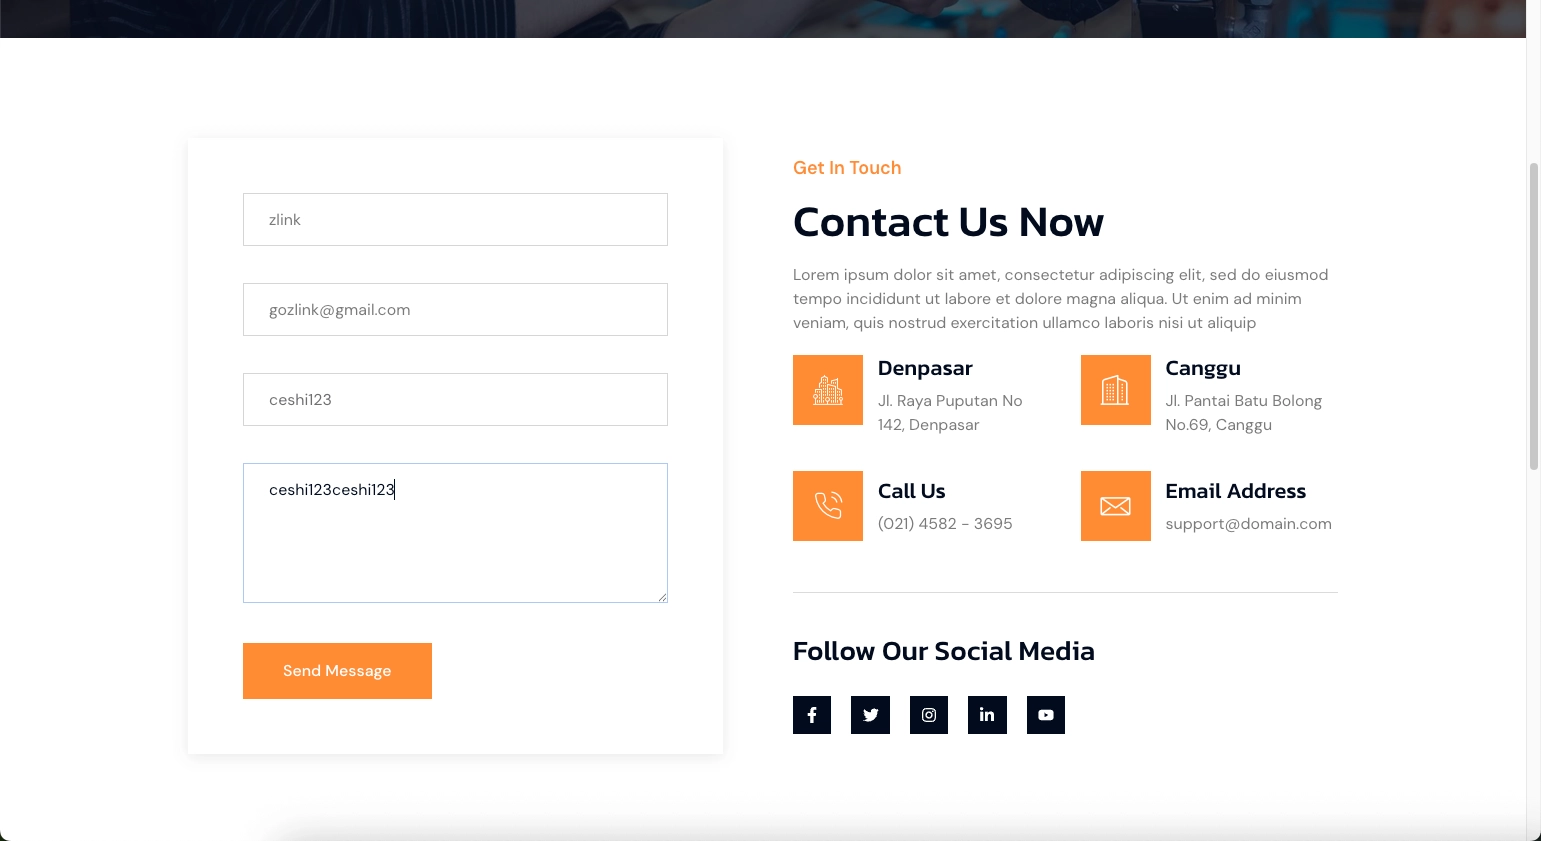
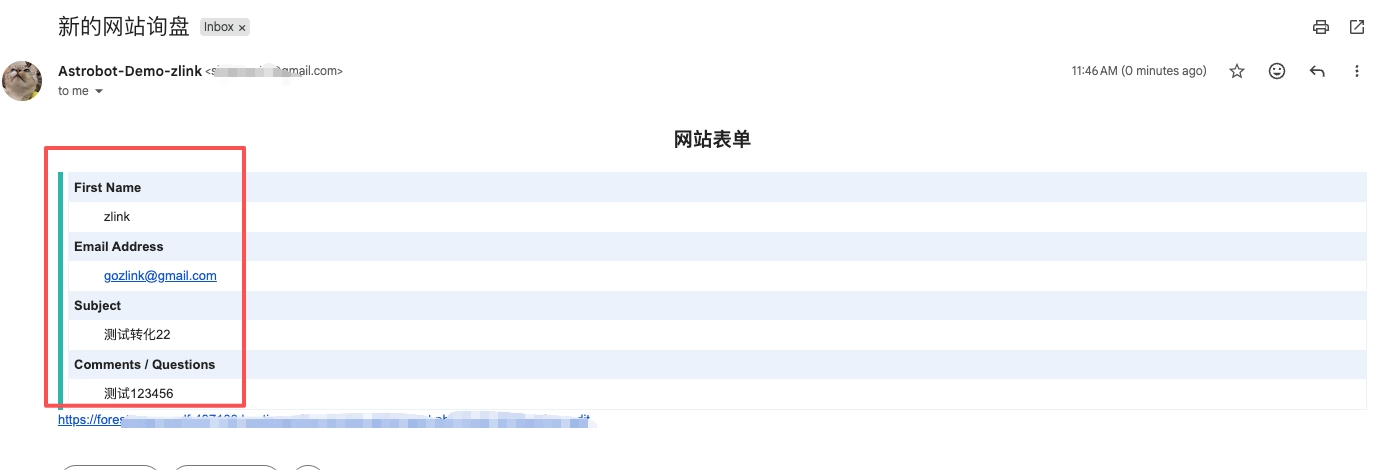
4. Configure the Metform form notification settings; each form must be configured.
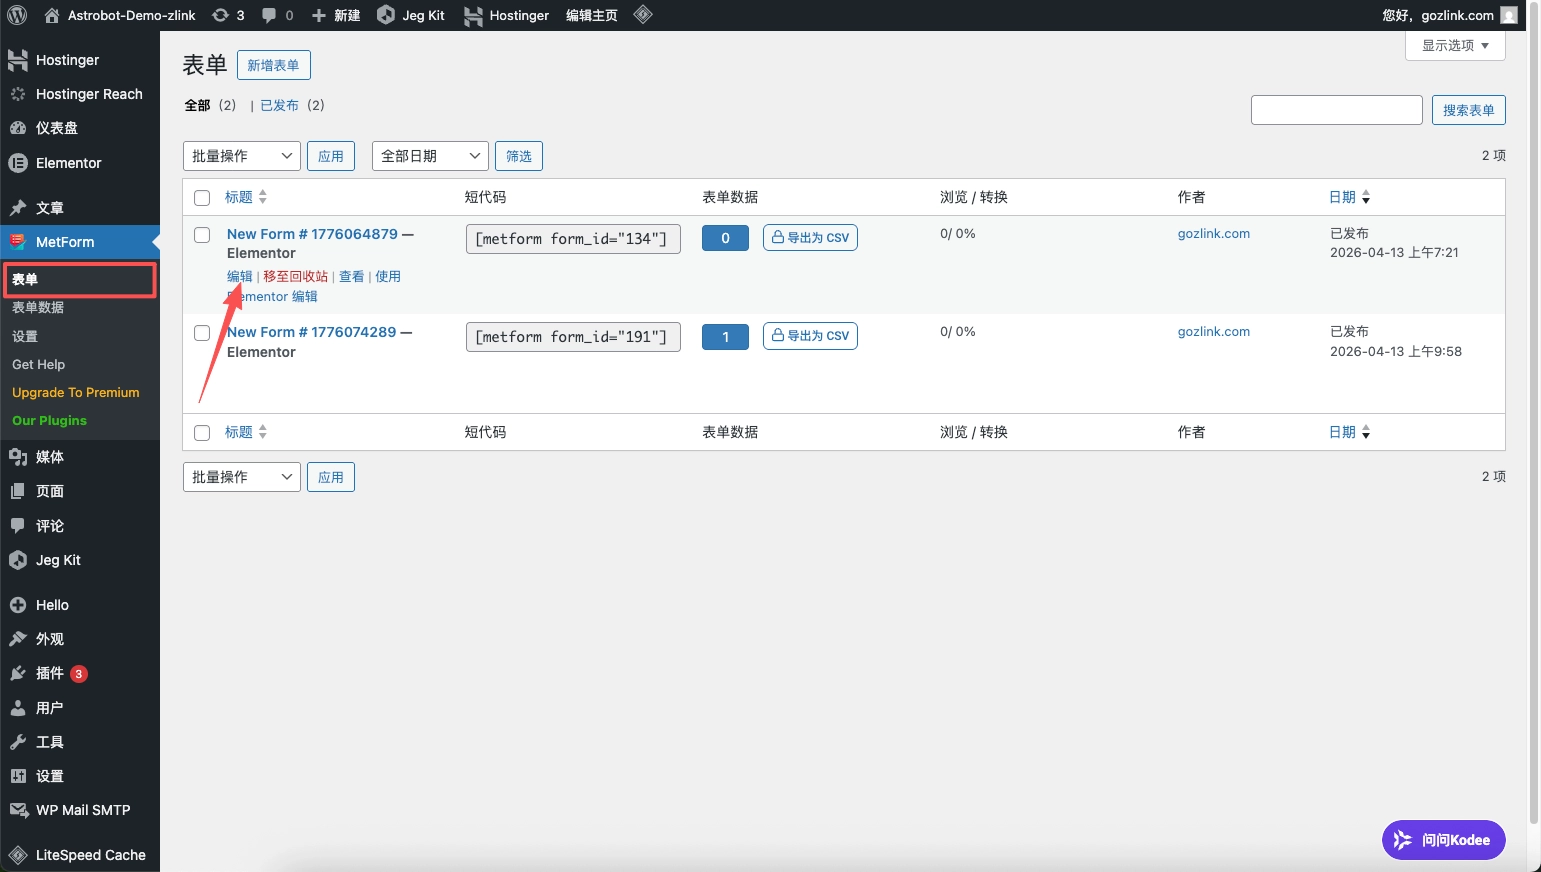
- General: Change the title to "Website Form"
- Notice: Please change the email subject line to "New Website Inquiry" and update both the recipient and sender fields to your business email address.
- After saving your changes, go to the "Contact Us" page on your website and submit the form to test it.
- Check your work email to see if you've received any form submissions.
6. Domain Name Resolution and Official Launch
Once the website content has been updated, perform a final verification of the configuration:
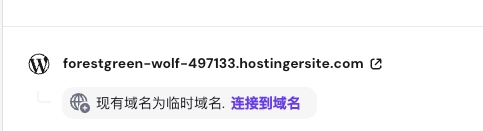
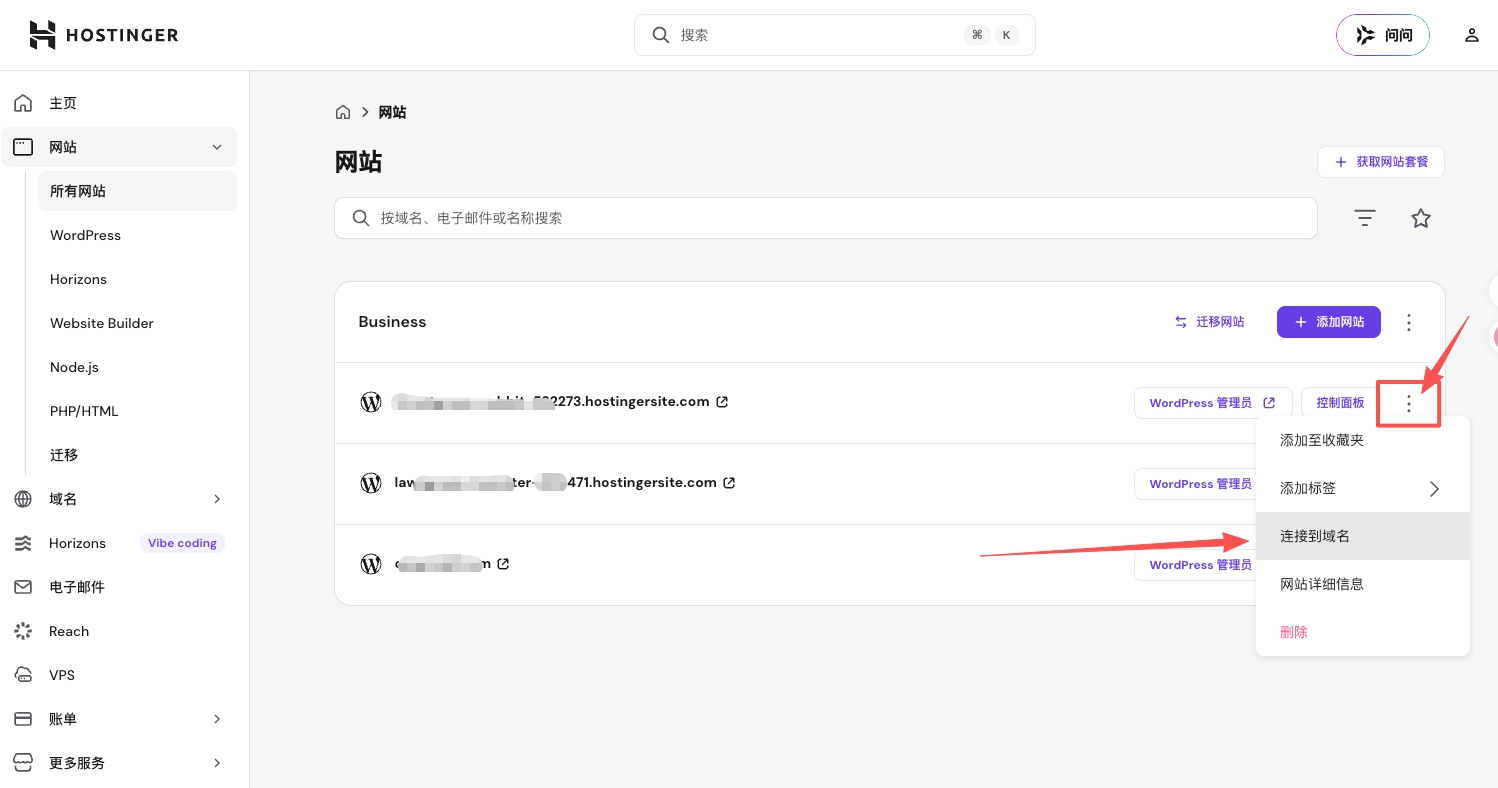
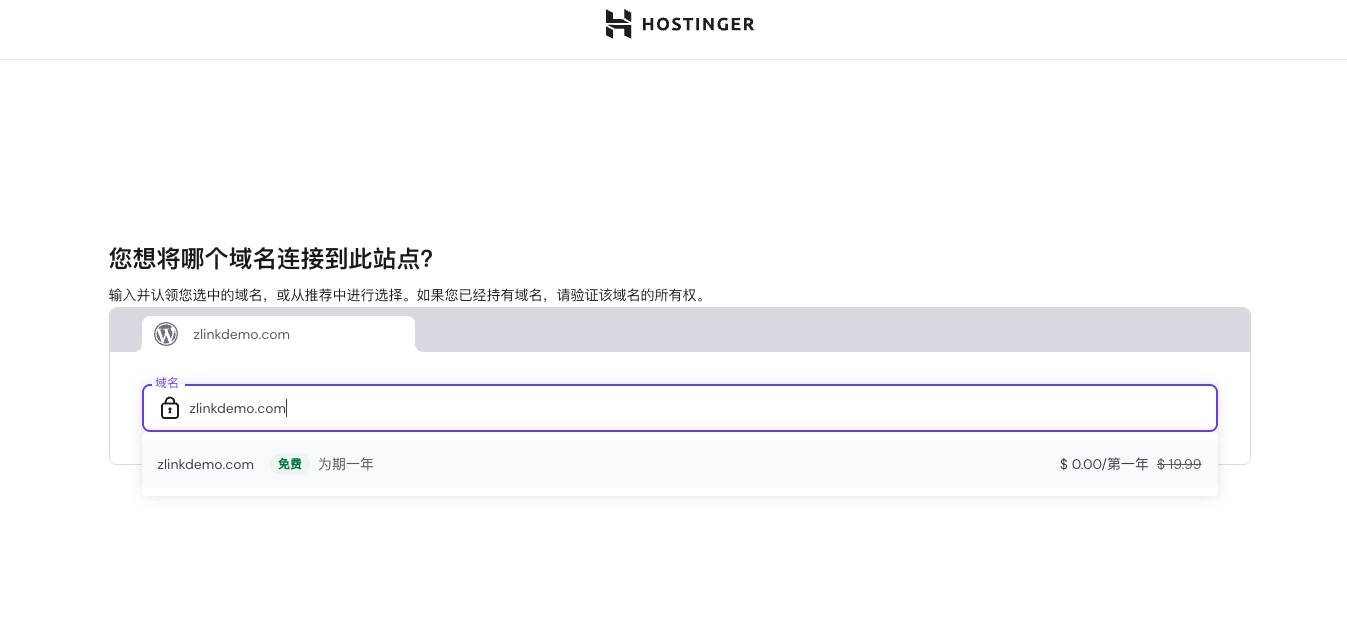
- If you're connecting a domain provided by Hostinger as a free one-year gift, just connect it here. After the connection is successful, wait a few minutes.
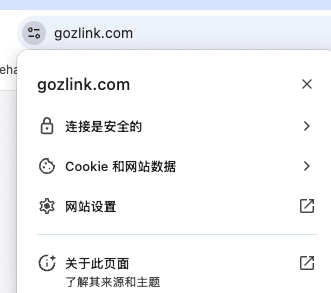
- SSL Security Lock: Check to see if a green padlock icon (HTTPS) appears in your browser's address bar. If it's not enabled, you'll need to activate the free SSL certificate with one click in the hosting control panel. Hostigner usually configures this for you automatically.
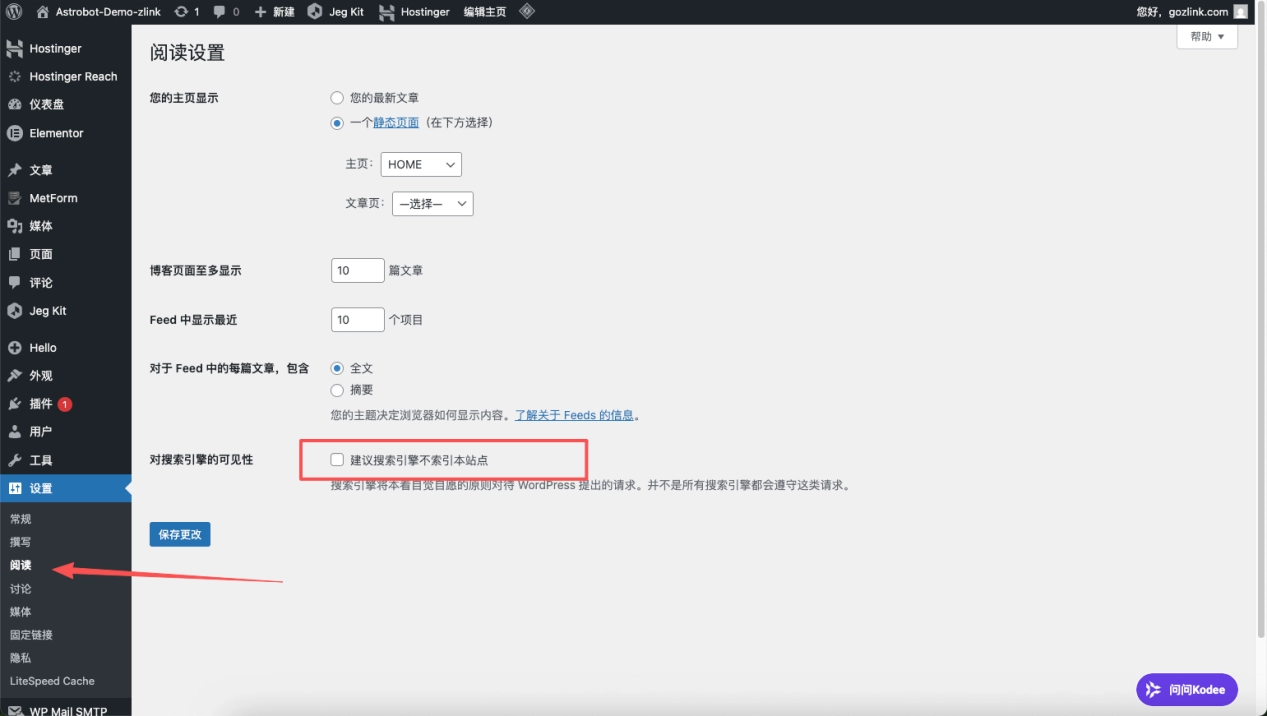
- Enable Indexing: Go to “Settings -> Reading” and make sure “Please do not index this site in search engines” The option is set toUnchecked, so that Google can start crawling the website.
At this point, your B2B standalone website has completed all setup steps and has officially entered the operational phase.
Enter this code at checkout and click “Apply” to view the discounts available for your current plan; the actual price is subject to the Hostinger checkout page. View the full Instructions for Using the Hostinger Promo Code 2026ZLINK。